I’ve hunted down 20 budget-friendly kitchen backsplash ideas that look luxe without the hefty price tag. From durable ceramics and glass to chic peel-and-stick options that fool the eye, you can get stylish patterns, bold grout, and subway-inspired layouts without breaking the bank. I’ll show you how to mix textures, pair bold grout with calm tiles, and test finishes in light for maximum impact. Curious what else elevates your space on a dime? You’ll find it here.
Budget Criteria: Define Your Backsplash Goals

Sure! Here’s the revised content following your directions:
—
So what exactly are you hoping to achieve with your backsplash, and how much are you willing to spend to get it?
I start by listing goals: durability, ease of cleaning, and a vibe that matches your kitchen.
Then I assign priority levels, set a budget ceiling, and choose materials that deliver impact without draining funds. Exploring budget-friendly options can elevate the aesthetic without compromising on quality.
Clarity wins, style follows.
—
Feel free to let me know if you need any more adjustments!
High-End Look on a Tight Budget: Design Principles

I’m keeping costs in check while aiming for that high-end feel, and I’ll show you how smart material choices can do the heavy lifting.
Think budget-friendly options with real visual weight—think textured tiles, dark tones, and a matte sheen that reads luxe without the splurge.
Incorporating bold kitchen backsplash ideas can elevate your space without breaking the bank.
Let’s talk about how to mix affordable materials to achieve a polished, cohesive look that doesn’t scream “cheap.”
Budget-Friendly Materials
When you’re after a high-end look on a tight budget, smart material choices matter more than brand names.
I lean toward durable, faux-grain or textured panels, peel-and-stick options, and glass tiles in neutral tones.
Mix matte and sheen thoughtfully, cut wastelessly, and embrace coordinated grout.
Practical, budget-smart picks keep our kitchen feeling luxe without wrecking your wallet. Incorporating peel and stick backsplashes can elevate the space effortlessly.
Visual Weight Principles
Visual weight isn’t just about size—it’s how you balance elements to read as luxe, even on a budget.
I’m eyeing contrast, texture, and placement like chess moves, not accidents. Pair bold grout with calm tiles, repeat metallic hints, and let negative space breathe. Incorporating industrial glam backsplashes can enhance the overall aesthetic while keeping costs low.
A cohesive rhythm elevates the whole backsplash without draining your wallet or winking at chaos. Subtle dominates.
Budget-Friendly Materials: Best Value Options

Choosing budget-friendly materials is a smart way to get a stylish backsplash without breaking the bank.
I pick value without sacrificing flair, favoring durable options like ceramic or porcelain, affordable stainless-steel accents, and glass tiles that catch light.
Practical, not precious, these choices clean easily and resist wear.
You’ll gain texture, color, and polish—without blowing your budget or chasing trends. Additionally, incorporating glass backsplashes can elevate the overall aesthetic of your kitchen while remaining cost-effective.
Peel-and-Stick Tiles That Really Mimic Real Tile

If I’m sticking with peel-and-stick, I want a look that fools the eye, not the wallet.
Realistic textures, subtle grout lines, and true tile patterns prove these sticks can rival the real deal without the mess. These options can elevate your kitchen design, making it feel more luxurious and stylish, much like tiles for kitchen wall backsplashes.
Let’s compare options that nail the look while staying budget-friendly.
Realistic Peel-and-Stick Look
Realistic Peel-and-Stick Look (Peel-and-Stick Tiles That Really Mimic Real Tile)
Realistic peel-and-stick tiles have come a long way, so you don’t have to settle for cheesy textures or obvious gridlines. I test-drive patterns that mimic real grout, subtle sheen, and true-thickness realism, then share what actually reads as premium. You’ll hear how practical adhesion, forgiving seams, and clever color choices translate into a kitchen that feels built, not pasted.
Additionally, these modern options often feature stunning backsplash inspiration that can elevate your kitchen’s aesthetic without breaking the bank.
Budget-Friendly Tile Alternatives
Peel-and-stick tiles have evolved into serious contenders that actually mimic real tile—no cheesy faux grout here.
I’m showing you budget-friendly options that still feel premium, with bold patterns, subtle textures, and strong adhesives.
You’ll get quick installs, minimal mess, and credible results you can brag about.
Let’s pick a look that sings without blowing your budget or your patience. Plus, these options are perfect for easy backsplash ideas that can transform your kitchen in no time.
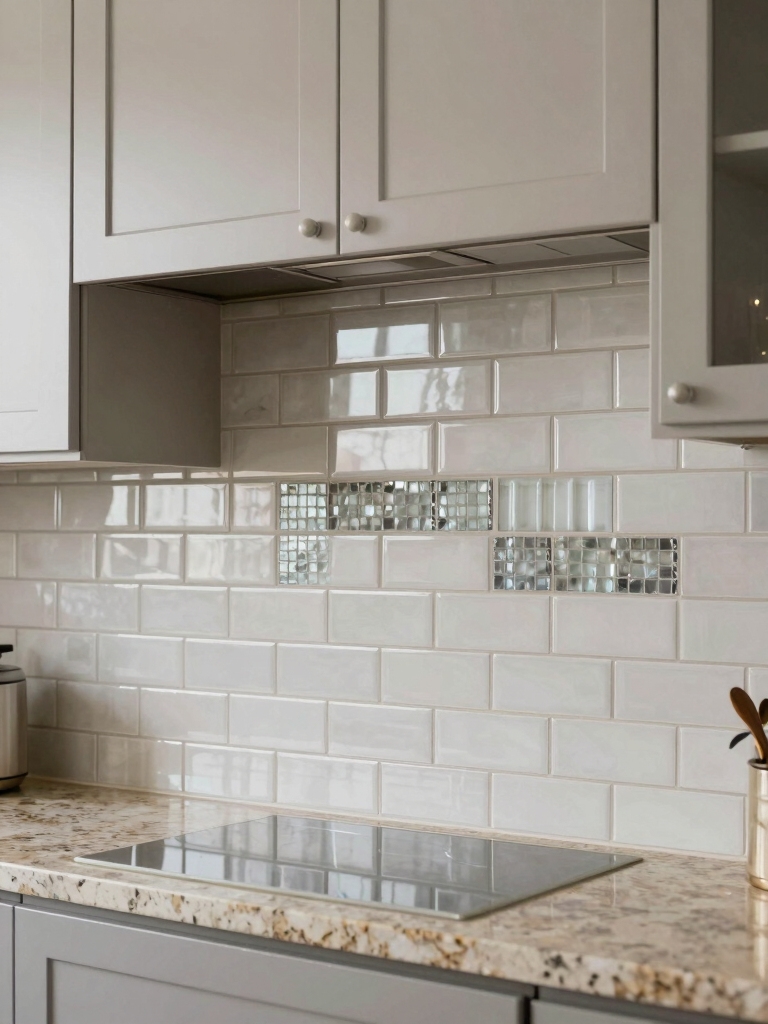
Subway Tile Patterns That Save Money and Look Premium

You don’t need to break the bank to get a premium look in your kitchen, and subway tile patterns can prove it.
I lean on classic runs like stacked, brick, and herringbone—each delivers high style with minimal fuss.
Mix spacers smartly, pick a subtle grout, and let the sheen do the talking.
Budget-savvy, design-forward, and totally doable. Additionally, incorporating stylish subway tile designs can enhance the overall aesthetic of your kitchen space.
Faux-Wood and Faux-Stone Panels: Fast, Affordable Wraps
Faux-wood and faux-stone panels are kitchen quick-fixes that actually look the part, delivering warmth or texture without the heavy lifting.
I love how they snap in, cover flaws, and wipe clean in a hurry. They’re affordable, surprisingly durable, and endlessly versatile—letting you switch styles without a full remodel. Additionally, these materials can mimic the look of timeless stone backsplashes, providing a sophisticated feel without the high cost.
Quick, bold impact with minimal fuss, every time.
Glass and Mirror Accents for a Luxe Shine
Glass and mirror accents bring a luxe shine to any kitchen without a full redo.
I love how a few panels or a curved mirror splashback reflect light, making small spaces feel bigger. You get chic drama without the heft of real stone.
Keep edges clean, avoid glare, and pair with matte neutrals to balance the sparkle.
Budget-friendly glam, delivered.
Faux Brick and Stone Veneers You Can Install Yourself
Brick and stone veneers are a budget-friendly way to get that rugged, textured look without the heft of full-on masonry.
I love how easy they install—no pro crew required, just patience and a level. You’ll cut, align, and paste till it resembles real mortar drama, minus the mess.
Practical, affordable, stylish—your backsplash suddenly looks like a designer’s secret.
Decals and Stencils for Designer Flair on a Dime
I’ll show you how decals and stencils can punch up your backsplash without punching your wallet, starting with smart sticker composition that looks intentional, not random.
Next, I’ll map out a simple pattern placement guide so you get symmetry without overthinking it.
And I’ll share durable peel-back tips that keep the look fresh as your kitchen ages gracefully.
Sticker Composition Tricks
Sticker decals and stencils are my go-to cheats for cheap-on-trend kitchen backsplashes, because a few well-placed patterns can transform bland walls into bold design statements without breaking the bank.
I mix scale, contrast, and negative space to keep surfaces lively yet legible. The trick is intentional repetition, not overwhelm, so your backsplash feels curated, not cluttered or gimmicky.
Pattern Placement Guide
Pattern placement isn’t just where you put decals and stencils; it’s how you orchestrate flair without flooding the room.
I map rhythm, not random splashes—alignment guides, margins, and focal points keep your backsplash cohesive.
I mix decals with negative space, repeat motifs sparingly, and let scale breathe.
You’ll get designer illusion on a dime, with tasteful, intentional charm.
Durable Peel-Back Tips
Peel-back decals and stencils are your fast lane to designer flair without the DIY headaches, and they stick around long enough to impress but come off clean when you’re ready for a change.
I’ll keep it simple: durable materials, clean surfaces, and proper removal seal the deal.
- Choose vinyl with low residue
- Seal edges for moisture defense
- Test peel on hidden area first
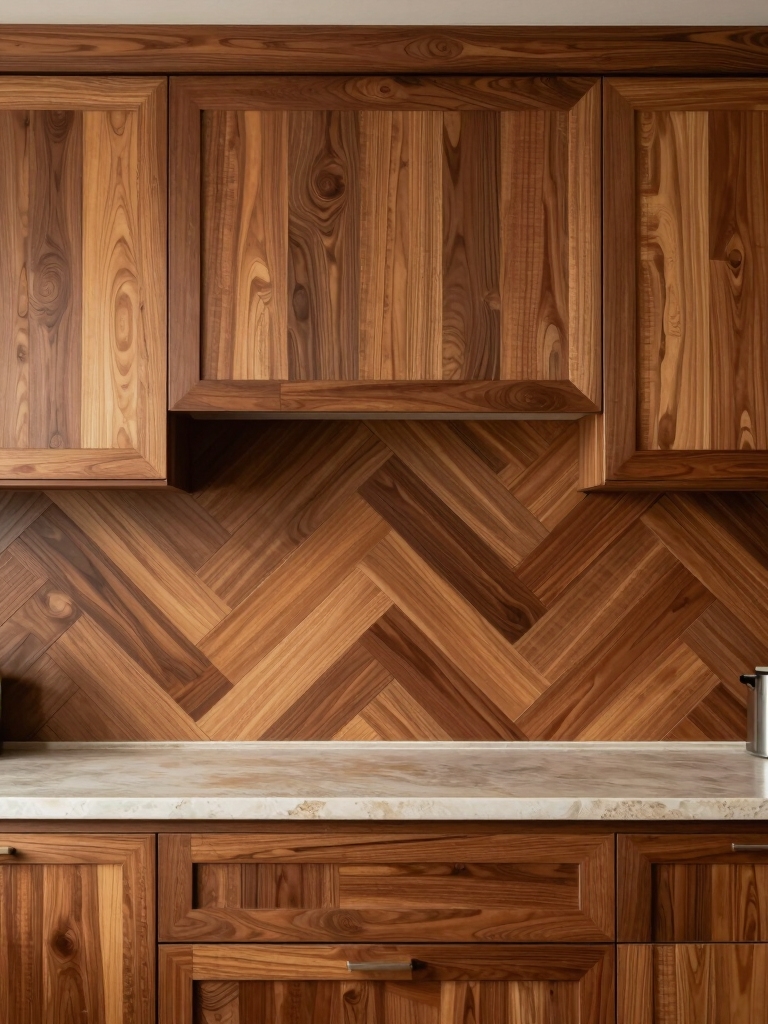
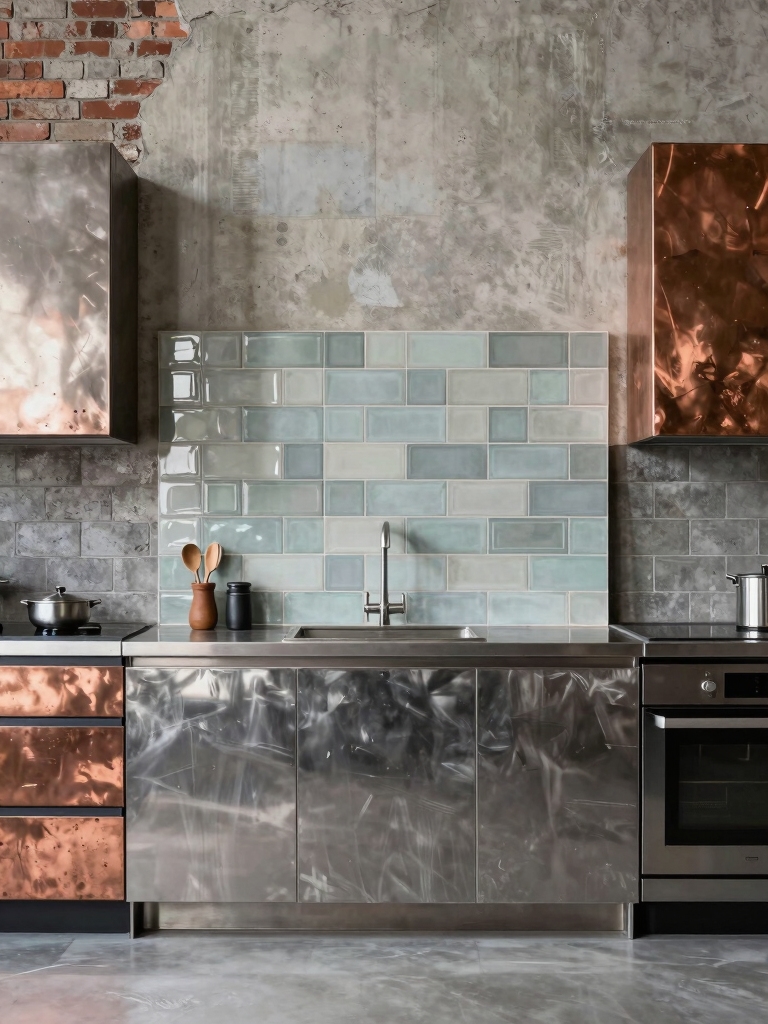
Texture Play: Metal, Wood, and Ceramic in One Wall
Texture is where kitchens go from stylish to signature, so I love combining metal, wood, and ceramic on one wall to play with light, warmth, and a hint of edge.
I mix finishes intentionally, letting metal catch glare, wood soften edges, and ceramic provide clean contrast.
The result is tactile drama that stays budget-friendly, modern, and totally within reach.
Keep it deliberate.
Grout Color Hacks to Elevate Cheap Tiles
Grout color can make or break the vibe of cheap tiles, and I’ll show you how a simple shift can tie everything together.
I’ll share quick tile tie-in tricks and why matching or contrasting grout changes the feel without breaking the bank.
Ready to tweak the shade and watch the room come alive?
Grout Color Impact
Grout color might seem tiny, but it can make a big statement, especially with cheap tiles.
I’ve learned that subtle tint tweaks can unify mismatched pieces or make patterns pop without pricey changes.
Try:
- matching grout to tile for cohesion
- contrasting shade for punch
- recessed-color tricks to hide dirt while elevating style
Tile Tie-In Tricks
Sometimes a grout tweak is all your cheap tiles need to look intentional, not rushed.
I’ll show you how tiny color shifts, like warm taupe or charcoal accents, pull everything together.
We’ll blend grout with cabinetry, harmonize with countertop specks, and use a feathered edge to erase seams.
Smart contrast creates cohesion, elevating affordability into considered, polished wow.
Floating Shelf Backsplashes: Function Meets Style
Floating shelf backsplashes blend form and function in a way traditional tiles can only dream about.
I love how they carve countertop space for essentials while adding depth.
Here’s why they work:
- Invisible storage, visible impact
- Easy swaps, upgradeable mood
- Budget-friendly, statement-making design
Upcycling Ideas: Luxe Reads From Repurposed Materials
I love turning repurposed materials into statement pieces that feel luxe without the sticker shock.
From budget-friendly material sculpting to a luxe aesthetic, the right upcycled reads can elevate any backsplash.
Let’s chat about how small changes—using repurposed textures and finishes—can make a big impact without breaking the bank.
Repurposed Materials Beauty
Repurposed materials aren’t just leftovers; they’re fuel for creativity, turning everyday scraps into statement pieces.
I’m here to remind you that beauty isn’t bought—it’s curated. Think textures, colors, and stories layered into a single backsplash that makes guests do a double take.
- Salvaged tile shards forming a mosaic
- Reclaimed wood slices as warm accents
- Upcycled metal rings for shimmer and edge
Budget-Friendly Material Sculpting
Budget-friendly material sculpting is all about turning what you already own into high-impact accents without breaking the bank.
I’ll show you how to caress old boards, tiles, and fabrics into focal backsplash moments, using simple cuts, clever coatings, and a dash of patience.
You’ll gain style without waste, proving repurposed can feel luxe, not leftovers, when you mix wit with restraint.
Luxe Aesthetic, Low Cost
You don’t need a big budget to nail a luxe look—the trick is clever upcycling that reads high-end, not home store.
I’m showing you how repurposed finds glow with polish, texture, and story.
Try these quick hits:
- Reclaimed subway tiles with metallic grout
- Salvaged wood shiplap painted satin black
- Upcycled glass bottle mosaics with a glossy finish
Minimalist Monochrome Schemes for Premium Vibe
A minimalist monochrome kitchen is the quiet luxury that never goes out of style, and it’s shockingly easy to pull off with a few well-chosen tiles.
I keep lines clean, palettes tight, and texture doing the talking, not busy patterns. You’ll get premium vibes by pairing matte blacks with crisp whites, simple grout, and strategic lighting that makes every tile feel intentional.
Patterned Tile Alternatives That Emulate Costly Motifs
Patterned tiles can give you that high-end look without the designer price tag, and that’s where smart alternatives shine.
I love mixing affordable prints that echo marble, arabesque, and encaustic vibes without the guilt.
Here are budget-friendly picks:
- Faux-marbled vinyl sheets that fool the eye
- Stenciled paint patterns for quick drama
- Peel-and-stick motifs with lasting grip
Lighting Tricks to Highlight Your Budget Backsplash
Lighting can turn a budget backsplash from cute to enchanting, and it’s all about positioning and tone rather than a designer’s budget.
I’ll share simple tricks: downlights to wash tiles evenly, a warm LED strip beneath cabinets for subtle glow, and a dimmer to shift mood.
Highlight grout lines with strategic lighting, and avoid glare—focus on cohesion, not glare or gimmicks.
DIY Guide: Measure, Cut, and Install a Budget Backsplash
Hitting the toolbox, I’ll walk you through measuring, cutting, and installing a budget backsplash that looks sharp without breaking the bank.
I keep it simple, precise, and frugal, with smart tricks for clean lines and a professional twist.
- Measure twice, cut once, curse twice (then smile).
- Use stencil guides and a steady hand for accurate edges.
- Seal edges and grout or caulk for lasting durability.
Removable Backsplashes for Rentals: Best Options
Removable backsplashes are a landlord’s best friend and a renter’s secret weapon, offering style without the commitment.
I’m sharing top options that blend protection with pizzazz: unpeelable vinyl tiles, snapping acrylic sheets, and magnetic metal accents.
They’re easy, affordable, and reversible, so you get tonight’s look without tomorrow’s regret.
Pick textures that hide smudges, then switch when trends flip.
Maintenance Tips to Keep a Budget Backsplash Fresh
Keeping a budget backsplash looking fresh is all about quick, smart upkeep that doesn’t break the bank—because style shouldn’t require a second mortgage.
I keep it simple, honest, and upbeat, addressing you directly.
- Wipe weekly with a mild cleaner
- Seal grout or caulk every season
- Quick touch-ups with matching paint or tile pen
Quick-Start Checklist: Choose Your Affordable Luxe Look
If you’re ready to level up without blowing your budget, this quick-start checklist helps you pick a luxe look that’s affordable and doable.
I break it down: define the vibe, pick a focal backsplash, choose durable materials, test finishes under light, and map installation steps.
Trust my methods to save time, dollars, and headaches while delivering polished, high-end vibes.
You’ve got this.
Conclusion
So there you have it—20 cheap, chic ideas that make your kitchen look luxe without the workload or the price tag. Ready to mix, match, and patch your way to a showroom-worthy backsplash? With the right budget mindset and a little elbow grease, you can nail high-end vibes on a dime. Which idea will you tackle first to turn your space from meh to magazine-ready, all while keeping your wallet smiling? Let’s get cracking.