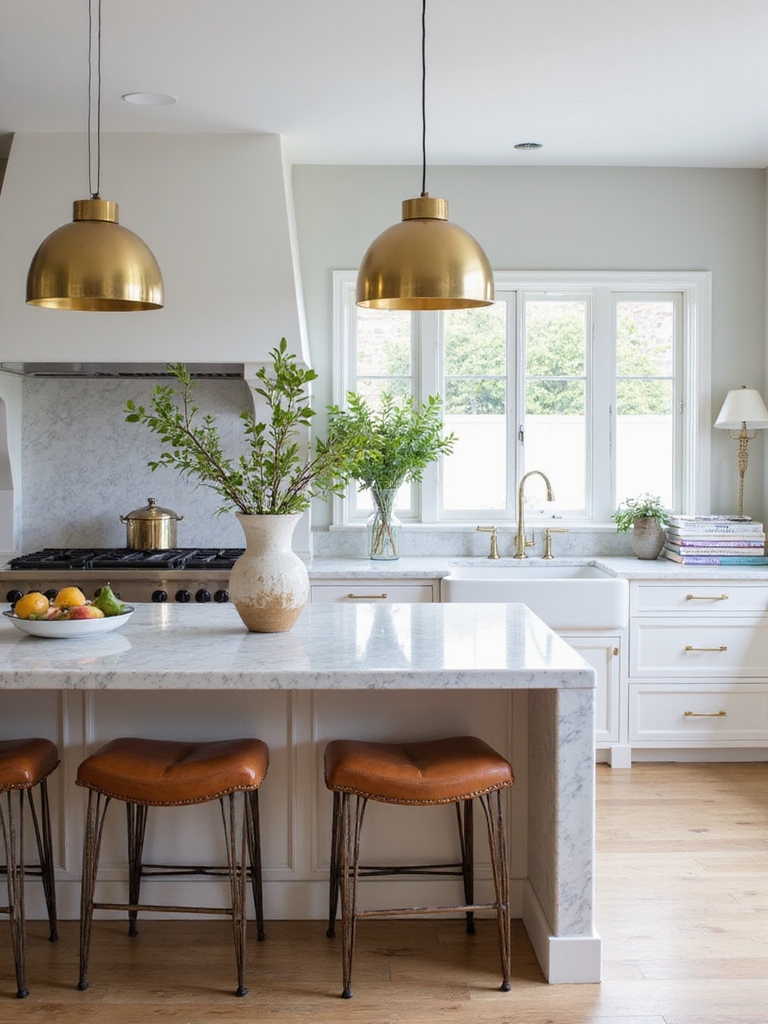
I design islands that feel like furniture—beautiful yet built for real life—so I start with a durable, luxe surface (marble, quartzite or oiled wood) and mix textures like figured walnut, brushed brass and honed stone.
I zone for prep, cooking, seating and storage, add sculptural stools, layered lighting and a curated tray or vase to soften the hard surfaces. Hide chargers and opts for pop-up outlets, then keep a simple maintenance routine so the island stays inviting—there’s more on finishes and layouts ahead.
Why a Kitchen Island Must Balance Beauty and Function

I like to think of the kitchen island as the heart of the room — it should pull people in with good looks but also work hard for them.
I choose materials that age beautifully, mix storage with open shelves, and add seating that invites conversation.
Beauty without purpose feels empty; function without charm feels cold. Balance keeps the space both lived-in and refined.
High-end kitchens often benefit from unique island layouts like waterfall edges and multifunctional cabinetry that elevate both form and usability, emphasizing unique island designs as essential.
Kitchen Island Size, Scale, and Clearance Guidelines
Because a kitchen island should feel like it was made to fit your life, I start by measuring the room and imagining how people will move around it.
I aim for 36–48 inches clearance for work aisles and 42–48 inches when traffic flows both directions.
Proportion matters: scale the island to the cabinetry and keep sightlines open so the space breathes.
Stagers often recommend adding a focal point like a centerpiece or pendant grouping to create visual balance and tie the island into the rest of the kitchen.
Planning Island Zones: Prep, Cooking, Dining, and Storage

Once you’ve figured out size and clearances, it’s time to map how the island will actually work for you.
I divide mine into clear zones: a prep sink and chopping area, a cozy dining overhang with stools, a cooking section with a cooktop and ventilation, and deep drawers for pots and pantry items.
Thoughtful lighting and durable finishes tie it all together.
Consider incorporating layered lighting and statement decor to elevate the island as a focal point and reinforce luxury kitchen island styling.
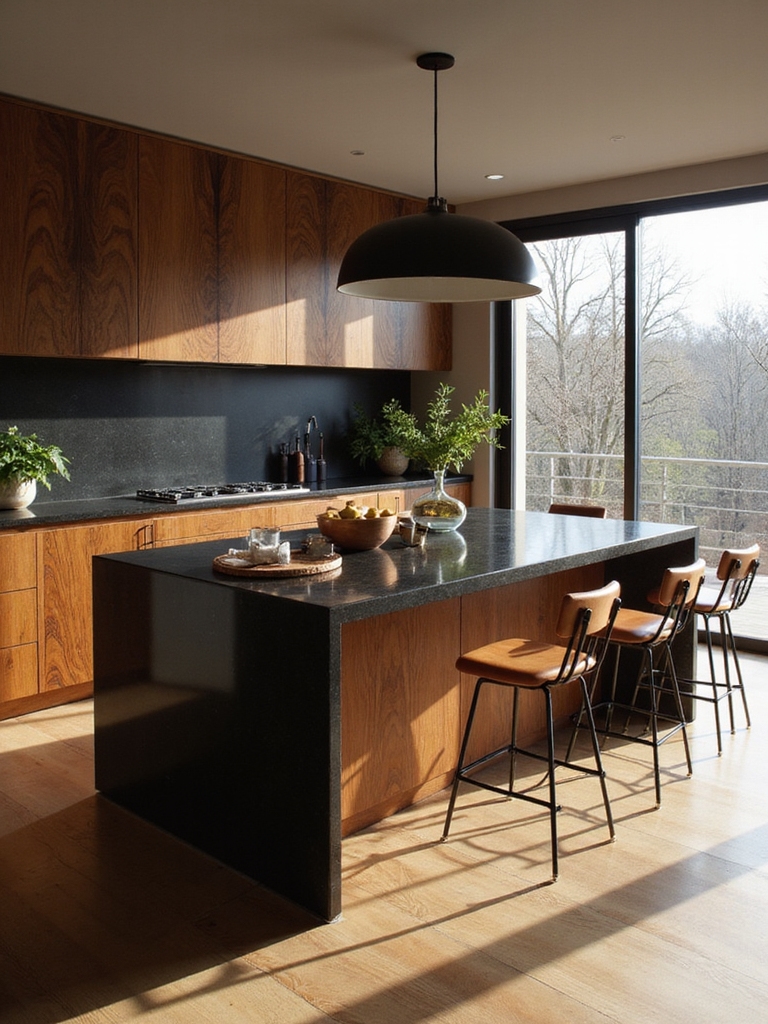
Luxe Surfacing: Marble, Quartzite, and Veined Stone
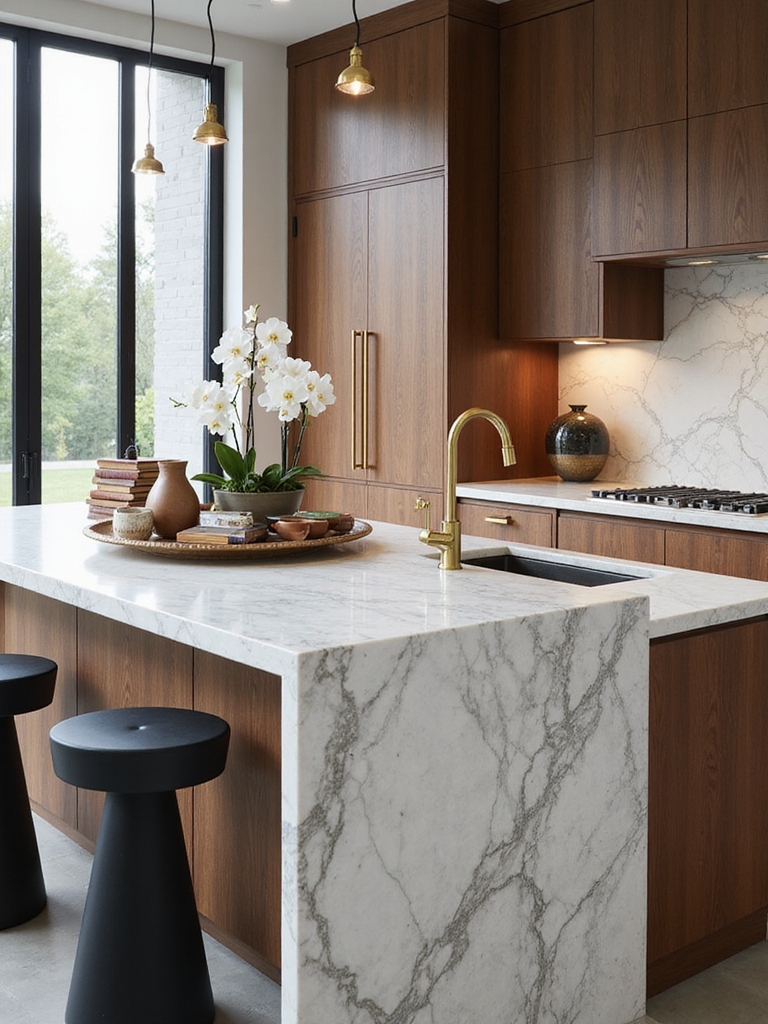
While I love the warmth of wood, I reach for marble, quartzite, or a bold veined stone when I want the island to feel truly elevated—those materials bring natural drama without fuss.
I choose honed finishes for lived-in charm or polished for sparkle. Veins guide the eye, anchors the room, and pairs beautifully with aged metals and simple pottery for a cozy, refined kitchen.
High-end options like granite, quartz, and marble are rated differently for durability and maintenance, so consider performance ratings when selecting your surface.
Exotic Woods and Mixed-Material Island Cladding
I’ve been playing with exotic wood grains on islands lately, pairing rich teak or walnut with contrasting inlays to make the surface sing.
I’ll show how metal trim and stone accents bring a modern edge while still keeping a warm, rustic feel.
And I’ll explain simple ways to mix materials sustainably so your island looks intentional and lasts.
Contemporary luxury kitchens often favor clean lines and high-quality materials, which is why many designers now prioritize mixed-material cladding to achieve a cohesive, upscale look.
Exotic Wood Grain Pairings
I love pairing dramatic, exotic woods with other materials because the contrast makes an island feel handcrafted and rooted in place.
I often mix figured walnut or zebrawood with softer oak or ash to highlight grain patterns, balancing bold streaks with calm texture.
That layering brings warmth, depth, and a lived-in elegance that still reads intentional and designed, not fussy.
These luxury collections often include curated pieces that are truly worth the splurge and elevate a kitchen’s overall aesthetic.
Metal And Stone Accents
After pairing exotic walnut or zebrawood with softer oak, I like to anchor that warmth with metal and stone accents that give the island a grounded, handcrafted finish.
I add brushed brass trim, a hammered iron apron, and a honed basalt slab for contrast.
Those touches catch light, age beautifully, and make the island feel both rugged and refined without overpowering the wood.
I also incorporate above-cabinet decor to extend the design language upward and enhance the kitchen’s architectural flow.
Sustainable Mixed-Material Finishes
Exploring sustainable mixed-material finishes lets me celebrate exotic woods while keeping the island eco-minded and durable.
I pair reclaimed teak or walnut veneers with recycled metal or cement panels, balancing warmth and toughness.
That contrast adds handcrafted charm without waste.
I’ll choose low-VOC finishes and responsibly sourced timber, so the island feels rich, lived-in, and kind to the planet.
These choices also reflect a focus on luxury personalized decor that elevates the kitchen’s overall aesthetic.
Designer Finishes and Bespoke Hardware for Durability
I like to choose high-performance surfaces that stand up to spills and hard use, then pair them with custom metal hardware that feels weighty and made to last.
Protective finishes and coatings keep wood and mixed materials looking lived-in but resilient, so you won’t worry about daily wear.
Let me show you how the right finishes and bespoke pulls can make your island both beautiful and tough.
High-Performance Surface Materials
Think about the island surface as the workhorse of your kitchen—I’ll steer you toward materials and hardware that stand up to daily life without losing style.
I favor honed granite, engineered quartz, and oiled woods for resilience and patina.
Choose matte finishes to hide wear, sealed edges for spills, and integrated sinks for easy cleaning. These choices keep your island handsome and hardworking.
Custom Metal Hardware
Choose hardware that feels as honest and lived-in as the rest of the kitchen — I lean toward custom metal pieces because they age well and stand up to real use.
I pick finishes with character: hammered copper, hand-brushed brass, or patinated iron. They bring warmth, anchor the island, and reward daily handling, becoming more beautiful the longer you live with them.
Protective Finishes And Coatings
Because finishes are the first line of defense for both metal and wood, I treat them like part of the design, not an afterthought.
I pick hard-wearing oils, waxes, and clear coats that age gracefully, and coordinate patinas with hardware.
Proper coatings protect daily use, resist stains and scratches, and keep the island feeling handcrafted yet resilient for years of warm, lived-in beauty.
Island Lighting: Pendants, Layers, and Placement
I like to start with lighting when planning an island because it sets the mood and defines the space—pendants bring character, layered light adds function, and placement makes everything feel intentional.
I choose mixed materials—warmed metal, handblown glass—and stagger heights for visual rhythm.
Task, ambient, and accent layers keep prep, dining, and display comfortable.
Aim for balance and simple, rustic charm.
Lighting Layout and Dimming for Entertaining
When I’m planning lighting for a dinner party, I map out zones so each activity—cooking, serving, eating, lingering—has its own level of light, and I make sure the controls let me blend them smoothly.
I favor warm dimming, slow fades, and separate circuits for task and mood. A simple scene button lets me shift from prep bright to candlelike glow without fuss.
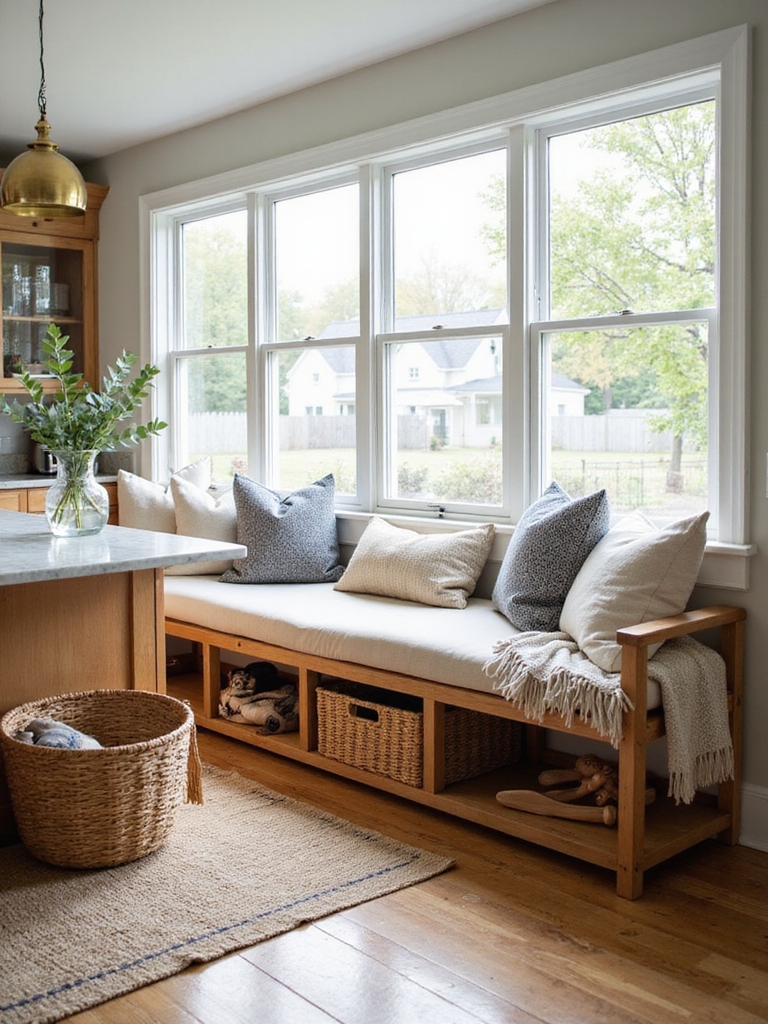
Sculptural Seating: Stools That Look and Sit Well
I love choosing stools that feel like little sculptures—curved, supportive shapes that actually cradle you during a long chat.
I pair ergonomic forms with rough-hewn wood, matte metal, or woven seats so the textures play off each other and the island feels lived-in.
Let me show you how the right material contrasts and comfy contours make a kitchen both beautiful and welcoming.
Ergonomic Sculptural Forms
Although form matters, I always think comfort should come first—and the best sculptural stools marry bold silhouettes with seat shapes that actually support you.
I choose pieces that hug your posture, have gentle curves, and invite lingering over coffee. Rustic finishes and rounded edges feel welcoming while staying refined.
- Curved back that cradles
- Slight waterfall seat edge
- Proper seat depth
- Subtle lumbar support
- Stable, tapered legs
Material Contrast And Texture
You’ll notice comfort matters most to me, but texture and material contrast are what give a sculptural stool personality and keep a kitchen island from feeling flat.
I favor leather seats against raw wood legs, or matte metal frames paired with woven rush.
Those tactile mixes invite touch, anchor rustic warmth, and make each stool a deliberate, functional art piece around the island.
Architectural Details: Waterfall Edges, Fluting, and Corbels
When I’m planning a kitchen island, I pay close attention to architectural details like waterfall edges, fluting, and corbels because they quietly set the tone—whether you want a clean modern look or a cozy, farmhouse feel.
- Waterfall edge wrapping stone to the floor
- Delicate fluting on cabinet faces
- Sturdy carved corbels under overhangs
- Subtle shadow lines for depth
- Integrated shelving with turned supports
Color and Contrast Strategies for a Refined Island
Because color anchors a room, I start every island plan by choosing a palette that balances contrast and warmth so the piece feels intentional, not accidental.
I favor deep muted blues or charcoal for base cabinets against warm wood or marble tops, then add subtle trim highlights.
Contrast should read calm, not harsh—layer tones, test samples in different light, and trust instinct over trends.
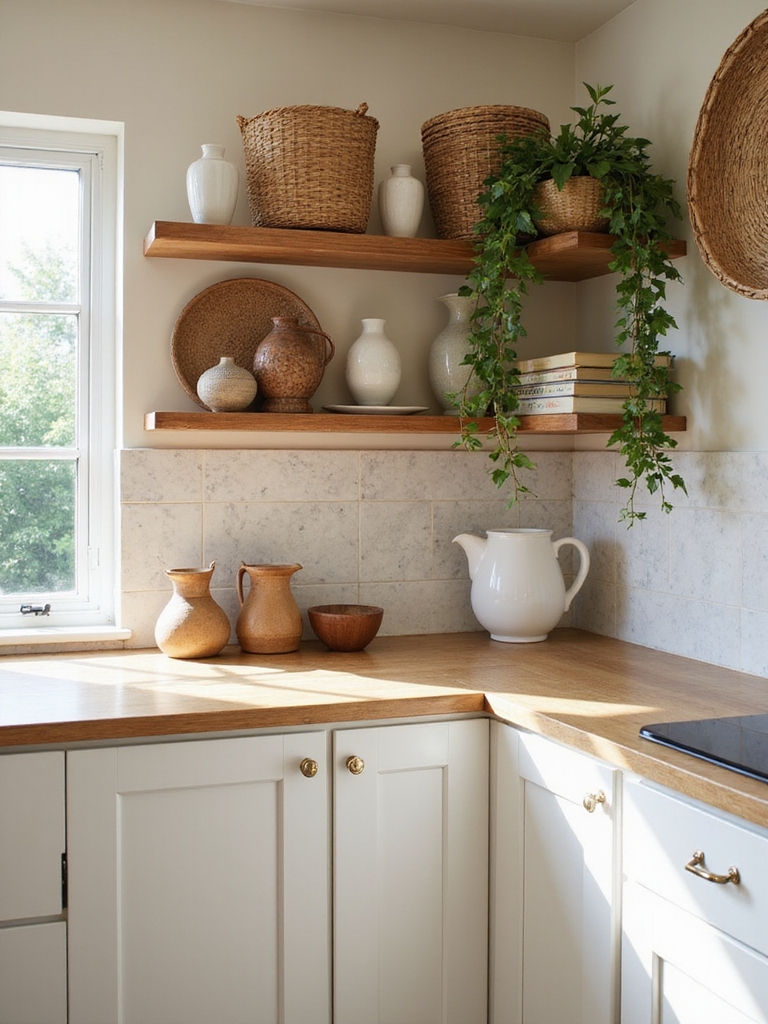
Curated Island Accessories: Trays, Vases, and Tools
After settling on a palette that feels intentional, I bring the island to life with a small edit of objects — trays to corral, vases to soften, tools to invite use.
I favor honest materials and purposeful placements that look lived-in, not staged.
- A wooden tray for olive oil and salt
- A stoneware vase, single stem
- Brass utensil crock
- Hand-towel on a folded board
- Leather-bound recipe book
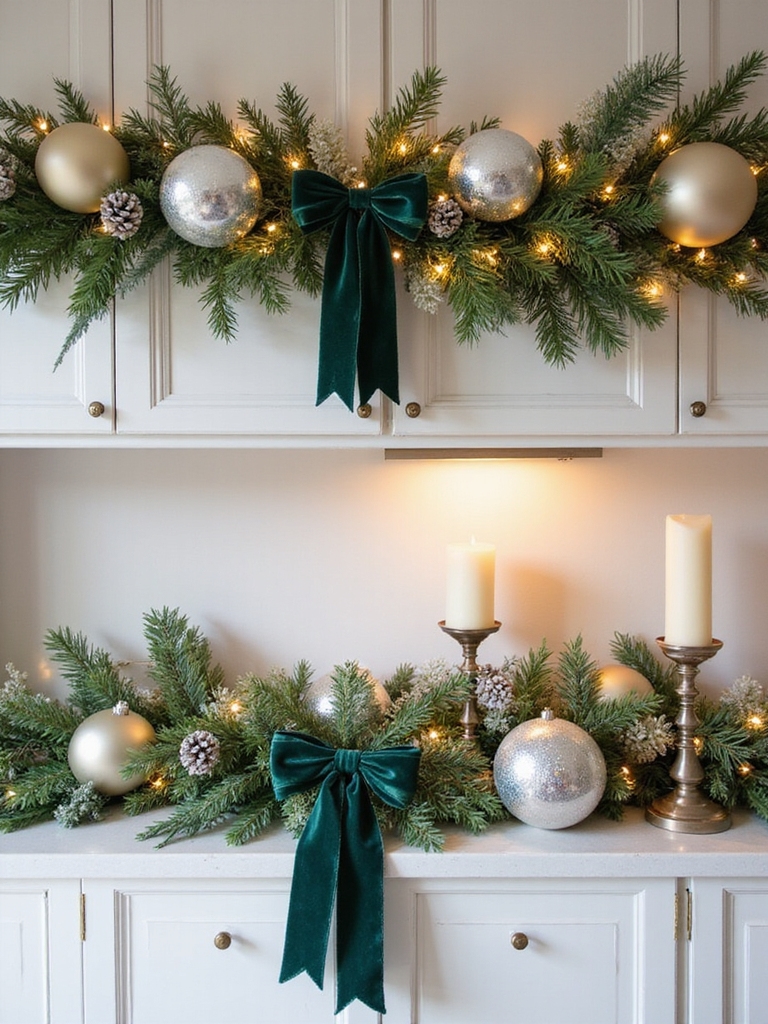
Art, Greenery, and Softening Hard Surfaces
I like to break up the island’s hard edges with a few well-chosen pieces that feel collected, not catalogued.
I add a small framed print or ceramic bowl, a linen runner, and a cluster of potted herbs or a sculptural branch.
These soften surfaces, introduce texture and scent, and keep the space lived-in and inviting without overwhelming function or sightlines.
Seamless Tech and Appliance Choices for Islands
I like keeping tech and appliances on the island looking built-in and effortless, so I usually choose integrated ranges or dishwashers that blend with cabinetry.
I also hide cords and chargers in pull-out drawers or a pop-up charging station to keep the surface warm and uncluttered.
Let me show you simple ways to marry modern convenience with a cozy, handcrafted feel.
Integrated Appliance Design
When I’m planning an island, I think about how appliances can feel like part of the furniture instead of loud, mechanical interruptions; built-in ovens, under-counter fridges, and flush-mounted downdraft vents make the island look tidy and intentional.
I choose integrated finishes, warm woods, and simple lines so the island feels cozy and purposeful.
- Panel-ready fridge
- Flush cooktop
- Concealed wine cooler
- Drawer microwave
- Pop-up vent
Hidden Power And Charging
Although you mightn’t notice them at first, I plan hidden power and charging so the island stays uncluttered and life at the counter feels effortless.
I tuck pop-up outlets, wireless pads under butcher block, and drawer USBs into the wood grain.
It keeps phones charging, blenders ready, and surfaces serene—practical, warm, and quietly modern without breaking the rustic charm.
Staging and Maintenance Tips to Keep an Island Pristine
Since I want your island to look effortlessly welcoming, I keep staging simple and maintenance predictable: a wooden tray for daily clutter, a small vase with seasonal blooms, and a bowl for fruit that gets rotated and refreshed every few days.
- Wipe daily with a damp cloth
- Use coasters for mugs
- Swap blooms weekly
- Rotate fruit every 2–3 days
- Polish wood monthly
I hope this sparks ideas for making your kitchen island both beautiful and utterly useful. Think of it as the heart of your home—solid, welcoming, and ready for anything.
Keep scale and clearances in mind, choose materials that age like good stories, and mix practical zones with a few curated touches. With thoughtful tech and gentle upkeep, your island will stay pristine and soulful, a warm anchor in your everyday life.