I’ll tell you the quiet ceiling moves that make a modern kitchen feel lived‑in: warm tongue‑and‑groove or reclaimed beams for depth, Venetian or textured plaster for soft patina, and hidden cove lighting or skylights to lift work zones without glare.
Add acoustic clouds, ceiling racks, or discreet speakers to free counters and calm noise. Pick materials by height and upkeep, check structure, and plan wiring early — keep going and you’ll find practical options that look effortless.
Top Modern Ceiling Treatments

I often start by looking up—your kitchen ceiling is as much a design opportunity as the cabinets or island, and I want to show you the best modern treatments that bring warmth and character.
I favor tongue-and-groove planking, exposed beams, textured plaster, and reclaimed-wood panels. Each adds depth, tactile warmth, and simple charm while keeping a clean, modern silhouette you’ll love.
Elevated ceilings with modern statement details can transform the whole room and create a strong visual focal point.
How to Choose a Kitchen Ceiling: Quick Decision Guide

While you’re picturing the overall feel—bright and airy or cozy and layered— I’ll walk you through the quick choices that make picking a kitchen ceiling simple.
I’ll ask about ceiling height, maintenance, and material warmth, suggest matching wood tones or painted plaster, and prompt you to contemplate scale and trim.
Pick what complements cabinets, feels durable, and reflects your daily rhythm.
Consider adding textured or stained wood panels for visual interest and warmth to create a more modern look with wood tones that coordinate with cabinetry.
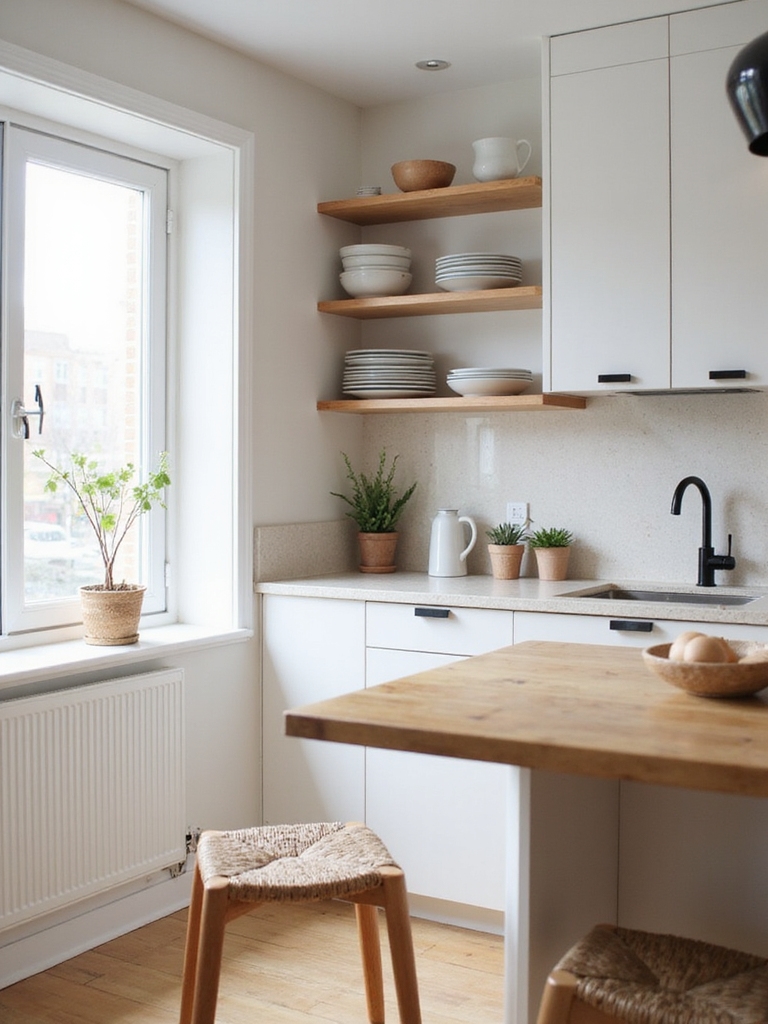
Integrated Lighting: Recessed, Cove, and Track

When I plan kitchen lighting I think about where recessed fixtures should sit to wash counters without casting shadows.
I like soft cove lighting to lend a warm, inviting glow in the evenings.
And I keep track lighting in mind for flexible task spots I can shift as my needs change.
I also consider how a well-designed false ceiling can conceal wiring and support integrated lighting while creating a polished finish.
Recessed Lighting Placement
Let’s talk about recessed lighting placement and why I don’t treat it as an afterthought: the right spacing and layout can make a kitchen feel cozy, functional, and effortlessly inviting.
I center fixtures over work zones, stagger spacing for even light, and use dimmable LEDs for warmth.
I avoid glare by angling near task areas and keep patterns simple so the ceiling feels calm and purposeful.
Proper layering with accent and ambient fixtures creates a five-star lighting experience that elevates both mood and functionality.
Cove Lighting Ambiance
I often use cove lighting to soften a kitchen’s atmosphere, because it wraps the room in indirect glow that feels both cozy and intentional.
I tuck LED strips behind crown molding or open shelves, creating gentle uplight that highlights texture—beams, plaster, reclaimed wood—without harsh shadows.
It sets a relaxed, lived-in mood for evening meals and quiet mornings, subtle yet distinctly warm.
I also pair cove lighting with architectural details like tray ceilings to emphasize ceiling design and create depth.
Track Lighting Flexibility
I like to lean on track lighting when I need flexibility in the kitchen—its adjustable heads let me aim light where the day’s work actually happens, from chopping at the island to brightening a dim pantry corner.
I love swapping fixtures, angling beams for recipe prep, and creating cozy task zones. It’s practical, earthy, and instantly adapts as my needs shift.
Proper task lighting placement improves visibility and safety around prep areas by reducing shadows and glare, especially over islands and counters with focused illumination.
Skylights and Solar Tubes for Brighter Kitchens

When I wanted more natural light in my kitchen, skylights and solar tubes felt like the simplest, most honest fix; they pull daylight straight from the sky and make even small, shaded rooms feel open.
I chose a modest solar tube for a narrow spot and a single low-profile skylight over the prep area—both cut energy use, brighten workspaces, and keep the rustic charm intact.
Large window styles can also flood your cooking space with natural light, complementing overhead options like skylights and solar tubes with large window styles for an even brighter kitchen.
Venetian Plasters and Textured Finishes

Think of Venetian plaster as the finishing touch that turns a plain ceiling into something you want to reach up and touch; I’ve used it to add depth, warmth, and a little old-world soul to kitchens that would otherwise feel flat.
I mix subtle trowel textures and muted pigments for a lived-in patina, creating cozy character without overwhelming light or sightlines.
Modern luxury kitchens often feature dramatic ceiling treatments that serve as focal points and elevate the entire space, including statement ceilings that draw the eye.
Wood and Engineered Beam Accents
Beamed ceilings add instant backbone to a kitchen, and I like to use both reclaimed wood and engineered beams to balance character with practicality.
They define zones, hide wiring, and introduce patina without overwhelming space. I pair darker beams with light ceilings for contrast, or pick milled, consistent profiles where weight and budget matter, keeping the look honest and comfortably lived-in.
Tongue‑and‑Groove and Shiplap for Modern Farmhouse Style
I love how tongue‑and‑groove and shiplap bring instant texture and warmth to a farmhouse kitchen ceiling.
I’ll walk you through the main installation options—tongue‑and‑groove for a snug fit or shiplap for a bit more character—and what each means for prepping and fastening.
Then we’ll weigh paint versus stain so you can choose whether to brighten the room or celebrate the wood’s natural grain.
Texture And Warmth
Often I reach for tongue-and-groove or shiplap when I want the kitchen ceiling to feel like a cozy, lived-in crown for the room.
The boards add gentle texture, catching light and shadows that make the space feel warmer and more intimate.
I love how simple lines and natural grain give farmhouse charm without fuss, inviting conversation and lingering over coffee.
Installation Options
For a modern farmhouse kitchen, I pick tongue-and-groove when I want a seamless, traditional look and shiplap when I want a bit more shadow and separation between boards.
I favor tongue-and-groove for tight joints and clean lines; shiplap gives character with visible gaps and texture.
Both install straightforwardly, fit rustic aesthetics, and hold up well when fastened and supported properly.
Paint Versus Stain
Let’s talk through paint versus stain so you can pick the finish that fits your modern farmhouse vibe. I prefer stain for warmth and grain; paint brightens and feels crisp.
Tongue‑and‑groove or shiplap respond differently to each—here’s what I consider:
- Stain highlights natural knots and texture
- Paint hides imperfections, adds uniformity
- Stain deepens rustic character
- Paint modernizes lines
- Maintenance differs: touchups vary
Minimal Options: Painted Drywall and Metal Ceilings
While I lean toward simple solutions, painted drywall and metal ceilings each bring a distinct kind of quiet charm to a kitchen: painted drywall keeps things warm and seamless, letting light and color define the room, while metal adds a subtle industrial edge and durability without fuss.
I prefer drywall for cozy kitchens and metal for utility—both read as honest, low-key choices that age well.
Acoustic Panels and Fabric Clouds for Noise Control
When noise starts to eat at the calm of a kitchen, I turn to acoustic panels and soft fabric clouds to bring the sound down without stripping the room of warmth.
I pick textures and muted tones that feel lived‑in, tucking sound treatments into beams or above islands so conversation stays cozy and clear.
- Warm wool panels
- Reclaimed wood frames
- Hanging fabric clouds
- Patterned felt tiles
- Hidden mounting clips
Ceiling‑Mounted Racks and Rails for Storage and Style
If I want to free up counter space and add a touch of rustic charm, I reach for ceiling‑mounted racks and rails that keep pots, pans and linens within easy sight and reach.
I choose warm woods or black iron, hang herbs and cast iron, and mix practical hooks with decorative baskets. They organize, display, and make the kitchen feel lived‑in and welcoming.
Soffits and Drop Ceilings: Hide Systems, Add Task Lighting
I like using soffits and drop ceilings to quietly hide ductwork and other mechanical bits so the kitchen feels cozy instead of cluttered.
They also give me perfect places to tuck in task lighting right where I need it over prep zones and the stove.
Let’s talk about how to plan those ceilings so they solve practical problems and add warm, useful light.
Conceal Mechanical Systems
I like to tuck away vents, ductwork, and wiring into soffits or a shallow drop ceiling so the kitchen reads as calm and lived-in rather than mechanical.
I favor simple lines, warm wood tones, and finishes that age well, keeping focus on cooking and company.
- Conceals noise and clutter
- Preserves clean sightlines
- Simplifies maintenance access
- Frames cabinetry gracefully
- Supports recessed fixtures without fuss
Integrated Task Lighting
Usually I tuck task lights into soffits and shallow drops so the work surfaces stay bright without the fixtures shouting for attention.
I pick warm LED strips and small recessed lamps, aiming for even illumination over counters and islands.
The framing hides wiring, keeps sightlines clean, and adds a cozy, handmade feel. It’s practical, tidy, and quietly inviting for cooking and gatherings.
Smart Ceiling Tech: Speakers, Sensors, Adaptive Lighting
Let’s bring the ceiling down to earth: I find smart ceiling tech quietly transforms a kitchen from purely functional to genuinely alive.
I love hidden speakers for morning radio, motion sensors that wake light pathways, and adaptive tones that match cooking moods—subtle, useful, homey.
- Hidden multiroom speakers
- Motion-activated modest lighting
- Color-temperature adaptation
- Voice-activated controls
- Ambient noise sensing
Materials by Budget: Costs, Lifespan, Maintenance
Start by thinking of your ceiling like the kitchen’s weather roof — the material you pick sets the tone for cost, care, and how long it’ll last.
I’ll guide you through budget-friendly drywall, mid-range beadboard or painted tongue-and-groove, and pricier reclaimed wood or metal.
I’ll note typical costs, expected lifespan, and simple maintenance so you can choose wisely for style and practicality.
Structural, Code, and Permitting Considerations
Before you swing a hammer or strip any joists, I want to make sure we talk about how ceiling changes can affect load-bearing structure and what that means for safety.
I’ll walk you through the basics of when a permit is required and which local codes usually matter so you don’t get surprises later.
Let’s keep the project cozy and legal from the start.
Load-Bearing Ceiling Changes
When you open up a ceiling to change its load-bearing elements, I want you to know this is as much about safety and paperwork as it’s about looks; the beams you see and the ones you hide govern how your house carries weight.
I’ll guide you gently: think structure first, aesthetics second, hire pros, document changes, and respect existing framing.
- Assess existing beams
- Consult a structural engineer
- Use proper temporary shoring
- Choose compatible materials
- Keep clear records
Permit And Code Compliance
Because structural changes affect safety, I always treat permits and code compliance as part of the design, not an afterthought.
I check local codes, get necessary permits, and coordinate inspections so beams, wiring, and fire-rated materials meet standards. That protects your home and our work.
It’s practical, humble care—like making sure the roof rafters rest on solid shoulders before we celebrate the new light.
DIY vs Pro: Installation Tips and Common Post‑Upgrade Fixes
Although I’m comfortable rolling up my sleeves for many kitchen projects, I know some ceiling upgrades really call for a pro’s steady hand and the right tools; in this section I’ll walk you through which jobs you can tackle yourself, which ones to hire out, and practical tips to avoid common headaches after the work is done.
- Patch and paint yourself
- Leave electrical to pros
- Prep surfaces thoroughly
- Check ventilation afterward
- Inspect seams for settling
So you’ve read about all these fancy ceiling tricks — skylights, plasters, smart sensors — and now you’re supposed to choose the ceiling that’ll finally make your kitchen sing.
I’ll be honest: most of us buy a light fixture, call it a day, and pretend the ceiling is decorative insurance.
Do something bold if you can, but don’t feel foolish if you stick with cozy, sensible choices that actually get the job done.