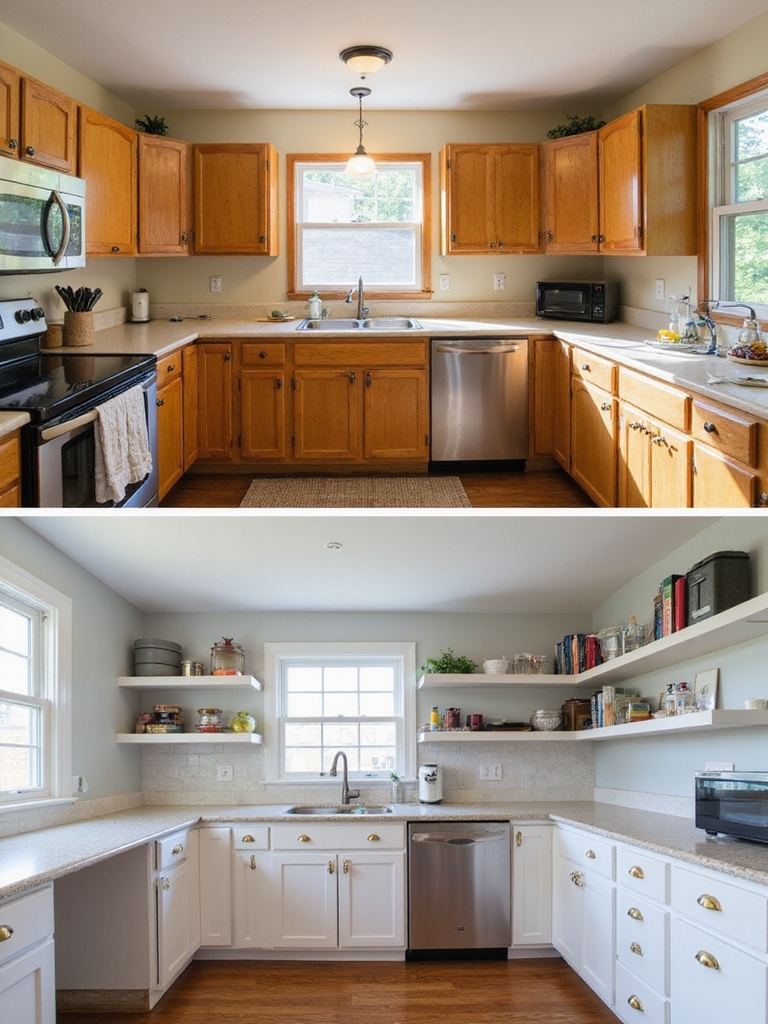
I turned boring upper cabinets into open shelves and it instantly warmed my kitchen and made everyday items feel intentional. I removed mismatched pieces, added woven baskets and a sage-painted back, and arranged plates by height and color for calm, usable displays.
It’s low-cost, invites conversation, and asks for tidy habits, but the payoff is huge — cozy, accessible, and stylish — and I’ll show you which cabinets to open first, paint choices, and budget options next.
Quick Before-and-After Wins With Open Cabinets

I love how a few simple swaps can brighten an open cabinet and change the whole kitchen vibe—pull out mismatched dishes, add a few woven baskets, and suddenly the space feels intentional and lived-in.
I swapped clutter for curated staples, painted the back panel a soft sage, and grouped items by use.
Guests notice the calm order; I enjoy the easy, cozy charm every day. I also found that incorporating open shelving sparks conversation and makes the kitchen feel more inviting.
Should You Open Cabinets? Pros, Cons, and Results

Curious whether you should rip out doors and show off your dishes? I’ll tell you straight: open cabinets warm a kitchen, display personality, and make things reachable. But they demand tidy habits, curated dishware, and dust-tidying routines.
Think about traffic, storage needs, and resale. If you love cozy, lived-in charm and can commit to upkeep, they’re often worth it.
Open cabinets can be one of the easiest cheap kitchen makeover ideas to try with minimal cost.
Which Cabinets to Open First (Open Cabinet Makeover)

When you’re ready to start, I’ll tell you which cabinets to open first so you get the biggest impact with the least fuss: begin with the ones near your prep and serving areas, like the cabinets above the counter where you chop and the lower cupboards beside the stove.
I’d also open a display spot near the sink for pretty dishes and a pantry corner for everyday staples—practical, cozy, immediate.
Open-concept kitchen and living room designs are increasingly popular for creating a more social, airy home layout, so consider how opening cabinets can enhance that flow and visual connection with the rest of your space, especially in open-concept kitchens.
Budget Guide: Low-, Mid-, and High-Cost Options

Since you’ll want a plan that fits both your taste and your wallet, I’ll lay out clear low-, mid-, and high-cost routes for open cabinet makeovers so you can pick what delivers the most charm for your budget.
Low: simple declutter, baskets, contact paper.
Mid: shelving, hardware swaps, lighting.
High: custom shelving, reclaimed wood panels, professional installs.
I’ll help you weigh payoff.
Open shelving can instantly transform a kitchen’s look while keeping essentials accessible and on display, and it works especially well with open kitchen shelves to inspire your space.
Paint and Finishes That Make Open Cabinets Pop

I love how a high-contrast color scheme can make open cabinets feel intentional instead of cluttered.
I’ll walk you through finish choices that hold up to daily use—think durable, washable paints that resist scuffs and spills.
With a few smart color and finish swaps, your open shelving will look fresh and stay practical.
Embracing simplicity with open shelving can create a sense of light and space when you pair it with minimalist styling that highlights a few key pieces.
High-Contrast Color Schemes
I often reach for bold contrasts when I want an open cabinet to feel like a centerpiece rather than a background note.
I pair deep charcoal or navy backs with white or reclaimed-wood shelves so dishes and pottery leap forward.
A pop of barn-red or mustard on trim warms the scene. These pairings read rustic and intentional, giving open cabinets personality without fuss.
I also choose cabinet colors that make the entire house look more luxurious, like deep charcoal and navy combined with warm accents.
Durable, Washable Finishes
Those high-contrast colors look great, but they’ll only keep commanding attention if the finishes can take everyday life.
I chose a satin acrylic enamel—easy to wipe, resists fingerprints and steam, yet keeps a soft, lived-in glow.
For wood shelves I oil-stain and a durable topcoat; for painted backs, washable semi-gloss.
These choices protect beauty and make daily cleanup feel effortless. Neutral palettes create a timeless backdrop that lets hardware and textures stand out.
Hardware, Trim, and Simple Swaps That Transform
I’ll show you how a few simple swaps can change the whole feel of open cabinets — new pulls and knobs bring instant character while weathered wood or matte metal sets the tone.
Adding decorative trim or crown molding gives shelves a finished, cottage-ready look without a full remodel.
And if you want a bigger shift, swapping in glass-front doors or lived-in shelves makes the space feel curated and cozy.
Open shelving also benefits from thoughtful groupings to keep visual clutter minimal and cohesive.
Update Cabinet Hardware
Start by swapping out tired knobs and pulls—I’ve found tiny hardware changes make the biggest visual difference.
I’ll pick finishes that age well, mix metals sparingly, and choose sizes that feel sturdy in hand. These swaps are quick, cheap, and totally transformative.
- Replace knobs with rustic cup pulls
- Match hinge finishes subtly
- Use larger pulls for open shelves
Add Decorative Trim
Add a simple trim and you’ll be amazed at how much character it gives open cabinets—think beadboard, moulding, or a thin picture-frame edge that reads like built-in furniture.
I love adding reclaimed wood trim or painted beadboard to warm things up; it hides raw edges, frames collections, and feels intentionally cozy.
It’s an easy, affordable detail that makes open shelving look finished and charming.
Swap Doors And Shelves
You can totally change the whole feel of open cabinets by swapping doors and shelves — I love trading plain plywood for glass-front doors, slatted panels, or simple beadboard to give depth and personality.
I’ll show you small swaps that feel big: replacing worn shelf boards, adding trim-ready doors, and mixing open with closed for a cozy, lived-in look.
- Glass-front doors
- Slatted panels
- Beadboard shelves
Lighting Solutions and Easy Installs for Open Cabinets
I often reach for a small light switch when I open an upper cabinet, and installing simple, low-profile lighting made that comforting moment possible in my kitchen.
I chose warm LED strips and puck lights with adhesive backs—no messy wiring. They highlight wood grain, brighten work zones, and feel cozy.
Battery options and plug-in kits kept installation fast, practical, and entirely doable.
Styling Basics: Arrange Dishes, Glassware, and Decor
I like to arrange dishes and glassware by function — plates with plates, glasses by height — so everything’s easy to grab and looks intentional.
I mix open shelving with a few closed cabinets to keep clutter out of sight and the display feeling calm.
Then I layer in texture and a few pops of color with woven baskets, wooden bowls, or a simple vase to warm the space.
Group By Function
When I style open cabinets, I group items by function so every shelf feels intentional and easy to use.
I arrange plates, bowls, and mugs together for quick meals, cluster glassware for drinks, and reserve a shelf for rustic decor that adds warmth. It stays practical and pretty.
- Everyday dishes
- Drinking glasses
- Decorative accents
Balance Open And Closed
Moving from grouped shelves to the bigger picture, I balance open and closed storage so the space feels lived-in without looking cluttered.
I display everyday plates and a few glasses where they’re easy to grab, then hide bulky appliances and excess dishware behind doors.
That mix keeps the kitchen practical, cozy, and calm—inviting without feeling over-styled or precious.
Add Texture And Color
Because texture and color turn open cabinets from storage into scenery, I layer pieces that feel collected rather than matchy-matchy.
I mix earthenware, woven baskets, and colored glass to add soul and depth, arranging by height and palette for calm cohesion. Little mismatches make it personal.
- Terracotta bowls for warmth
- Linen napkins for softness
- Green glassware for sparkle
Storage Hacks to Keep Open Shelves Tidy and Usable
I often start by grouping like items together—plates with plates, jars with jars—so I can see what really needs to live on those open shelves and what should be tucked away.
I use baskets, matching jars, and folded linens to corral smaller bits, label subtly, and rotate display pieces seasonally.
That keeps the space tidy, functional, and warmly lived-in.
Mixing Closed and Open Cabinets for Balanced Design
When I mix closed cabinets with open shelves, I aim for a rhythm that feels lived-in rather than staged; closed doors hide the clutter of daily life while open spaces show off the pieces that give the kitchen soul.
I balance function and charm, keeping everyday items accessible yet letting pottery and wood accents breathe.
- Store essentials behind doors
- Style a few treasured pieces
- Keep lines simple and warm
Color and Material Combos for Farmhouse, Modern, Eclectic
When I think about open cabinet makeovers, I picture farmhouse kitchens warmed by honeyed woods and worn brass that feel like a cozy hug.
For modern spaces I lean into sleek neutral contrasts—matte blacks, cool greys, and crisp whites—to keep things clean and calm.
And if you like eclectic, I’ll mix bold textures and unexpected finishes so every shelf tells its own story.
Farmhouse: Warm Wood Pairings
Blending warm woods with vintage touches can really make a farmhouse open-shelf kitchen feel lived-in and inviting, and I’ll walk you through the combos that nail that balance.
I love pairing reclaimed oak shelves with whiteware, honey pine with copper accents, and walnut trim with woven baskets for texture.
These mixes feel cozy, practical, and quietly charming.
- Reclaimed oak + whiteware
- Honey pine + copper
- Walnut + woven baskets
Modern: Sleek Neutral Contrasts
If you want a modern open-shelf kitchen that still feels grounded, I lean into sleek neutral contrasts—think matte charcoal shelves against soft limestone backsplashes, or cool concrete paired with warm ash wood accents.
I keep lines clean, hardware minimal, and textiles muted so the materials sing. Subtle brass or black fixtures add character without clutter, creating a calm, refined space that still feels lived-in.
Eclectic: Bold Mixed Textures
I love mixing unexpected textures and colors to give open shelves a lively, soulful feel—think reclaimed pine next to glossy teal tiles, or a chunk of rough-hewn stone beside a sleek stainless pot rack.
I layer patinaed metals, woven baskets, and painted ceramics to craft a collected, joyful kitchen that feels both lived-in and intentional.
- Patinaed brass + terracotta
- Weathered wood + teal glass
- Cast iron + handwoven fiber
Three Before-and-After Case Studies With Costs and Task Lists
When I walk you through three real open‑kitchen makeovers, you’ll see practical before‑and‑after photos, exact costs, and task lists that you can adapt to your own space.
I’ll detail a farmhouse refresh, a minimal modern strip, and a budget spruce-up—each listing materials, labor estimates, timelines, and step-by-step tasks.
You’ll get honest numbers and simple action plans to replicate easily.
Common Mistakes When Converting Cabinets to Open Shelving
After walking through those three makeovers and the exact costs and task lists, I want to point out a few pitfalls people often run into when they swap cabinet doors for open shelving.
I learned the hard way: balance, storage planning, and finishing matter.
- Overcrowding shelves
- Ignoring weight capacity
- Leaving raw edges unfinished
Weekly Maintenance Routine to Keep Open Cabinets Fresh
Regularly I run a quick weekly sweep through my open cabinets to keep them looking fresh and to stop dust and grease from settling in.
I wipe shelves with a microfiber cloth and mild cleaner, straighten dishes, rotate frequently used items to front, and air things briefly.
A tiny jar of baking soda tucks in a corner to absorb odors—simple, steady care keeps the rustic charm.
Step-by-Step Checklist to Plan Your Open-Cabinet Makeover
Keeping up with little weekly tasks makes planning a makeover much easier, so I like to start my checklist with what already works.
I map zones, set a budget, and pick finishes that feel homey. Then I schedule steps and source materials.
- Measure and photo every shelf
- Prioritize fixes and budget
- Choose paint, stain, lighting
I’ve loved walking you through these open-cabinet makeovers — they’re rustic, practical, and more doable than you’d think.
Whether you rip doors off like a pioneer or gently evolve one shelf at a time, small changes render big charm.
Keep the palette simple, curate what you show, and dust weekly like it’s 1776 (but with a microfiber cloth). Go slow, enjoy the process, and let your kitchen tell its story.


