I designed luxury kitchen islands you can trust, and I’ll show you 19 variations that fit every layout. From small nooks to open-plan spaces, I balance bold function with refined style—think hidden storage, multi-level surfaces, and durable finishes that feel effortless. I focus on flow, lighting, and seating that actually works, plus smart tech and adaptable shapes. Ready for ideas tailored to your space? If you keep scrolling, you’ll uncover how to tailor each option to your home.
What Makes a Kitchen Island Feel Luxurious

A kitchen island feels luxurious when it looks intentional, balanced, and just a touch indulgent.
I notice how clean lines meet warm textures, and how thoughtful details whisper quality.
It isn’t about excess; it’s about purpose: a refined counter, soft lighting, and subtle hardware.
I invite you to savor restraint—luxury blooms where intention, craft, and comfort mingle. Smart upgrades can elevate both functionality and aesthetics, enhancing your overall kitchen experience with purposeful enhancements.
How to Decide If an Island Fits Your Space

Is your kitchen island the right scale, footprint, and vibe for the room you’ve got? I’ll guide you through quick checks: measure clearance around edges, maintain flow with pathways, and balance countertop task zones with seating.
Consider ceiling height, natural light, and appliance placement. I’ll help you weigh function, rhythm, and luxury touches without overcrowding—precision, not guesswork. Remember that elegant lighting schemes play a crucial role in enhancing the overall ambiance of your kitchen island.
Space-Smart Islands for Small Layouts

Small spaces don’t mean sacrificing island impact; they just demand smarter tricks.
I design compact setups with folding leaves, narrow profiles, and wheels for flexible reconfiguration. I focus on storage-smart details: built-in organizers, vertical shelves, and hidden niches.
We combine multi-purpose surfaces, seating that tucks away, and smart appliances. Your small layout can feel generous, lively, and meticulously tuned. Incorporating space-saving techniques can further enhance the functionality and style of your kitchen island.
The Built-In Wine Wall: Pros, Cons, and Alternatives
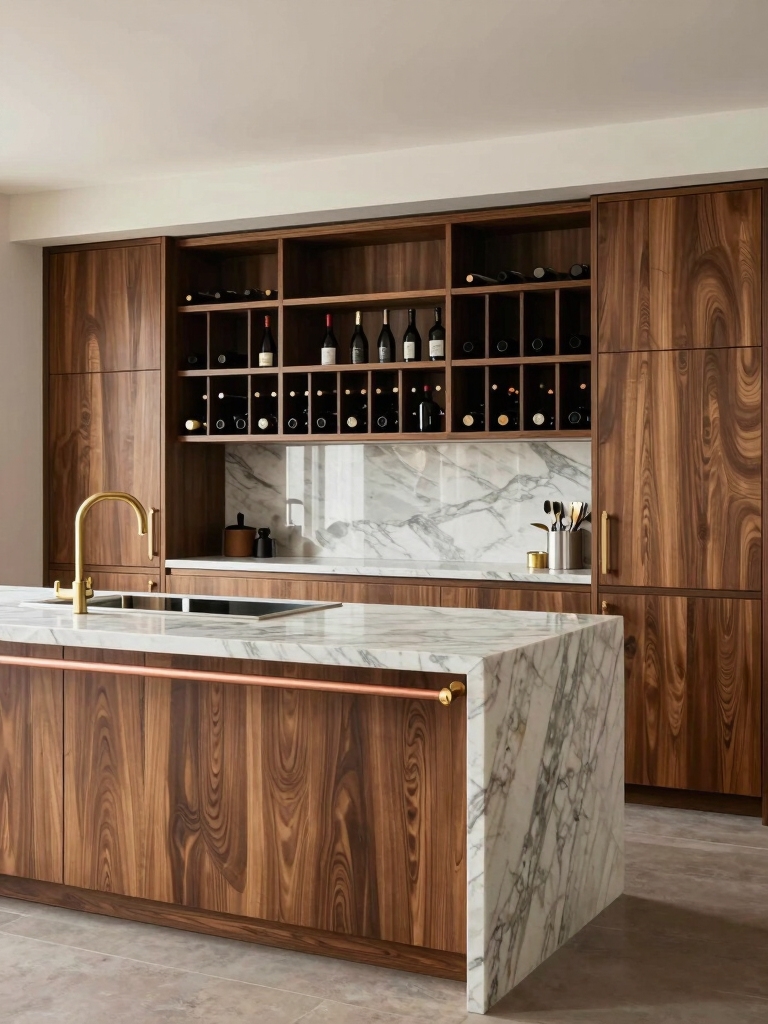
Curating a built-in wine wall can feel like a room’s most stylish personality, but it’s not all rosé and romance; there are practical pros, sneaky drawbacks, and plenty of smart alternatives to weigh.
I mix careful organization with accessible design: proper ventilation, climate control, and future-proof shelving. Additionally, incorporating luxury kitchen design approaches can help enhance both functionality and aesthetics.
Alternatives? Freestanding racks, refrigerated drawers, or a compact wine bar that preserves vibes without clutter.
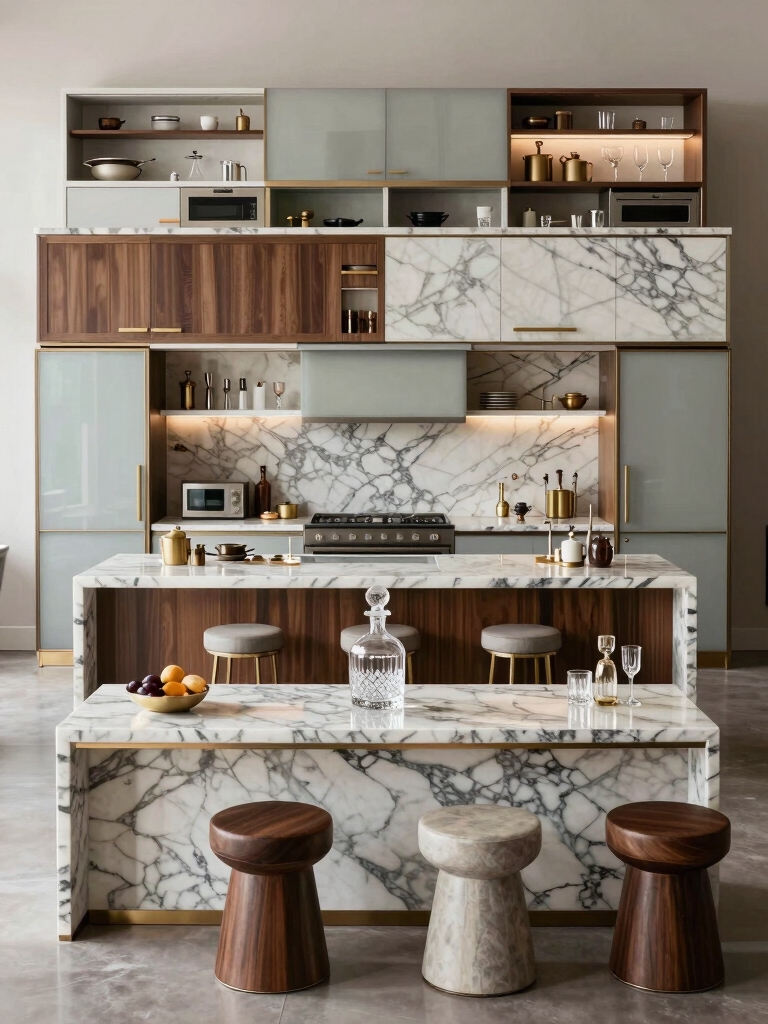
Multi-Level Surfaces for Dramatic Breakout Space
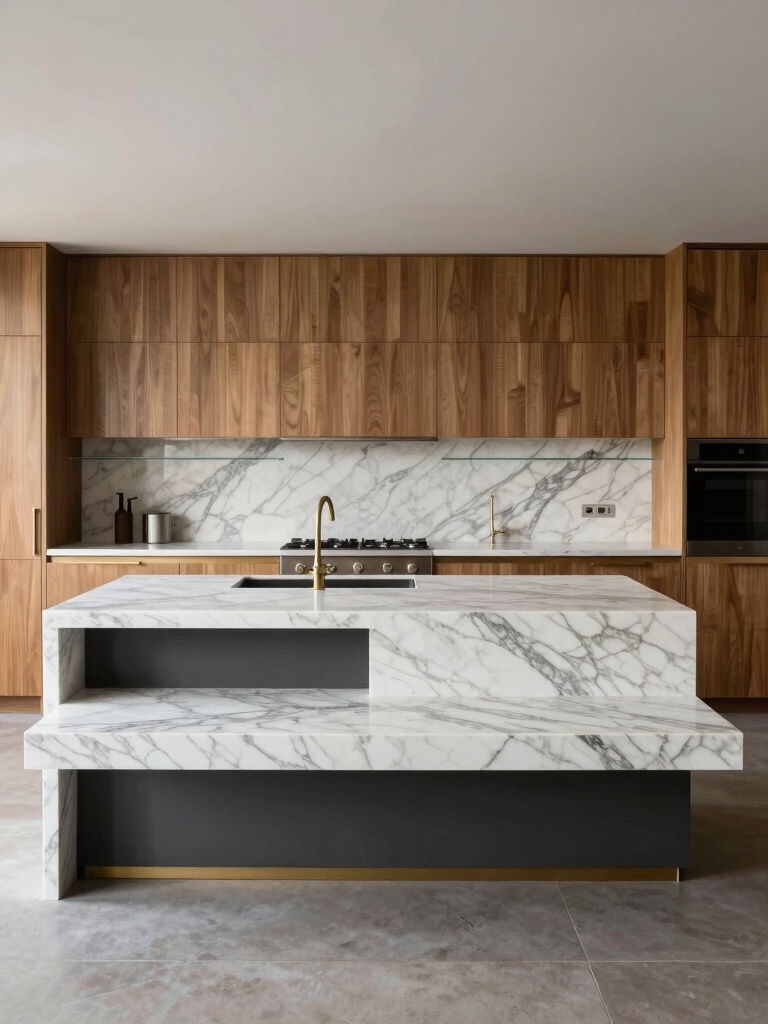
If you’ve softened the idea of a single, streamlined kitchen island after weighing the built-in wine wall, you’ll love how multi-layered surfaces can create a dramatic breakout space.
I mix levels to define zones, balancing prep with seating and display.
Practical edges, soft shifts, and varied textures keep it tactile and inviting, while clear sightlines preserve flow and conversation. The integration of luxury kitchen design not only enhances functionality but also elevates the aesthetic appeal of your space.
Hidden Storage That Multitasks Without Clutter
I love how hidden organization systems transform clutter into calm, letting every tool have a home without shouting for attention.
My favored approach blends multi-purpose storage solutions—think pullouts, modular inserts, and concealed bins—so you get more use from every inch of island space.
Let’s explore how these smart setups keep essentials close at hand while staying sleek and seamless.
Hidden Organization Systems
Hidden storage isn’t just about tucking things away—it’s about multitasking spaces that stay tidy without shouting for attention.
I design hidden organization systems to feel effortless: pull-out trays that classify gadgets, adjustable dividers that adapt to cookware, and magnetized spice rails that vanish after use.
Incorporating smart island storage can further enhance your kitchen’s efficiency and style.
You’ll notice cleaner counters, faster meals, and a calmer kitchen rhythm that never interrupts your flow.
Multi-Purpose Storage Solutions
When you’re juggling pots, pans, and gadgets, smart multi-purpose storage becomes the quiet hero of the kitchen.
I’ll show compact, clever ideas that hide clutter while staying within reach, so prep stays effortless and chic. Designed for versatility, these solutions maximize space without fuss, pairing function with flair.
- Hidden pull-out drawers for utensils
- Drop-in organizers inside islands
- Convertible shelves for trays
- Magnetized spice racks
- Integrated charging stations
Incorporating professional organization systems can elevate your kitchen’s efficiency and aesthetic.
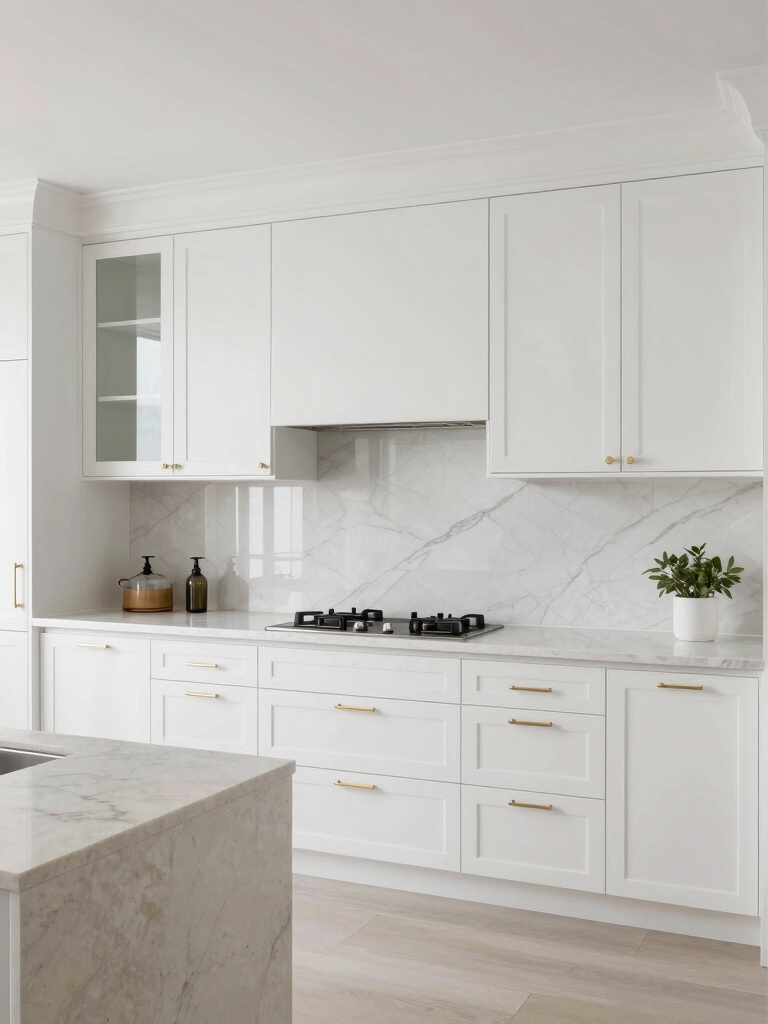
Seamless Materials for Minimalist Luxury
I love how seamless material palettes create a calm, uninterrupted look across the island, so every edge feels deliberate and refined.
I’ll walk you through minimalist surface continuity, where color, grain, and finish align to read as one plane.
And I’ll call out hidden fastening details that keep joints clean and the whole piece quietly luxurious.
Additionally, these designs often incorporate high-end materials that enhance both durability and aesthetics, elevating the overall kitchen experience.
Seamless Material Palettes
Seamless material palettes fuse form and function into one quiet, confident statement: the surface looks continuous, the edges vanish, and everything reads as a single, high-end canvas.
I’m guiding you with tactile details you can trust, choosing contrast subtly, textures carefully, and edges discreetly.
- monolithic quartz
- veined marble-look porcelain
- satin lacquered panels
- brushed brass accents
- glass-backed islands
Incorporating luxurious marble surfaces can elevate the overall aesthetic and sophistication of your kitchen design.
Minimalist Surface Continuity
Minimalist surface continuity means the island reads as one uninterrupted plane, with every detail agreeing in tone, texture, and edge.
I embrace seamless materials that whisper restraint, letting color and grain guide the eye.
No visible joins distract; instead, edges are crisp, corners softened, and sinks vanish beneath smooth surfaces.
The result feels calm, precise, and instantly luxe for any layout. Additionally, the choice of seamless materials enhances the kitchen’s overall elegance while ensuring durability and ease of maintenance.
Hidden Fastening Details
Hidden fastening details can be surprisingly invisible when you’re chasing seamless luxury, and that’s exactly the goal here: concealment without compromising strength or style.
I guide you through clever methods that honor material unity while keeping doors, panels, and islands fluid, resilient, and calm.
- concealed screws
- hidden biscuits and dowels
- laser-cut channels
- flush edge joinery
- magnetic, tool-less access
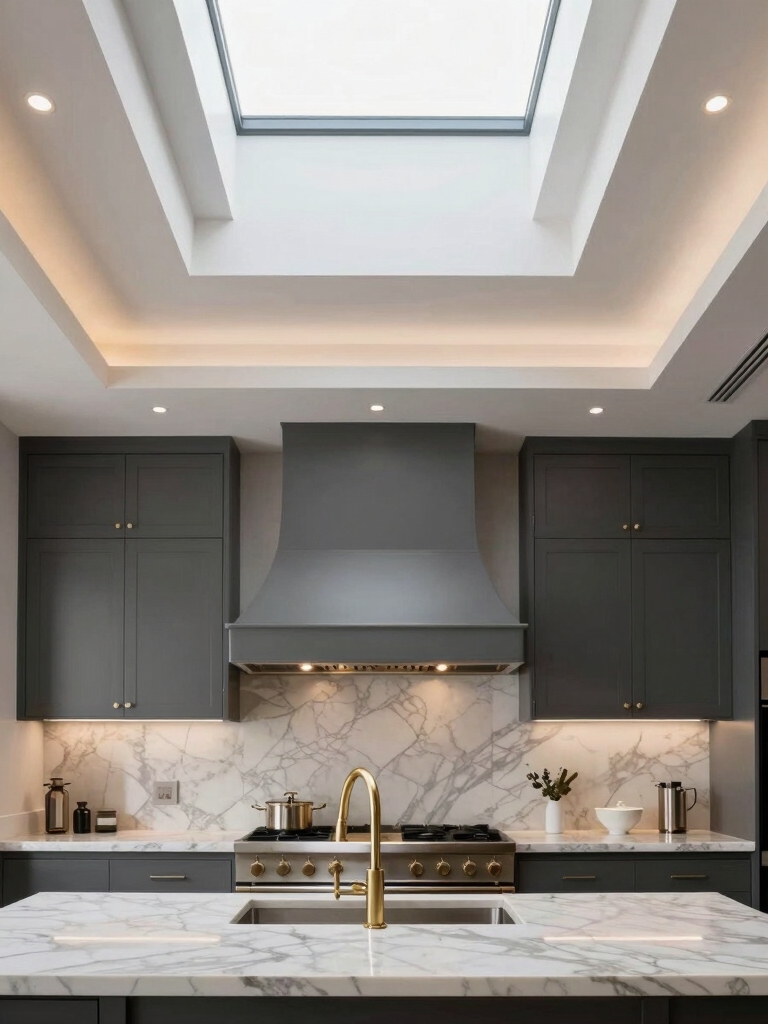
Statement Lighting to Elevate the Island
Statement lighting can transform your island from a functional workspace into a focal point.
I tailor fixtures to your layout, mixing pendants, track, and under-cabinet glow for balanced brightness. My approach favors dimmable options, warm hues, and scaled sizes that echo countertop length.
I avoid clutter, highlight textures, and guarantee shadows sculpt instead of overwhelm the space.
Integrated Seating: Breakfast Nooks and Counter-Height Spots
I’m excited to explore how Integrated Seating layouts can transform your island into a social hub, from cozy breakfast nooks to sleek counter-height spots.
I’ll size up breakfast nook dimensions for comfortable seating, clear counters, and easy flow between prep and chat.
We’ll also map out counter-height comfort zones so guests and cooks can mingle without crowding.
Integrated Seating Layouts
Integrated seating is where form meets function, blending breakfast nooks and counter-height spots into one inviting kitchen micro-vibe.
I pair comfort with flow, letting sightlines guide conversations and snacks. Think compact zones, shared surfaces, and subtle lighting cues.
- Seamless edge shifts for shared surfaces
- Varied seat heights to encourage movement
- Integrated storage under benches
- Under-counter lighting for mood and visibility
- Durable, easy-clean materials throughout
Breakfast Nook Dimensions
A breakfast nook should feel cozy yet purposeful, so I size it to balance seating and flow: think 24 to 36 inches of counter depth plus 60 to 72 inches of table length for four.
I prioritize legroom, clearance, and chair swing. With integrated seating, I favor tight corners, padded benches, and smart storage beneath to keep mornings smooth and inviting.
Counter-Height Comfort Zones
Starting from a cozy breakfast nook mindset, I’m turning attention to counter-height comfort zones where integrated seating shines in both casual meals and quick workflows.
I emphasize flow, ergonomics, and subtle texture that keeps conversation easy and space efficient.
- integrated seating for social meals
- legroom and knee clearance details
- material choices that resist stains
- seating depth balancing comfort
- lighting for morning and evening tasks
Floating or Cantilevered Islands for a Light Look
Floating or cantilevered kitchen islands give a crisp, airy vibe without sacrificing function.
I love how they visually hover, making small rooms feel larger while keeping seating and prep surfaces practical.
Install tips: support beams must vanish from sight, edges stay sharp, and lighting should skim beneath.
I’ll show you clever detours—tactile materials, hidden storage, and a playful, breezy silhouette.
Customizable Work Zones: Cooking, Prep, and Cleanup
Moving from that airy, floating vibe, I’m all about tailoring zones to how you cook, prep, and clean.
I design distinct flows that minimize steps and maximize joy.
- Separate prep, cooking, and cleanup zones
- Ample glide room for multiple helpers
- Pull-out mats and trash stations integrated
- Smartly placed knives, boards, and oils
- Easy wipe, easy reach, easy switch
Tech-Enhanced Islands: Power, Prep, and Connectivity
Tech-enhanced islands fuse power with purpose, turning prep into a plug-and-play routine.
I design around hidden outlets, USB hubs, and induction-ready surfaces, so you’re never hunting for chargers mid-chop. A built-in tablet dock, smart lighting, and wireless charging keep workflows smooth.
Clean, practical connectivity meets chic surfaces, making every move from prep to plating feel effortless and intentional.
Material Pairings: Butcher-Block Warmth vs Stone Coolness
Material pairings set the mood before you even touch a knife.
I’m weighing butcher-block warmth against stone coolness, choosing textures that sing with your layout.
Think contrast, not clash, and let accents decide the vibe.
Here are options that work:
- Warm butcher-block for inviting prep spaces
- Stone for clean, professional edges
- Microtextures to reduce glare
- Seamless shifts for openness
- Durable finishes that age gracefully
Traditional Accents on a Modern Luxury Island
Traditional accents bring warmth and character to a modern luxury island without stealing the show.
I mix antique brass hardware with clean quartz counters, balancing nostalgia and polish.
I tuck woven baskets under overhangs for texture, and I pair open shelving with soft, earthy ceramics to keep it approachable.
Subtle tambour doors hide gadgets while preserving celebratory design details.
Color Schemes That Make the Island a Focal Point
Color schemes can turn a simple island into a showstopper, and I love playing with bold contrasts and unexpected neutrals to make it pop.
- Pair high-contrast cabinets with a warm-tinish countertop
- Embrace monochrome tones for quiet drama
- Add metallic accents as visual punctuation
- Use color pops in bar seating cushions
- Consider two-tone islands for depth and rhythm
Durability and Maintenance: Luxury Without Fuss
I’m excited to show you how low-maintenance metals, stain-resistant surfaces, and durable finishes blend luxury with ease.
We’ll explore options that stay radiant with minimal effort, from sleek stainless to hardy composite countertops.
Let’s start with practical picks that keep your island looking polished without fuss.
Low Maintenance Metals
Metal surfaces that resist fingerprints and stains are the quiet heroes of a luxury kitchen, and I’m quick to reach for them because they stay as flawless as a showroom gloss.
I adore low-maintenance metals that shine with minimal effort.
- Stainless steel with matte finish
- Brushed nickel that hides smudges
- Anodized aluminum for durability
- Copper with clear sealant
- Titanium for modern longevity
Stain-Resistant Surfaces
Stain-resistant surfaces are the quiet workhorses of a luxe kitchen, keeping glossy beauty intact while shrugging off inevitable splashes and fingerprints.
I nerd out on micro-porosity, sealants, and maintenance cycles, explaining how a quick wipe becomes ritual rather than chore.
You’ll notice fewer routine scratches, rapid cleanup, and cohesive styling, all without sacrificing tactile luxury or color depth.
Trust me.
Durable Finishes Options
Durable finishes are the backbone of a luxury kitchen that stays pristine with real-life use.
I guide you through smart choices that resist wear while staying chic, with practical upkeep baked in.
Here are key options you can confidently pick:
- Quartz counters
- Anodized aluminum panels
- Porcelain surfaces
- Matte polymer laminates
- Sealed wood veneers
Open-Concept Islands: Maintaining Visual Flow
Open-concept islands thrive on visual flow, so I design them to blend with the surrounding space rather than shout over it.
I prioritize unobtrusive cabinetry, slim profiles, and integrated appliances, letting lighting and color whisper rather than shout.
We maintain sightlines, choose pared-back textures, and arrange seating to invite conversation while preserving openness and purposeful, practical zones.
Island Shapes That Fit Any Floor Plan
When it comes to island shapes, one size never fits all—and that’s the point.
I tailor forms to flow, traffic, and tasks, not trends. Here are options you can mix or match:
- Rectilinear for compact spaces
- L-shaped for corners and seating
- G-shaped for multitasking zones
- Oval for soft sightlines
- Island with a peninsula extension for flexibility
Quick-Start Checklist: Prioritize Your Island Design
I start by prioritizing function first, making sure the island serves you daily without crowding the workflow.
Next, I map out traffic flow so every route around the island stays smooth and clear.
Finally, I define a visual focal point that anchors the space while supporting practical task zones.
Prioritize Function First
If you want a kitchen island that actually boosts daily flow, start with function and let it shape every decision from size to sockets to seating.
I prioritize usefulness, then polish. Quick-start checks keep me honest, while adaptive design stays flexible.
- Define primary tasks first
- Plan power and outlets precisely
- Determine seating needs
- Map workflow zones
- Leave room for future tweaks
Maximize Traffic Flow
Maximize traffic flow by treating the island as a highway, not a furniture piece.
I design clear route paths, leaving at least 42 inches around for smooth movement.
I place appliances and prep zones to minimize backtracking, layer subtle signage with color cues, and keep seating generous but non-interfering.
You’ll navigate an efficient kitchen, every move intuitive and effortless.
Define Visual Focal Point
Visual impact isn’t an afterthought—it’s the heartbeat of your island.
I define the visual focal point by choosing a standout material, fixture, or sculpture, then arrange surrounding elements to support it.
Here’s my quick-start checklist:
- Identify your hero feature
- Align lighting to illuminate it
- Balance color and texture
- Anchor with purposeful props
- Guarantee sightlines remain clear
Conclusion
I hope my handy hints helped you hone in on your heavenly, highway-ready island. If your dream is dazzling, decisive design, immerse yourself and decide today. Think texture, tone, and task—tastefully tailored to your space. Picture a polished, practical perch that pleases people and pockets alike. Ponder multiple plans, pick a pretty, practical path, and push toward a perfect, playful focal point. Your stunning kitchen sanctuary starts with a smart, swoon-worthy, space-savvy island.