I’ve snagged 17 practical island kitchen ideas to give your space a complete makeover, from layout basics to style and smart storage. I’ll map zones for prep, cook, and cleanup, choose a vibe—minimalist, warm, or industrial—and pick the right island geometry. You’ll see how seating, lighting, and hidden tech boost daily flow without clutter. I’ll also share budget-friendly upgrades that punch above their price. Ready to explore more tips you can apply today?
Fundamental Island Layout Principles

When you’re designing an island, start with the flow of people and tasks. I map zones: prep, cook, clean, eat, and store, keeping paths clear and elbows free.
I favor a primary work triangle, avoid crowding, and place outlets where tools live. Height harmony matters—counter, seating, storage align for comfort, efficiency, and chic practicality. Additionally, incorporating unique island designs can elevate both functionality and aesthetics in your kitchen space.
Define Your Island Style: Minimalist, Warm, or Industrial

I’m here to help you pick a vibe, whether you lean minimalist, warm, or industrial, by grabbing the core cues from Minimalist Elements Guide and Warmth And Texture Cues.
I’ll show you practical moves—clean lines, pared-down details, and subtle textures—that keep things calm yet inviting.
Let’s map out how those cues translate into your island so it feels intentional, not fussy. Incorporating modern minimal kitchen design concepts will enhance the overall serenity and functionality of your space.
Minimalist Elements Guide
Minimalist island design is all about clarity and calm in pace and space: we strip away clutter, keep lines clean, and let a few well-chosen pieces speak loudly.
I focus on form over flourish, embrace hidden storage, and favor durable, matte finishes.
You’ll feel organized, not boxed in, as function guides beauty, and restraint sparks everyday elegance without sacrificing warmth or practicality. Ultra-minimalist kitchen designs emphasize simplicity, making them an ideal choice for achieving a serene atmosphere.
Warmth And Texture Cues
Texture isn’t just a detail—it’s the mood you set. I’m crafting warmth with tactile cues you can feel: wood grain, soft textiles, and matte finishes that invite lingering.
You’ll sense coziness without clutter as I blend comfortable tones, subtle patterns, and practical textures. Multifunctional island solutions are essential for maximizing space in a compact kitchen.
Define your island style—warmth, not loud show—so every touch feels welcoming, effortless, and precisely yours.
Choose Island Geometry: Central Island, Peninsula, or Console
Choosing the right island geometry shapes how your kitchen feels and works, so start by imagining your daily flow and how guests will interact with the space.
I’ll help you weigh Central Island, Peninsula, or Console to suit your vibe and chores.
- Central Island: social focal point, prep space, storage
- Peninsula: single-wall efficiency, dining nook potential
- Console: streamlined, compact, tech-friendly
In addition, consider how an island can double your workspace and enhance functionality through strategic design.
Map Workspace Flow: Cooking, Prep, and Cleanup Zones

I’m thinking about how we map the flow between cooking, prep, and cleanup to keep the kitchen efficient.
Let’s talk about how the prep and cleanup linkage supports a smooth workspace zoning flow.
If we nail these links, every move—from chopping to cleaning—feels seamless and practical. Incorporating sink in island kitchen placements can significantly enhance the overall workflow and connectivity between these zones.
Workspace Zoning Flow
When you map out a kitchen, I start with the flow: cooking, prep, and cleanup each get their own zone, but they connect smoothly so the whole surface moves with you.
- Clear pathways that keep tasks fluid
- Distinct lighting for each zone
- Quick-access tools at hand
Casual chic, practical, and precise in how it feels to work. Additionally, incorporating smart layout tips can help optimize space and enhance efficiency in your kitchen design.
Prep and Cleanup Linkage
Prep and cleanup aren’t afterthoughts; they’re the hinge that keeps the workflow smooth.
I design the prep and cleanup linkage to minimize backtracking, linking stations with intuitive spacing and accessible tools.
Think task-focused zones, smart appliance placement, and waste sorting integrated into the island.
To enhance your design, consider implementing smart island storage solutions that hide away clutter, making everything easily accessible.
You move from prep to plating without friction, finishing with a clean, calm workspace.
Plan Seating Options: Bar Stools, Banquettes, or Family Nooks

Choosing seating for the island means balancing function with flow: bar stools keep things lively and social, banquettes invite cozy conversation, and family nooks offer practical, everyday comfort.
I weigh outlook, traffic, and cleaning ease to tailor vibe without clutter.
- Bar stools for quick chats and high-energy meals
- Banquettes for intimate gatherings and pull-up workspace
- Family nooks for busy mornings and casual dining
Incorporating wood kitchen island styles can enhance the overall aesthetic while providing warmth to your space.
Optimize Island Storage: Drawers, Cabinets, and Hidden Modules
We taper clutter by designing smart storage that’s easy to reach and even easier to use: drawers keep utensils organized, cabinets hide bulkier gear, and hidden modules tuck away rarely needed items without stealing countertop space.
I’ll tailor pull-out trays, shallow organizers, and modular dividers to fit your island footprint, maximizing access, minimizing clutter, and keeping essentials within finger’s reach for everyday flow. Incorporating small kitchen cabinets can further enhance your island’s functionality, allowing for a seamless blend of style and efficiency.
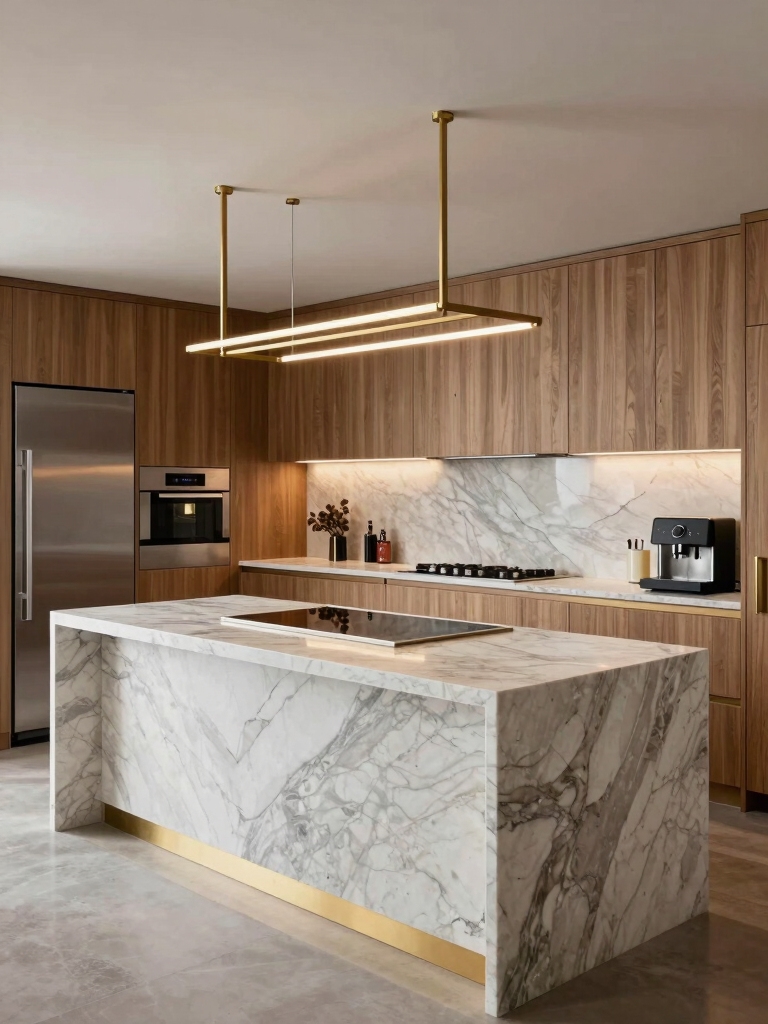
Select Surfaces That Stand Up to Life and Style
When picking surfaces, you want materials that look good daily and stand up to real life. I choose durable, easy-care finishes that still feel luxe and timeless.
Think resilient countertops, sink-friendly backsplashes, and matte textures that hide fingerprints.
- Quartz for smooth, wipe-clean practicality
- Porcelain for beauty and stain resistance
- Bamboo or engineered wood for warmth with low maintenance
Integrate Appliances Seamlessly: Hidden vs. Highlighted
Integrating appliances in island kitchens is a balancing act between seamless flow and standout functionality; you can hide them for a clean, cohesive look or highlight them as design moments that set the tone.
I choose clarity over clutter, aligning size, finish, and placement to support daily tasks.
Hidden keeps calm, highlighted sparks personality, and both serve a practical, stylish workflow.
Light the Island With Layered Task and Ambient Lighting
Layered task lighting lets me map exact work zones on the island without washing out its personality.
I’ll balance ambient glow techniques to keep the space warm and welcoming while still bright enough for prep and plating.
Think of the island as a spotlight that also hums softly in the background, guiding focus to key focal points.
Layered Task Lighting
Layered task lighting on the island means more than just brightening the surface; it blends focused work light with ambient glow to keep prep and chatting effortless.
I prioritize zones: cooktop, prep strip, and seating. This setup reduces shadows, speeds tasks, and elevates mood without glare.
- Adjustable under-cabinet fixtures
- Pendant pairs for focused and ambient balance
- Dimmer controls for mood and clarity
Ambient Glow Techniques
Ambient glow isn’t just about brighter lights; it’s about weaving warmth into the island so prep, conversation, and cleanup feel effortless.
I mix layered task lighting with subtle ambient tones, keeping controls intuitive and glare low.
Think dimmable under-counter rails, warm LEDs, and a gentle overhead wash.
The result is inviting, practical, and versatile—without shouting for attention or clutter.
Island Lighting Focal Points
So, what makes the island pop without shouting? I layer lighting so the space feels practical yet polished, using task brightness for counters and ambient glow for mood.
Focused pendants frame the workstation, while under-cabinet LEDs erase shadows. This trio keeps meals effortless and corners welcoming:
- Pendant trio over the island
- Under-cabinet wash
- Dimmable ambient glow
Tie It Together: Color Palettes That Connect to the Room
Color isn’t just a splash; it’s the thread that ties the whole kitchen to the room around it.
I’m sharing simple palettes that echo nearby spaces, not overwhelm them. Start with a main neutral, add two accents, and repeat a couple textures.
Balance warm and cool tones, test with swatches, and trust proportion over trend. Your room will feel cohesive and intentional.
Add Tech Without Clutter: Smart Features That Read as Design
I’m all about tech that blends in, so we can enjoy smart features without the clutter.
Think hidden tech aesthetics and seamless additions that feel like design, not devices.
Let’s explore how to keep functionality front and center while maintaining a clean, island-ready look.
Hidden Tech Aesthetics
Hidden tech should feel invisible—design that hides in plain sight while delivering smarter living.
I curate hidden tech with tact: devices disappear into cabinetry, screens morph into countertops, and lighting subtly signals status without shouting. You’ll notice convenience, not clutter.
- Seamless synchronization for routines
- Concealed controls, tactile confidence
- Materials that blend, not clash
Seamless Smart Additions
Seamless smart additions blend tech into daily life without shouting for attention.
I weave subtle controls and quiet sensors into surfaces you already trust, so gadgets feel like design, not distraction.
Think hidden speakers, flush lighting, and app shortcuts tucked behind cabinets.
I choose quality interfaces, intuitive layouts, and reliable syncs, keeping workflow smooth, spaces calm, and contemporary charm intact.
Small Kitchen, Big Impact: Compact Islands That Work Hard
When space is tight, a compact kitchen island can be the upgrade that changes everything, serving as prep space, storage, and a casual spot to chat all in one sleek package.
I share simple, smart layouts that fit tight rooms:
- multi-use surfaces
- hidden storage
- integrated seating
Compact islands punch above their size with style and practical appeal, guiding workflow without clutter.
Open-Plan Harmony: Sightlines, Zoning, and Flow
Open-plan design comes with a run of decisions, and the key is balance: we want sightlines that feel open, zones that keep tasks clear, and flow that keeps the kitchen connected to living spaces without chaos.
I prioritize clean sightlines, logical zoning, and seamless shifts, so movement feels natural, not frantic, with practical details guiding every choice and every conversation around shared spaces.
Create Drama: Make the Island a Focal Point
We’ve made the open-plan feel easy and connected; now it’s time to let the island steal the show.
I’ll guide you to create drama without shouting. Make it a centerpiece with shape, material, and lighting that read as intentional.
- Bold countertop material
- Sculptural pendant lighting
- Streamlined storage that stays visible
Budget-Smart Upgrades: High-Impact, Low-Cost Tweaks
We’ll keep your island stylish without breaking the bank: small changes can pack a big punch.
I’ll show you practical, high-impact tweaks that don’t drain your budget: swap hardware, add under-cabinet lighting, repaint surfaces, or install open shelving for airflow and charm.
Choose affordable finishes, optimize layout, and keep clutter minimal.
You’ll gain polish, function, and a refreshed vibe—without a pricey overhaul.
Care and Longevity: Practical Maintenance for Busy Homes
If you’ve been tweaking your island on a budget, you’ll appreciate how steady, low-effort care keeps that polished look long after the initial improvements.
I keep routines simple, so busy days don’t derail shine. Here are quick practices:
- daily wipe-down with a microfiber cloth
- weekly sealant checks and light polish
- spot-clean spills immediately to prevent staining
From Concept to Completion: A Step-by-Step Makeover Roadmap
Starting with a clear vision, I map every step from concept to completion so your island makeover stays on track and upscale-feeling without the drama.
I break the process into phases: concept, design, sourcing, budgeting, and execution. You’ll get practical decisions, realistic timelines, and clear milestones.
We’ll adapt as needed, keeping style cohesive, materials durable, and the result effortlessly chic.
Conclusion
A kitchen island isn’t just a surface—it’s the heartbeat of your space. I’ve seen tiny changes ripple into big daily joys, like a 20% faster prep due to better flow and layout. Trust the process: define your style, pick the right shape, map zones, and choose seating that invites conversation. With a smart, budget-friendly plan, your island becomes the warm, practical centerpiece you’ll actually enjoy every day. Let’s make it happen.