
If you want 20 DIY kitchen cabinet projects that you can actually finish, I’ve got you. I break it down from goal setting and budget to quick facelifts and smart storage tweaks, so you stay practical and on track. Expect budget-minded tweaks like painting boxes, peel-and-stick updates, and clever corner hacks that don’t require a full remodel. I’ll also flag common issues and finish with personal touches that keep your space looking polished—plus a little surprise for what comes next.
Define Your Cabinet Makeover Goal and Budget

Setting a clear goal and a realistic budget is my first move, because without them, DIY cabinet projects drift from dream to deadline-induced chaos.
I pick a target—style, function, or resale value—and timebox it with a concrete number for materials.
Then I map costs, add a contingency, and commit. Clarity saves scrambles, and decisive spending keeps progress steady. Additionally, focusing on kitchen remodels that boost value can further enhance the return on investment for your efforts.
Assess What Your Cabinets Need: Budget-Driven Times

If you’re budgeting in mind, start by mapping what your cabinets actually need rather than chasing shiny upgrades.
I’m keeping real life in perspective: prioritize structural fixes, durable hardware, and a clean finish over trendy bells and whistles.
Allocate funds for essential essentials first, then decide where savings matter most.
Your plan stays sharp when needs guide every choice, not hype. Additionally, consider that even simple hardware swaps can dramatically elevate the look of your cabinets without breaking the bank.
Prep Like a Pro: Demolition and Surface Prep Basics

Demolition and surface prep aren’t glamorous, but they’re the gears that keep your cabinet project from grinding to a halt.
I’ll walk you through smart teardown, stable protection, and clean, measured prep. We’ll tag old finishes, check for nails, then sand with purpose and dust control.
You’ll gain a solid base, fewer surprises, and confidence to move forward—without unnecessary drama or delays.
Quick Facelift: Paint the Cabinet Boxes for a Fresh Look

I’m sharing how I get an even, professional look when painting the cabinet boxes, starting with solid prep and steady coverage.
I’ll walk you through prep before painting and tips for even coats that minimize touch-ups later. To achieve a flawless finish, it’s essential to follow proper painting techniques that ensure durability and aesthetics.
Ready to let a fresh color transform the whole space without the chaos?
Prep Before Painting
To get a quick facelift, I start with prep that sticks: remove doors and drawers, label them, and tape off hinges and countertops so the real colors don’t bleed onto areas that stay brown.
I wipe surfaces with mineral spirits, scuff with fine-grit paper, and wipe again. Clean, dry, and ready, the boxes drink in primer—without drama or dust, promise. Applying a high-quality primer helps ensure a smooth and durable finish that lasts.
Even Coverage Tips
After prepping sets the stage, it’s time to even out the tone on the cabinet boxes so the new look reads cleanly from door to door.
I wipe, sand, and test spots, then apply thin coats. Slow, steady passes minimize lap marks.
If corners complain, I feather edges. Dry between layers, smile, and trust even coverage will wow. Remember, stunning kitchen cabinet makeovers can truly elevate your space.
Spruce up Doors With Peel-And-Stick Panels
Have you considered peel-and-stick panels for doors as a quick facelift? I’ll walk you through the pros, share smart application tips, and flag how to care for durability so your doors stay striking longer. Let’s weigh the sticks, sticks-are-good moments, and simple maintenance that keeps the look fresh. Additionally, using a stunning backsplash can elevate the overall aesthetic of your kitchen, complementing your white cabinets beautifully.
Peel-And-Stick Pros
Peel-and-stick panels are a game changer when you want a quick door upgrade without the mess of paint and tools.
I love their clean look, instant texture, and zero-drying drama. They’re forgiving, flexible, and cost-savvy, letting you test styles without commitment.
On real doors, they resize easily, grip firmly, and refuse to buckle under busy-kitchen life.
Simple, satisfying, scalable. Additionally, affordable ways to elevate your kitchen style can be easily achieved with these panels.
Application Tips Now
If you want a fast door refresh, Peel-and-stick panels make it simple—and you can start right away.
I guide you through clean walls, straight alignment, and confident pressing, with no mess, no fuss. Measure twice, cut once, then peel, press, and smooth.
Choose tones that cheer your cabinets, and enjoy instant transformation without chisels or glue mishaps. You’re DIY genius. Additionally, incorporating stylish decor upgrades can further elevate the overall aesthetic of your kitchen cabinets.
Durability And Care
Durability is the name of the game when you’re sprucing doors with peel-and-stick panels, and the good news is these babies hold up beautifully with a little care.
I’ll keep maintenance simple: wipe with a damp microfiber, skip harsh cleaners, and avoid scrubbing edges.
For peace of mind, reseal high-traffic spots every year and replace stubborn panels promptly.
Gel Stains for Beginners: Refine Color Without Mess
Gel stains are my secret weapon when refining color without the mess, especially for beginners who fear drips more than mistakes.
I apply a thin coat, wipe off excess with a clean cloth, and let the stain settle. The gel’s viscosity slows drips, while color builds evenly.
Quick cleanup means less stress, more satisfaction, and cabinets that look intentional, not hurried.
Hardware Hacks: Update Knobs and Handles for Impact
Hardware matters as much as finish, so I’ll start with a simple truth: swapping knobs and handles can transform a kitchen faster than a full remodel.
I’ll choose shapes and finishes that echo your style, then mix sizes for balance. Quick swaps save time, but bold hardware adds personality—without breaking the bank.
Ready for a refreshed vibe? Let’s pick something smart and clean.
Upgrade Closures: Magnetic Catches and Soft-Close Mechanisms
Upgrading closures is the quick, quiet win that makes drawers glide and cabinets close with confidence.
I pick magnetic catches for reliability and soft-close mechanisms for hush, so nothing clangs or snaps shut.
Installation is simple: mount a few brackets, align the strikes, and test.
You’ll enjoy smoother access and calmer mornings without any drama or rattles.
Efficient, tidy, satisfying.
Replace the Fronts: DIY Door Substitution Guide
If you’re chasing a fresh look, swapping out the cabinet fronts is a quick, high-impact makeover you can do in a weekend.
I walk you through choosing fronts, measuring precisely, and swapping hinges for a clean, gap-free fit.
Expect simple tweaks, upgraded hardware, and a refreshed vibe—no drama, just results.
You’ll love the instant, polished kitchen upgrade.
Add Glass Inserts for an Open, Elegant Look
Glass inserts instantly elevate cabinet guts and glow, but I’ll walk you through the basics so you’re not guessing when to use clear, frosted, or tinted panes.
I’ll cover how light moves through each option, plus practical tips on controlling glare and privacy, so you get that open, elegant look without sacrificing function.
Then we’ll tease style and finish choices—from frame options to glass textures—that amp up your kitchen’s personality.
Glass Inserts Basics
Adding glass inserts to your cabinet doors instantly brightens a kitchen and makes the space feel more open.
I’ll keep this practical: select tempered glass for safety, trim with matching frames, and measure precisely so panes fit snugly.
Consider a few clear panes for a clean look or frosted ones for subtle intrigue.
Simplicity, not flash, defines timeless elegance.
Light Transmission Tips
With glass inserts, light isn’t trapped behind doors—it travels, brightening everything in its wake.
I choose clear or lightly frosted panes to maximize diffusion without dulling character, then position them where natural light hits hardest.
Keep frames slim and edges tidy so reflections feel intentional, not busy.
Quick, tidy glazing tips: seal gaps, clean regularly, and enjoy the open feel.
Style and Finish Choices
When you’re choosing style and finish, glass inserts are a simple faultless upgrade that instantly elevates cabinets from practical to polished.
I’m picturing bold, airy shelves catching light, with the cabinet interior visible yet refined.
Pair them with soft hardware and a subtle frame.
The result: effortless elegance, easy maintenance, and a kitchen that feels spacious rather than nondescript.
Two-Tone Magic: Depth and Contrast on Your Cabinets
Two-tone cabinets instantly give a kitchen a designer vibe without a full remodel, and the trick is layering depth with contrast.
I pair rich, dramatic upper or lower tones with lighter interiors, then introduce subtle hardware to amplify the effect.
The result: visual intrigue without chaos.
I keep lines clean, edges sharp, and color balance deliberate for lasting impact.
You’ll nail balance fast.
Open Shelving That Stays Organized
Open shelving can look effortlessly chic, but it only stays organized if you curate it like a boutique instead of a grocery store.
I group essentials by use, not by color alone, and I rotate items seasonally to avoid clutter.
I label zones, keep a short, intentional display, and commit to routine tidy-ups so the look stays intentional, never chaotic.
Practical Upgrades: Pull-Out Organizers and Racks
Pull-out organizers and racks are the secret sauce for a kitchen that finally stays tidy, not just looks organized.
I’ve found they turn cramped corners into usable space, letting you glide pans and snacks out with a confident tug.
No more digging; I save minutes daily, making prep feel effortless, efficient, and surprisingly satisfying for stressed cooks like you.
Easy Backsplash Alternatives for a Cohesive Look
When you’re aiming for a cohesive look without a full-on tile job, easy backsplash alternatives can save time and money while still delivering punch.
I’m sharing options that feel luxe without the labor—peel-and-stick panels, tempered glass, or cultured stone veneers.
They’re versatile, wipeable, and photogenic, keeping your cabinets the star while avoiding fuss, mess, or banshee grout.
Voilà, simple style.
Lighting That Makes Cabinets Shine
I love how layered cabinet lighting can transform every drawer pull and corner shelf, turning function into ambiance.
With ambient under-cabinet glow backing it up, your workspace stays bright without shouting.
Let’s talk practical setups that balance task light with a soft, cabinet-enhancing mood.
Layered Cabinet Lighting
Layered cabinet lighting isn’t just about visibility—it’s about mood and function working in harmony.
I design with layers that guide, highlight, and soften spaces, making every shelf feel intentional. You’ll see depth, not glare, and tasks become effortless.
- Under-cabinet LEDs punch through shadows with clean color.
- Toe-kick accents add subtle glow that anchors the room.
- In-cabinet LEDs reveal organized chaos with style.
- Dimmable fixtures tailor ambiance to any moment.
Ambient Under-Cabinet Glow
Ambient under-cabinet glow isn’t just about visibility—it’s the soft signature that ties the whole kitchen together.
I’m sharing a practical trick: choose dimmable LEDs, thin strips, and quiet drivers.
Place them beneath uppers for even spill, not harsh hotspots. It highlights textures, saves eye strain, and invites guests to linger.
Effort tiny, impact undeniable, cabinets suddenly shine.
Durable Finishes: Sealing, Care, and Maintenance
Durable finishes aren’t just pretty faces—they’re the shield that keeps your cabinets looking sharp for years.
I seal once, then guard with smart habits, so the gloss lasts and fingerprints retreat.
Here’s how I stay ahead:
1) Wipe spills promptly with a microfiber cloth.
2) Re-coat every few years or when sheen fades.
3) Use mild cleaners, not abrasive scrubs.
4) Ventilate during and after finishing.
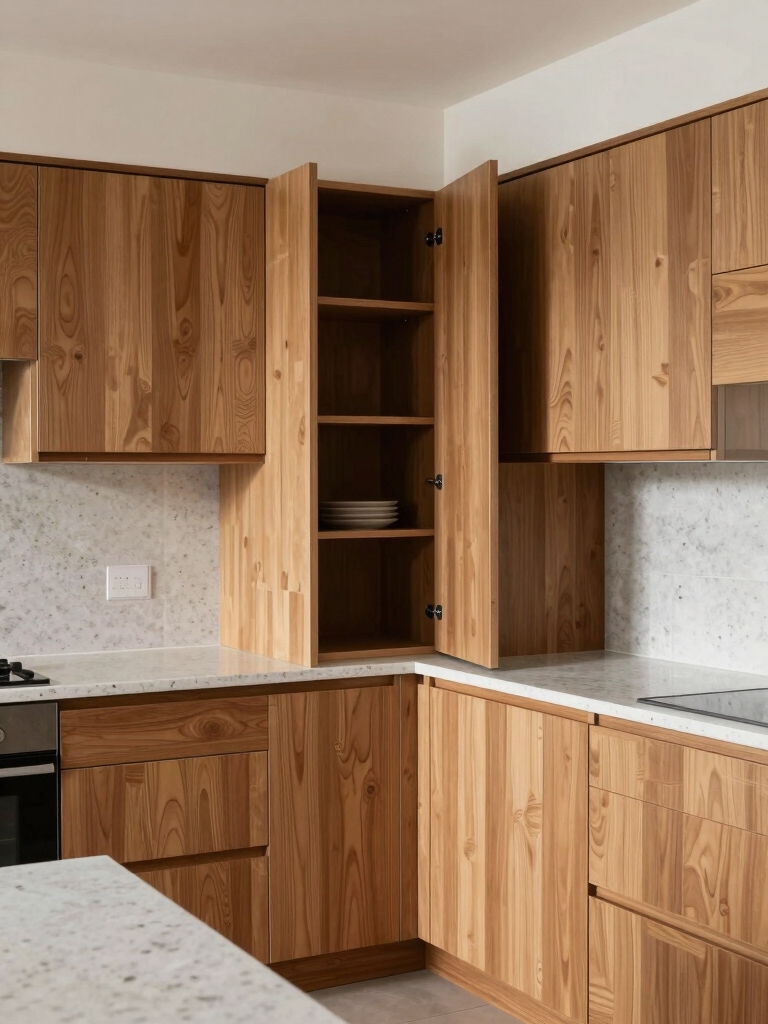
Small-Space Solutions: Corner Cabinet Hacks
If you’re tolerating tight corners, I’ve got corner cabinet inserts that turn small spaces into organized storage without a fight.
I’ll share slimline ideas that squeeze more shelves and pull-out options into every inch, so dead space finally pays you back.
Let’s explore how to turn those awkward corners into useful, accessible storage you’ll actually use.
Corner Cabinet Inserts
Corner cabinet inserts turn wasted angles into usable space fast.
I’ll show you simple tweaks that transform corners from dead zones into drawer-like access.
Numbers below paint the picture:
- Lazy susan rotation for spices
- Pull-out trays for pans
- Angle shelves to maximize depth
- Swing-out baskets for lids and measuring cups
Effortless, neat, and surprisingly practical for real kitchens.
Slimline Storage Ideas
Small-space kitchens demand clever, slimline solutions, and corner cabinets are a goldmine when you think in inches instead of square feet.
I swap bulky shelves for pullout organizers, slim dividers, and magnetic tins that cling to the door.
Every inch earns utility, not clutter. You’ll glide past corners, grab what you need, and still leave room for that espresso machine.
Turning Dead Space Useful
Turning dead space in a corner cabinet into workhorse storage is my favorite cheap fix for cramped kitchens.
I’ll show you practical tweaks that actually fit, shift, and simplify.
- Install a lazy susan for easy reach
- Use pull-out spice racks that never spill
- Add slim pullout drawers for lids and pans
- Mount adjustable shelves to maximize height flexibility
Time-Saving Techniques for Busy DIYers
Ever wonder how to squeeze more progress into a work session?
I’ve learned a few tricks that really stack up. Plan a micro-task list, batch prep materials, and cut trips by keeping everything within reach.
I pace with a timer, celebrate small wins, and flip between steps to stay fresh. You’ll finish faster, with cleaner joints and less fatigue.
Let’s explore.
Troubleshooting Common Cabinet Issues (Quick Fixes)
When you’re juggling cabinet projects, quick fixes are worth their weight in drawers and doors.
I’ll show practical, fast tweaks you can trust.
- Re-align misaligned doors with a micro-adjust screw.
- Tighten loose cabinet handles to stop rattling.
- Sand sticking drawers and apply a touch of wax.
- Patch scratches with a matched stain and light topcoat.
Finishing Touches: Personalizing Your Kitchen Style
Personalizing your kitchen style is where your cabinets stop being generic and start feeling like you.
I’ll guide you to curate hardware, finishes, and accents that reflect you, without tipping into gimmick.
Choose pulled-together contrasts, meaningful textures, and playful details.
I’m here to help you balance bold moves with timeless appeal, so your space reads polished, not loud.
Conclusion
You’ve got this. If you’re worried a full renovation is out of reach, forget the myth: small steps can yield big results. Start with a paint refresh or peel-and-stick doors, and you’ll see instant payoff without a contractor’s clock ticking. I’ll be here cheering you on as you tackle each project—one cabinet at a time. Pretty soon, your kitchen will feel fresh, organized, and proudly you. Ready to take the plunge and finish what you started?


