I turn IKEA islands into high-end drops of design by upgrading bases, countertops, lighting, and hidden storage for polished practicality with luxe touches. Start with a sturdy base that suits your space, then luxe countertops like quartz or ultra-thin granite. Dress it with stylish legs, hardware, and custom-front panels to hide clutter. Layer lighting for mood and function, and mix metals for texture. Curious what else elevates the look? There’s more you can reveal just ahead.
Choose the Right IKEA Island Base for Your Space

Choosing the right IKEA island base starts with your space, not the spare parts aisle.
I size up layout, traffic flow, and outlets, then pick a base that breathes with the room. It should feel sturdy yet chic, like it learned manners from a designer.
Practical, precise decisions trump flash—function wears polish, and polish reads as effortless. Incorporating unique island designs can elevate your kitchen’s aesthetic while maximizing its utility.
Upgrade Countertops for a Luxe IKEA Island

I’m thinking through luxe countertop upgrades that make an IKEA island feel custom without breaking the bank.
I’ll weigh materials, from durable surfaces to statement edges, and share practical installation tips you can actually use.
Let’s kickoff with a crisp plan for choosing materials, matching it to your island base, and getting a pro finish that lasts. Additionally, selecting stylish and durable countertops can significantly enhance the overall aesthetic and functionality of your kitchen remodel.
Luxe Countertop Upgrades
When you’re upgrading an IKEA island, the countertop is where the magic happens, so I’m choosing materials that fuse durability with drama.
I favor quartz for low maintenance and consistent veining, or ultra-thin granite for luxe heft without bulk.
Concrete? bold, industrial, but sealant-dependent.
Holz—that’s wood-look—adds warmth without shouting.
Seamless edges keep the surface calm and premium. Additionally, selecting top luxury countertops can elevate both performance and aesthetics, ensuring your kitchen island stands out.
Materials For Island
Let’s pick countertops that keep up with the Luxe IKEA vibe without turning the island into a maintenance maze.
I choose durable surfaces that resist stains, scratches, and heat, yet look refined.
Quartz, compact laminates, or honed marble tones keep lines clean and timeless.
Practical, affordable upgrades beat showy gimmicks, delivering a luxe feel without daily upkeep or drama. Additionally, consider selecting trendy colors for cabinets that complement your countertop choice for a cohesive and stylish look.
Installation Tips First
Clock in on the countertop upgrade by tackling installation tips first, because a flawless fit makes every Luxe IKEA island sing.
I’m guiding you with practical precision, no fluff, just results. Let’s lock it in smoothly.
- Measure twice, cut once for exact edges.
- Use painter’s tape to protect surfaces during fitting.
- Seal seams and edges with a quality, color-matched caulk.
Dress the Base With Stylish Legs and Hardware

I love choosing legs and hardware that do more than support the sink of a joke—they set the whole vibe. The right legs can morph a plain base into a staggeringly stylish foundation, and thoughtful hardware matters as the final, gleaming punctuation. Let’s explore how small details elevate steadfast function into high-design appeal. Moreover, easy hardware swaps can add a touch of sophistication that transforms your kitchen island into a statement piece.
Stylish Legs Impact
Even small changes can lift the whole look, so start at the base with stylish legs and hardware that echo your kitchen’s personality.
I notice how slender profiles, brushed metal, or warm wood can transform the vibe without overhauling the core. In fact, using cabinet colors that evoke a sense of luxury can enhance the overall aesthetic of your kitchen.
Here are three impact ideas:
- Choose leg silhouette to mirror island style
- Contrast finishes for depth
- Subtle hardware echoes faucets and pulls
Hardware Details Matter
Hardware details matter, and that means pairing the right hardware with those stylish legs to knit the base into the room.
I choose handles that echo the island’s lines, soft-close hinges, and subtle finishes. The result isn’t flashy; it’s cohesive.
I keep gaps tight, screws level, and celebrate texture—matte brass, charcoal steel—so function and style never fight. Mastering kitchen cabinet organization can also enhance the overall aesthetic and functionality of your space.
Conceal Storage With Custom-Front Panels

Conceal storage with custom-front panels by turning plain frontages into a design feature you’ll actually want to show off.
I swap bland doors for panels in a finish that echoes your kitchen’s vibe, hiding clutter with style.
- Pick a panel style that reads as intentional design
- Align grain and color with countertops and cabinetry
- Use soft-close hardware to keep everything pristine
Incorporating durable backsplash materials can further enhance your kitchen’s aesthetic and increase your home’s value.
Light It Right: Smart Lighting for the Island

We’ll start with a layered ambient glow that smooths every corner of the island and makes prep feel like a mood setter, not a glare show. I’ll show you how dimmer-driven ambiance control lets you switch from bright, task-ready light to cozy evenings without reaching for the knobs—or the sunglasses. And when you actually prep, we’ll tag in task lighting that stays focused where your knives and cutting boards live, keeping the workflow sharp and stylish. Consider incorporating kitchen pendant lights to elevate the aesthetic and functionality of your space.
Layered Ambient Glow
Layered ambient glow isn’t just pretty—it’s practical.
I’ll show you how layering light elevates prep, dining, and mood without clutter or glare. You’ll feel the polish in every task.
- Layer task lighting under cabinets to illuminate prep zones precisely.
- Add warm ceiling highlights for ambience without overpowering the room.
- Use accent LEDs along the island edge to define space elegantly.
In addition, ideal task lighting placement can greatly enhance your kitchen’s functionality and aesthetics.
Dimmer-Driven Ambiance Control
Dimmer-driven ambiance is where smart lighting stops being fancy and starts solving problems.
I tune the island with a touch, dialing brightness for coffee in the morning and dinner in the evening without a second thought. No glare, no fuss—just mood with purpose.
Your space stays polished, efficient, and effortlessly welcoming, because rhythm matters more than excess.
Task Lighting For Prep
Task lighting for prep isn’t an afterthought—it’s the main event. I’m not dimming this down; I’m dialing it in with smart, crisp radiance that follows your whisk and knife.
Light both function and mood, without glare.
- Highlight workflow: map shadows, place fixtures for even coverage.
- Color accuracy matters: neutral white avoids recipe distortions.
- Dim smartly: presets for prep, plating, and cleanup.
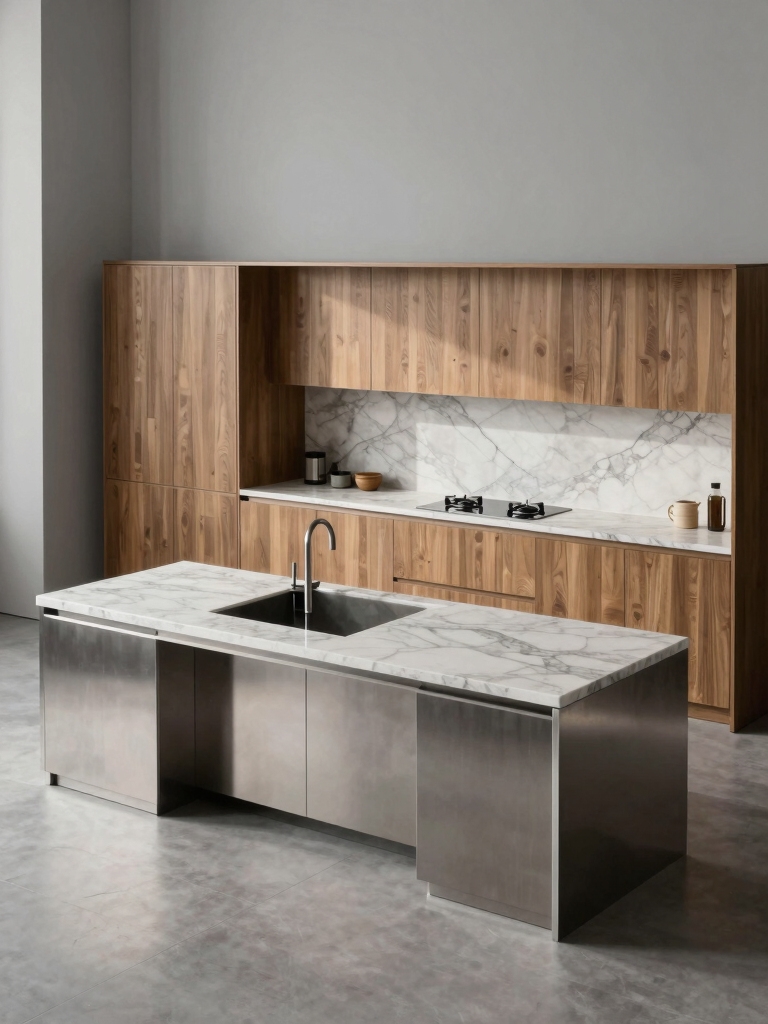
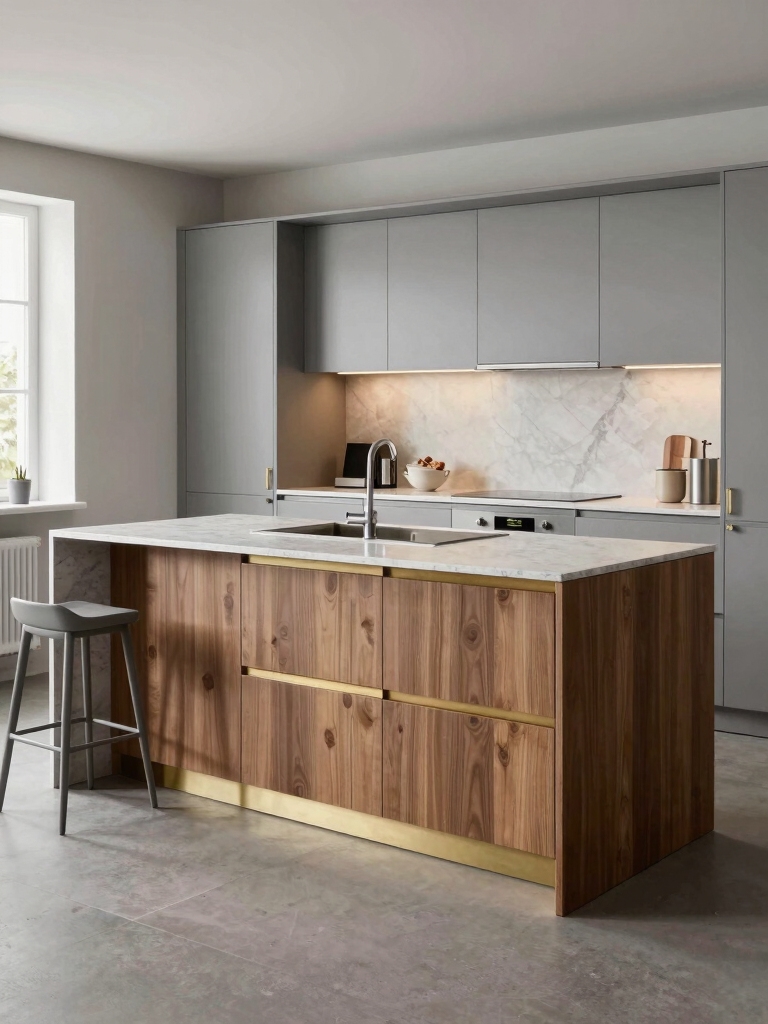
Add Luxe Textures: Wood, Marble, and Metallics
When you mix wood, marble, and metallic accents, your kitchen island instantly gains texture and personality.
I love pairing a live-edge timber with a honed marble slab, then punch it up with brass pulls or copper fixtures.
This combo reads luxe, stays durable, and wears gracefully.
Keep scale balanced, protect surfaces, and enjoy the tactile, polished contrast.
Organize Like a Pro: Smart Setups for Clutter-Free Zones
Organizing a kitchen island isn’t about piling gadgets into drawers; it’s about smart setups that keep essentials within reach while banishing clutter with intention.
I teach you to think in zones, not chaos, so every tool earns its place—and looks right doing it.
- Use labeled trays for quick grab-and-go items
- Install dividers to corral gadgets by function
- Put daily-use items within arm’s reach, seasonal items tucked away
Create a Seating-Forward Island for Social Kitchens
A seating-forward island isn’t an afterthought; it’s the social hub that makes your kitchen hum.
I design bench-height counters, slim overhangs, and smart stools for vibes that invite chat without crowding prep.
Keep sightlines open, maximize unobstructed movement, and tuck essential apps nearby.
A polished, practical centerpiece blends form with function, turning meals into easy, stylish everyday gatherings.
Use Color Theory to Punch up the IKEA Island
Color theory isn’t a gimmick here—it’s your IKEA island’s design compass.
I’ll show you how color signals function, mood, and flow, so your space feels intentional, not accidental.
Ready to elevate without new cabinetry?
- Pair bold accents with neutrals to ground the look
- Use analogous hues for calm, cohesive vibes
- Add a metallic pop for polish and personality
Hide Appliances and Cables With Paneling and Covers
We’ve set a bold color course, now let’s bring that cohesion down to the surfaces you actually see and touch: hiding appliances and cables with paneling and covers.
I sneaky-sleight-of-hand kept cords tucked behind slim panels, and appliances vanish behind veneer that matches, not clashes.
It looks seamless, feels tidy, and keeps the island’s vibe elevated—without shouting, “look, tech!”
DIY Paneling and Edge Details to Add Depth
Ever wonder how to give your island depth without adding bulk?
I’ll show you DIY paneling and edge details that read high-end without the price tag. Subtle bevels, mock-frame panels, and T-molding create depth you can feel.
It’s craft meets polish, with practical tweaks you can actually finish.
- bevel edges for shadow
- faux frame panels for weight
- contrasting trim to carve lines
Mix Metals and Finishes for a Curated Look
Mixing metals and finishes isn’t chaos; it’s choreography for your kitchen.
I pair matte brass with brushed steel accents, then temper the look with a satin charcoal countertop.
Keep scale in check: one gleaming piece, one muted, and one texture’d contrast.
Remember lighting, reflections, and cohesion over trend-chasing.
The result: a curated, confident space that feels intentionally designed.
Maintenance Tips to Keep the High-End Illusion Lasting
Pulling off that high-end illusion isn’t a one-and-done gig; it’s about keeping the gleam disciplined as you live with it.
I share simple, durable habits that protect polish without fuss.
- Wipe spills promptly with a soft cloth and mild cleaner.
- Seal wood surfaces yearly, avoiding harsh detergents.
- Dust and inspect hardware weekly, tightening screws as needed.
Conclusion
You’re not just buying an IKEA island; you’re crafting a dream on a budget that somehow feels priceless. With a few smart swaps and sleek details, I’ve turned flat-pack into high-end theater—without selling a kidney or the cat’s favorite chair. Trust me: those hidden panels, those perfect legs, that whisper of brass, all scream “luxury,” while politely winking at your wallet. Follow the steps, stay clever, and watch your space become the ultimate, impeccably styled stage for every meal.