I’ve scouted 20 island setups that put cooktops center stage for gourmet results, from blazing gas to precise induction. I favor hybrids that blend prep zones with smart storage, and I obsess over ventilation that stays quiet and clean-lined. Think ergonomic zones—prep, cook, plate—flowing around a 42-inch clearance and a social seating 30 inches out. Want layouts that keep tasks seamless and conversations flowing? Keep going and you’ll pick up pro tips you can actually use.
Decide Your Island Cooktop: Gas vs. Induction

Choosing between gas and induction for your island cooktop isn’t just a spec sheet decision—it’s how you’ll cook most days.
I’ll keep it tight: gas offers instant heat and pot-sauté drama, while induction delivers precise control and easier cleanup. Additionally, many high-end kitchens now feature unique island designs that seamlessly integrate these cooktop options.
My read? Pick based on how you actually cook, not just what looks cool on a brochure.
Your kitchen, your rhythm.
When to Use Hybrid Island Configurations

When should you go hybrid on an island? I say when you crave flexibility without clutter.
A hybrid island blends gas or induction with a prep zone, extra storage, and seating that invites conversation.
Use it when you host often, design constraints push either fuel type, or you want workflow that shifts from chef’s station to casual chat.
Incorporating a hybrid island can also enhance your home’s value, as modern kitchen designs are highly sought after by potential buyers.
Practical, stylish, seamless.
Ventilation Essentials for Island Setups

Ventilation isn’t the flashy part of an island, but it’s the foundation you can’t ignore.
I design with clean lines and quiet efficiency, prioritizing hood performance, proper clearance, and balanced airflow.
Think duct placement that hides in plain sight, minimal noise, and easy maintenance.
With smart sizing, you keep cooking aromas focused, not drifting into dining.
Clarity matters; your kitchen breathes easier.
Incorporating smart layout tips can significantly enhance the overall functionality and flow of your kitchen space.
Downdraft vs External Vents: Pros and Cons

Downdraft systems pull smoke and steam right at the cooktop, while external vents pull from above and push outdoors; both aim to keep your island clean, but they do so in different ways.
I’ll cut to the chase: downdraft saves ceiling space and pairs with sleek lines, yet weaker capture.
External vents excel at odor control but demand cabinet height and noise tolerance.
Choose based on airflow, aesthetics, and kitchen rhythm. Additionally, consider how kitchen hood designs can influence the overall look and functionality of your space.
Ergonomic Zones on the Island: Prep, Cook, Plate

If you want an island that flows as smoothly as your prep, set up three ergonomic zones—prep, cook, and plate—like a well-choreographed kitchen dance.
I’ll map how to keep moves tight, reduce steps, and maintain focus, so every bite lands perfectly.
- Zone triad layout for efficiency
- Clear traffic paths and clearance
- Prep surfaces aligned to sinks
- Cook area with unobstructed reach
- Plate zone near serving utensils
Incorporating island configurations for any floor plan can enhance the overall functionality and aesthetics of your kitchen.
High-BTU Performance: Searing and Wok Cooking on an Island
Searing and wok work on an island demands heat you can feel in your bones—and a layout that keeps flames and flavors in the same orbit.
I prioritize high-BTU burners that deliver fast response, wide seating clearance, and robust ventilation.
You’ll get blistering sear marks, controlled wok tosses, and a kitchen rhythm that stays focused, not fussy.
Efficiency meets explosive flavor. Additionally, an optimal kitchen island design includes kitchen island layouts that cater specifically to serious culinary enthusiasts.
Precise Induction Control: Simmer to Boil on Command
Imagine how I can shift from a gentle simmer to a vigorous boil with a tap of the dial, thanks to precise temp modulation and rapid heat response. I’ll tune every bubble and sizzle in real time, so you get consistent results without overthinking it. With next-gen kitchen tech, you can elevate your cooking experience while enjoying the convenience of modern gadgets. Ready to explore how exact control changes everything on a kitchen island?
Precise Temp Modulation
Precise temp modulation is where induction truly shines: I can nudge the heat from a gentle simmer to a vigorous boil with exact, repeatable control. I’ll keep it tight, purposeful, and fun.
- Consistent low simmer for sauces
- Instant jump to rolling boil when needed
- Fine-tuned sauté without scorching
- Quick return to steady medium
- Predictable, repeatable results every time
Rapid Heat Response
Rapid heat response is the heart of precise induction control: I can swing from a gentle simmer to a vigorous boil on command, with no lag and no drama.
You’ll notice the instant feedback, the steady, predictable burner behavior, and the confidence to adjust on a dime.
It’s efficient, tactile cooking that keeps timing predictable and meals perfectly plated. Additionally, this technology enhances kitchen remodel must haves that you may not have considered before.
Layouts That Maximize Workflow and Socializing
When you’re designing a kitchen island, flow matters as much as form, so layouts that prioritize workflow and socializing keep cooks and guests in one easy orbit.
I’m sharing practical cues that blend function with fun, without fluff.
- Create clear work zones that minimize steps
- Position seating to foster conversation, not crowding
- Align appliances for smooth transfer and prep
- Use parallel counters for timed multitasking
- Include clutter-free surfaces and smart storage moves
In addition, consider how small kitchen layout ideas can help you maximize every inch of your space while maintaining an inviting atmosphere.
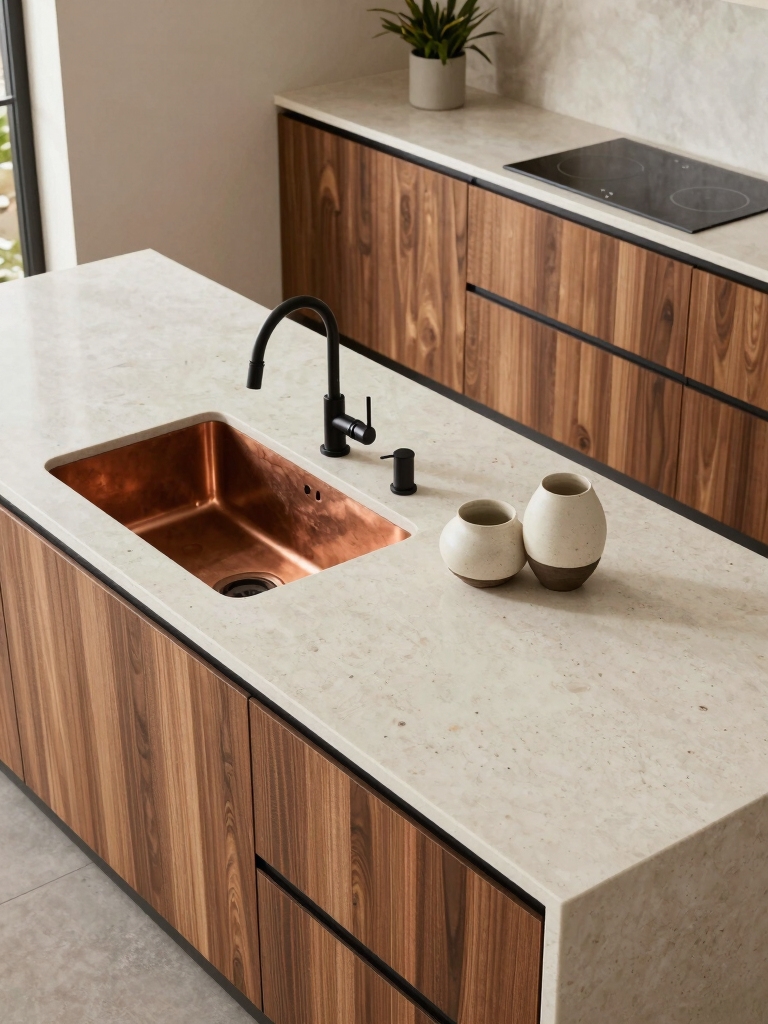
Integrated Prep Sinks and Waste Stations for Flow
Integrated prep sinks and waste stations keep your island honest and tidy, so you can rinse, chop, and tuck scraps away without chasing a trail of dishes. I love how these stations streamline cleanup, reduce trips, and boost morale during dinner rushes. With thoughtful layout, you’ll glide from prep to plating, minimizing clutter and maximizing flow for that gourmet edge. Additionally, sink in island kitchen placements enhance your daily workflow, ensuring everything you need is within reach.
Under-Cooktop Storage: Tools, Pans, and Accessories
Under-cooktop storage isn’t just about tucking away gadgets; it’s about having the right tools within arm’s reach.
I keep pans, tongs, and heatproof mats organized so sauces don’t stall. Sharp knives ride in a magnetic strip, measuring spoons nest beside a compact whisk, and a compact trivet stands ready for simmering pots.
- Magnetic knife strip
- Heatproof mats
- Compact whisk
- Measuring spoons
- Trivet
Countertop Materials That Stand Up to Heat
When we talk heat-ready countertops, I’ll spotlight heat-resistant surfaces that keep their cool, even near a blazing burner.
I’ll guide you through a quick durability check and a practical maintenance plan so everyday use stays smooth.
Stick with me as we map out materials that endure, stay stylish, and stay easy to care for.
Heat-Resistant Surfaces
Heat-resistant countertops matter more than you’d think.
I’m sharing surfaces that survive heat without sighing, so you don’t have to relocate your pot mid-sizzle.
You’ll notice why certain materials shine, while others crumble under pressure.
Here are standout options you can trust on a gourmet island:
- Material A stays cool to the touch
- Material B resists scorching marks
- Material C handles rapid temp changes
- Material D cleans easily
- Material E pairs with any backsplash
Material Durability Guide
If you’ve read about heat-resistant surfaces, you’re probably wondering which countertop materials actually stand up to the grind of a busy island cooktop. I’m right there with you.
In short, stainless steel resists heat but shows fingerprints; quartz stays calm but isn’t invincible; granite handles high temps yet rewards sealing; ceramic is tough but delicate around edges.
Pick smart, live comfortably.
Everyday Maintenance Tips
Staying on top of maintenance means knowing which countertop materials shrug off heat—and which want a little extra care.
I’ll guide you with practical, hot-tested tips so your surface stays sharp, not scorched. Let’s keep it simple, stylish, and stain-free.
- Chip-resistant choices for daily use
- Gentle cleansers, not harsh abrasives
- Protector pads for pans and gadgets
- Immediate spill action, minimal staining
- Routine sealant checks, seasonal care
Integrated Lighting for Heat Zones and Plating
Integrated lighting over heat zones and plating isn’t just about looks—it’s about precision.
I position LEDs to illuminate simmered sauces and seared finishes, so shadows don’t hide mistakes. Clear, warm glow helps timing and plating decisions, from dusk-to-dinner.
I avoid glare on glossy surfaces, prioritizing even coverage. You’ll notice faster line-of-sight tweaks and crisper presentation, every night.
Tool Access: Pull-Out Organizers and Hooks on the Island
Pull-out organizers and hooks on the island aren’t just clever space savers—they’re instant workflow upgrades.
I reach, I grab, I chop, I seal—without chasing gadgets across the kitchen. Your prep becomes a rhythm, not a rummage.
Here’s how it shines:
- Quick-access utensils near heat zones
- Magnetic ranges for knives and small tools
- Sliding spice drawers for flavor bursts
- Towel hooks for cleanup calm
- Detachable bins for waste sorting
Cleaning and Sanitation: Sealed-Back Islands
I’m curious how sealed surfaces make spill-proof storage feel almost effortless, from everyday messes to big cleanup moments.
We’ll skim through sealed surface maintenance, smart spill-proof storage, and hygienic cleaning protocols so you can keep that island pristine without a fuss.
If you’ve got a favorite wipe or spray combo, I’m all ears to compare notes.
Sealed Surface Maintenance
Sealed surfaces on back islands keep spills from seeping in, so daily cleaning is quick and painless.
I show you a simple rhythm: wipe, rinse, dry, and move on. No grimy corners, no fuss.
Here are quick tips to keep that smooth finish pristine:
- Use mild cleaner and a soft cloth
- Avoid abrasive pads
- Wipe spills immediately
- Dry thoroughly
- Polish weekly
Spill-Proof Storage Solutions
If you’ve got a sealed-back island, you’ve already minimized messes on the surface—now it’s time to lock down what happens below.
I organize storage with spill-proof bins, removable liners, and labeled zones so every item returns to its nook.
I keep cleaning simple, stacking supplies in low-risk trays, and I test seals so leaks stay where they belong.
Hygienic Cleaning Protocols
A sealed-back island makes hygiene simpler, so I keep cleaning tight and predictable with a clear routine: sanitize high-touch surfaces first, then tackle tasks in a logical order so nothing gets forgotten.
I also document steps, use color-coded cloths, and store cleaners safely away from food.
- Pre-clean high-touch zones
- Debris removal before sanitizing
- Use separate cloths for food zones
- Rinse and air-dry
- Regular deep-clean schedule
Seatings That Keep the Team Engaged
Seatings that keep the team engaged aren’t about luck or fancy chairs—they’re about intention.
I design conversation-friendly zones where cooks share ideas between tasks, not chatter gaps. Round, nonblocking setups invite eye contact and quick feedback, while adjustable stools respect standing prep.
We rotate seats to spark fresh perspectives, invite questions, and preserve focus—because momentum thrives when every teammate feels heard and valued.
Smart Controls for Heat Management and Monitoring
Smart controls for heat management and monitoring turn a kitchen island into a listening partner rather than a noisy hotspot.
I talk through precision taps, timers, and smart alerts that nudge you toward perfect sears without guesswork. You stay in control, with fewer flare-ups and cleaner pragmatism.
- Real-time temp syncing with cookware
- Auto-sensor adjustments for simmering
- Voice- or app-ready heat alerts
- Zoned heat distribution for multitasking
- Maintenance reminders that actually help
Real-World Island Layouts: 10 Pro-Grade Plans
You’ll get a real-world feel for how 10 pro-grade island layouts actually perform in busy kitchens.
I’ll walk you through practical spacing, traffic flow, and workflow tweaks that make every cook’s life easier.
Let’s explore these layouts and sharpen our eye for smart, no-fluff design.
Pro-Grade Layouts
When you’re choosing a pro-grade island layout, real-world practicality usually beats flashy theory, and these 10 plans prove it.
I’m sharing crisp, usable configurations that prioritize flow, prep zones, and safe navigation. No fluff—just layout logic you can actually implement today.
- Clear prep triangle first, then cook zone
- Seating tucked without crowding work zones
- Hidden appliance alcoves for clean lines
- Breakfast bar that doesn’t steal workflow
- Power, plumbing, and ventilation aligned first
Real-World Islanding Plans
Real-world island layouts aren’t about fancy theory as much as practical, on-the-ground usability.
I’ve tested ten pro-grade plans, translating them into cookproof realities you can actually build. You’ll see work zones, flow, and venting baked into every layout.
I’ll call out pitfalls, clever shortcuts, and sane compromises, so your island stays stylish without turning into a kitchen maze.
Ready to choose confidently?
Budget-Friendly Pathways to Pro-Grade Islands
Sure, you can get a pro-grade island without blowing your budget, and it starts with smart choices over flashy gimmicks.
I’ll show practical steps, not hype, so you can cook like a pro without debt.
- Prioritize durable, mid-range materials with clean lines
- Buy modular components you can adapt later
- Use under-counter outlets and smart plugs
- Refinish instead of replace for updates
- Source secondhand hardware, fixtures, and burners
How to Measure Your Space for a Gourmet Island
I’ll walk you through the essential steps to measure a gourmet island, starting with clearances for comfortable movement.
I’ll share a quick tools list and show how to map out your space so you don’t miss any critical measurements.
Together we’ll apply space planning rules that keep your island both functional and fabulous.
Clearance for Movement
Clearance around a gourmet island isn’t an afterthought—it’s the exhale of your kitchen flow.
I design for smooth movement, not cramped choreography, so you glide between sink, cooktop, and seating without bumping elbows. Measure clearances early, then optimize.
Here are quick checks:
- Island to wall: minimum 42″ (1.07 m)
- Walkway turns: 48″ (1.22 m)
- Seating clearance: 30″ (76 cm)
- Appliance swing: 24″ (61 cm)
- Door opening: clear path during prep
Measurement Tools List
To measure a gourmet island space, you’ll want a simple toolkit and a plan.
I grab a steel tape, a laser measure, a pencil, and graph paper, then map walls, clearances, and appliance footprints.
I mark door swings and seat zones, double-checking measurements against spec sheets.
Precision saves you trips, and keeps your setup beautifully, practically operable.
Space Planning Rules
Now that you’ve got the measurement toolkit in hand, let’s translate those numbers into a smart layout for your gourmet island.
I’ll help you plan clearance, traffic flow, and appliance spacing so prep, cooking, and cleanup don’t collide. Precision beats guesswork, and careful planning prevents wasted space and awkward moves. You’ll enjoy a kitchen that actually works.
- Clearance minimums and sightlines
- Work triangle awareness
- Appliance spacing for safety
- Island seating and clearance
- Future-proofing for upgrades
Real-World Island Inspirations: 20 Must-See Setups
Kicking off with 20 real-world island setups, this collection distills practical flair from kitchens that actually work, not just look good.
I’m sharing setups you can borrow, tweak, or ignore, with honest notes on flow, prep zones, and cooktop access.
You’ll hear what succeeded, what didn’t, and why small shifts yield big results—no fluff, just useful, chef-friendly ideas.
Conclusion
Imagine this: you, a chef-in-residence, commanding a sleek island that makes mis en place feel like magic. Did you know that 68% of home cooks report faster meal prep with a well-placed island? True story: smart zones, snappy ventilation, and a hybrid cooktop—plus a dash of humor—can turn chaos into choreography. I’ll keep the countertop confidence high and the ego low, so your kitchen feels like a pro’s stage—without the apron-string drama. Let’s cook up brilliance.