I’ve pared my kitchen to warm woods, matte ceramics, and one purposeful vignette so every shoot feels cozy and calm. I keep counters clear, stash props in labeled jars, and use soft morning light plus a compact LED for consistent warmth.
Rugs, linen curtains, and a small shotgun mic tame echo and noise. A fast prime, tripod, and neat cable tape save time. Stick around and I’ll share my step‑by‑step setup and styling tips.
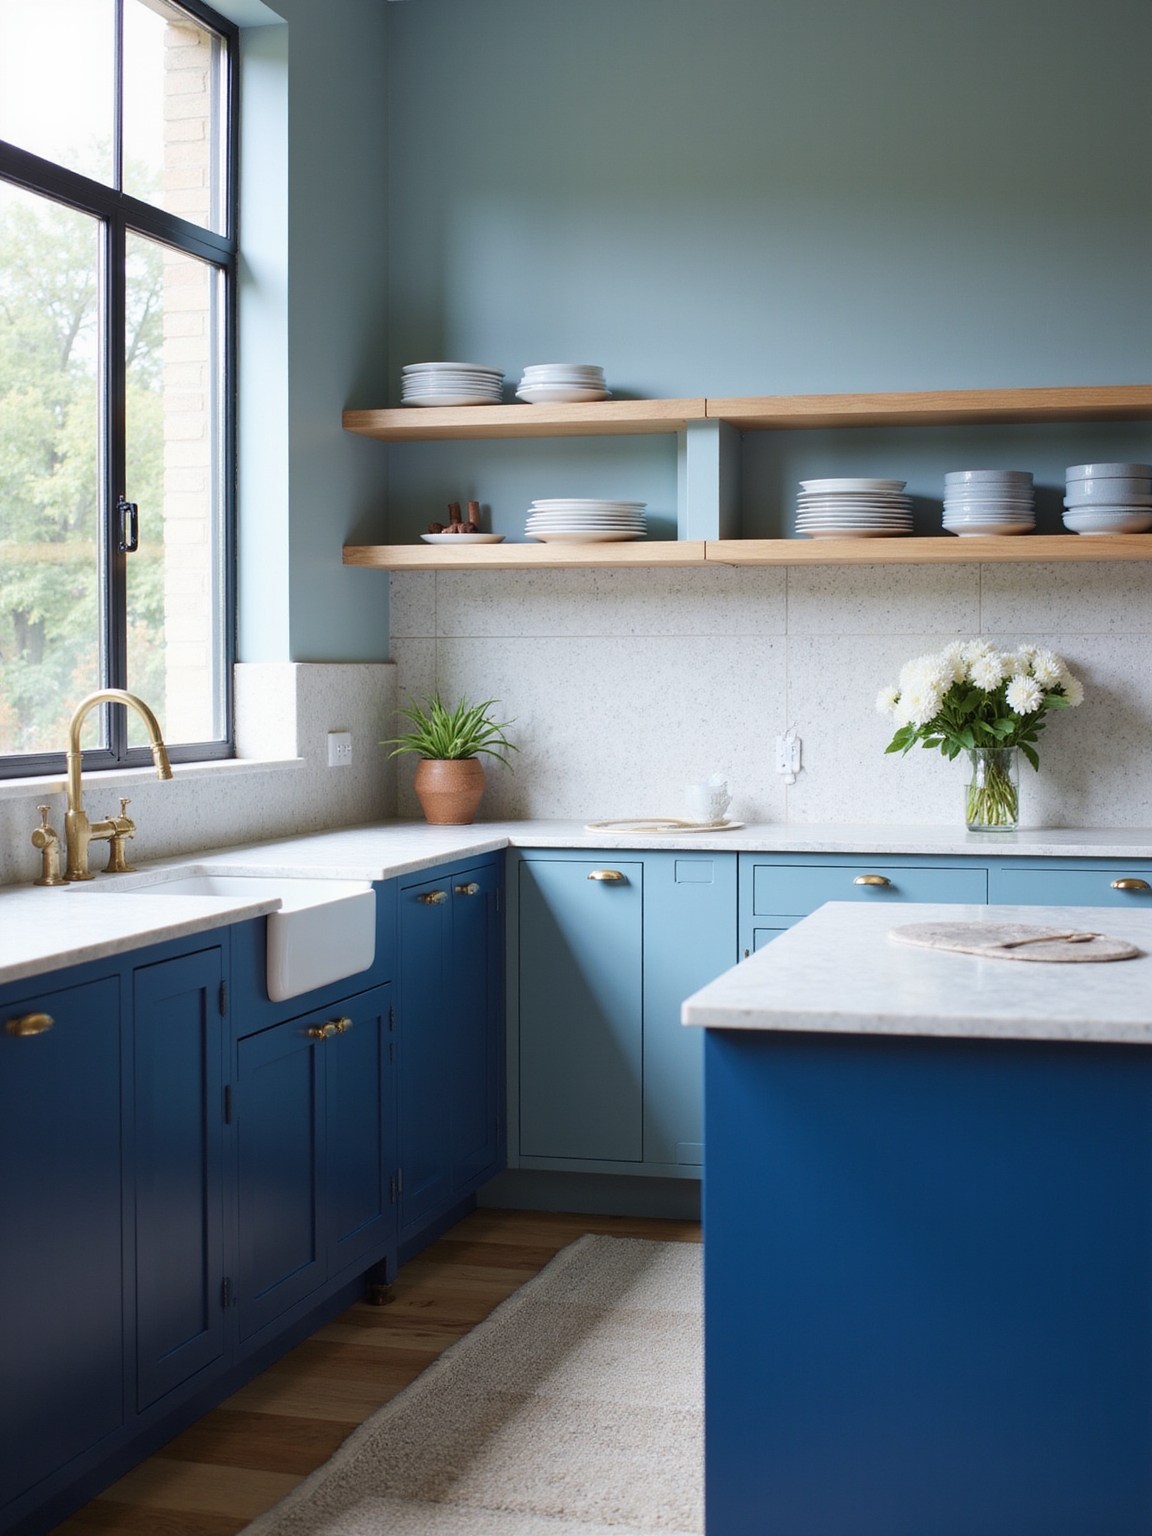
Quick Checklist: Get Your Kitchen Camera‑Ready in 10 Minutes

Let’s get your kitchen camera-ready in ten minutes—I’ll walk you through a fast, practical checklist so your space looks warm and lived-in without feeling staged.
I’ll clear clutter, wipe counters, and arrange one rustic bowl of fruit. I’ll layer a textured tea towel, light a candle, and set one prop plate.
Soft light, tidy surfaces, and a single focal point.
Use smart storage to keep countertops clear and maintain that polished look.
Set Content Goals: Video, Photos, Livestreams, or Hybrid

I like to start by choosing the format that fits the story—short recipe videos, styled photos, cozy livestreams, or a mix of them.
Then I set a realistic posting rhythm so my kitchen stays present without burning me out. Tell me which format feels most doable and we’ll map a schedule around it.
Layered lighting helps create the right mood and improves visual quality for each format by combining ambient, task, and accent lights to flatter subjects and surfaces; see layered lighting for ideas.
Define Your Content Format
Why choose one format when your kitchen could tell stories in several ways? I decide based on mood and message: quick, sunlit photos for quiet recipes; short videos for technique; livestreams for cozy, live chats.
I blend formats—still images to anchor, motion to teach, live to connect—so each piece feels intentional, rustic, and true to the vibe I want to share.
I also lean into chic neutral styling to create a timeless backdrop that complements every content type.
Set Clear Posting Frequency
Often I post rhythmically—three short videos, two photo sets, and one livestream a week—because having a clear cadence keeps my kitchen content honest and manageable.
I plan formats ahead, balance quick reels with lingering photos, and reserve Sundays for live chats.
That steady promise lightens creative pressure, helps followers know what to expect, and roots my content in a comforting, dependable rhythm.
Consistent daily habits like regular cleaning and simple storage systems support an organized space and reduce setup time for shoots, reinforcing the value of everyday ways to keep your kitchen neat.
Choose a Camera‑Friendly Kitchen Color Palette

Color matters more than people realize, and I pick hues with the camera in mind so your food and props look their best.
I favor muted earth tones, soft creams, and deep forest accents that flatter skin and ingredients without stealing focus.
Contrast for pop—think matte terracotta bowls on sage counters—and keep finishes low‑glare so textures sing and compositions stay cozy and timeless.
Designers often recommend building palettes around a core of neutrals with one or two accent colors to ensure cohesion and flexibility; see core neutrals.
Optimize Kitchen Lighting: Natural and Artificial Setups

When I set up lighting for a shoot, I treat it like seasoning—too little and the scene tastes flat, too much and it overpowers the ingredients.
I lean into soft morning light, diffuse harsh sun with linen curtains, and add warm practicals—under‑cabinet LEDs, pendant bulbs with dimmers.
Balanced layers keep textures honest, skin tones cozy, and the kitchen feeling lived‑in, calm, and camera‑ready.
I position task lighting over prep areas following recommendations for task lighting placement to ensure work surfaces are evenly lit without casting harsh shadows.
Fix Audio: Soundproofing and Ambient Noise Solutions

I’ve learned that a quiet kitchen makes your content feel more cozy and professional, so I start by cutting down background noise—closing windows, running quiet appliances, or recording at calmer times.
I also treat hard surfaces with rugs, curtains, and simple foam panels to tame echoes without ruining the room’s charm. Let’s look at easy, affordable tweaks that keep the space looking warm while sounding crisp.
High-quality area rugs can add texture to your kitchen floor while also helping reduce sound reflection with textured rugs.
Reduce Background Noise
Let’s tackle background noise so your kitchen videos sound as cozy as they look: I’ll show practical, low-cost ways to quiet the room, block outside sounds, and manage constant hums like refrigerators or street traffic.
I swap noisy appliances to off-camera, use simple draft stoppers on doors, record during quiet times, and place rugs or heavy curtains to soften persistent rumbles. I also hide larger machines in discreet storage to reduce appliance noise and clutter.
Treat Room Surfaces
You’ve already cut down on obvious noise; now I’ll focus on the surfaces that shape the sound itself. I favor natural textures and simple fixes to tame echoes without losing charm.
- Hang woven rugs or tapestries to absorb mid and high frequencies.
- Add felt pads or cork under cabinets to reduce slap reflections.
- Place potted plants for gentle diffusion and a cozy look.
Design a Filming Layout: Sightlines, Workflow, and Zones
When I map out a filming layout, I treat the kitchen like a stage where sightlines, workflow, and zones all have to play together harmoniously; that means placing the camera to capture clear action, arranging prep and cooking areas so I don’t cross into the frame, and zoning storage and props for quick reach.
I favor simple, rustic sightlines, logical flow between stations, and cozy, reachable zones for effortless filming.
Place Gear and Power for Tidy, Safe Kitchen Shoots
I tuck cables out of sight and keep gear within easy reach so shoots run smoothly and the kitchen stays safe. I favor simple solutions that look cozy and keep hazards away.
- Use cloth tape and cord covers along baseboards
- Position power strips under counters, labeled for quick shutoff
- Stash batteries and clamps in a wooden box near the prep zone
Pick Camera‑Friendly Backgrounds That Read on Screen
I pick backgrounds with a balanced color palette so the scene feels calm and my subject doesn’t get lost against loud hues.
I also clear extra clutter and simplify visual layers so the camera reads each element cleanly. If you keep colors muted and surfaces uncluttered, your shots will look intentional and easy on the eye.
Balanced Color Palette
Harmony matters in frame-by-frame cooking content, so I choose backgrounds with a balanced palette that reads clearly on camera.
I favor muted tones, warm neutrals, and a single pop color to guide the eye without overpowering food or motion.
- muted terracotta, soft sage, warm cream
- one accent — deep navy or mustard
- avoid high-contrast patterns that fight the subject
Decluttered Visual Layers
Because clutter reads louder than flavor on camera, I keep layers simple so each shot feels calm and intentional.
I choose a neutral backsplash, one textured towel, and a single wooden bowl as focal points.
Soft natural light and shallow depth bring warmth without distraction. Viewers notice the food first; the background whispers charm, not competing noise.
Select Surfaces and Textures That Photograph Well
A good start is choosing surfaces and textures that catch light without stealing the show — I look for materials that add depth and story to a shot while staying understated.
I favor tactile, muted elements that photograph true to life:
- Reclaimed wood counters for warmth and grain
- Matte ceramic backsplashes to soften highlights
- Linen or cotton linens for gentle movement and scale
Declutter: Camera‑Forward Storage and Staging Zones
When I’m shooting, I clear the visual clutter so the camera sees exactly what I want it to — that means creating camera‑forward storage and simple staging zones that make every frame read clean and intentional.
I tuck gadgets into warm wood drawers, label jars for quick swaps, and leave one countertop vignette for storytelling. Clear zones speed setups and keep shots cozy, honest, and focused.
Build a Compact Kitchen Filming Kit (Must‑Haves)
Start with essentials I can carry in one hand: a reliable camera, a fast prime lens, compact LED panel, and a small shotgun mic.
I keep things simple, practical, and cozy so I can shoot quickly between recipes.
- Small tripod or tabletop gorilla pod
- Spare batteries and fast SD cards
- Lightweight reflector or diffuser
This kit feels like home and moves with me.
Style Props and Pantry Items for On‑Brand Flatlays
Since my kit stays compact and mobile, I like to keep a small stash of props and pantry items ready for quick on-brand flatlays. I choose linen napkins, wooden spoons, ceramic bowls, twine, and amber jars.
Dried herbs, whole spices, and citrus add color and texture. Each piece tells a simple, cozy story so setups feel intentional without fuss.
Cheap DIY Upgrades With Big Visual Payoff
I swap out little things that make a big difference — a strip of peel-and-stick tile behind the stove, a fresh coat of milk-paint on a thrifted cutting board, or a hastily nailed shelf from reclaimed wood — and suddenly the whole scene reads cleaner and cozier.
- Paint old knobs in matte brass
- Add woven baskets for clutter
- Layer a neutral runner for warmth
Do Quick Color Checks and Simple Grading Tips
After swapping knobs and laying a runner, you’ll notice how color shifts can make or break that cozy look on camera.
I do quick checks with a neutral card and warm bulbs, then nudge white balance and contrast lightly.
I favor gentle saturation boosts for wood tones and muted highlights to keep things homey, consistent, and ready for a quick shoot.
Troubleshooting: Glare, Reflections, Clutter, and Sound
I’ve learned that a few simple tweaks can tame window glare and keep shiny surfaces from stealing the shot.
I’ll show you how to use curtains, diffusion, and angling to control reflections while keeping that cozy kitchen light.
Then we’ll cover quick fixes for echo and background noise so your voice sounds warm and clear.
Control Window Glare
On bright days, I move my setup and tweak curtains so window glare stops stealing detail from my shots and my eyes don’t strain.
I also use small, practical fixes that feel homey and simple:
- Angle reflectors or black foam to kill stray highlights.
- Thin linen panels to soften harsh light.
- Matte backdrops to prevent shiny reflections.
Minimize Echo & Noise
Once the light’s behaving, sound becomes the next thing I check — kitchens echo and pick up every clatter, and that hollow reverb can ruin a cozy take.
I hang thick linens, place rugs, and stash noisy dishes away. A small portable mic and foam panel behind me tame reflections. Soft closing bins and felt pads on drawers make your space sound as warm as it looks.
Think of your kitchen as a well-loved recipe: a few simple, thoughtful ingredients — light, color, sound, and props — turn something ordinary into something memorable.
Tidy the counters, tweak the lighting, and sprinkle in on-brand details, and you’ll serve visuals that feel like home.
Keep testing, keep filming, and let the space evolve with your content. With these small, rustic touches, your kitchen becomes the cozy stage for every story you cook up.