I can transform your kitchen island with 19 hanging light options that balance task visibility, ambient glow, and distinctive style. I’ll help you pick fixtures that fit your ceiling height, island width, and color palette, then show you how to layer task, ambient, and accent lighting for a cohesive look. I’ll share placement tips, height guidelines, and budget tricks so the upgrade feels effortless. Keep going and you’ll uncover practical steps to nail the glow.
What Hanging Lights Can Do for Your Kitchen Island (Overview)

Hanging lights over a kitchen island do more than illuminate the space—they define it.
I’ll show you how they frame tasks, mood, and flow. When positioned thoughtfully, they guide conversations, highlight textures, and create intimacy or drama in seconds.
They also influence perceived height and room balance, so your island feels intentional, usable, and welcoming—without shouting décor.
Trust the impact. Kitchen pendant lights can transform the atmosphere and functionality of your space, enhancing both style and practicality.
How to Pick the Right Pendant Style

Choosing the right pendant style starts with your space and your vibe.
I consider ceiling height, color palette, and metal tones to guide my choice. If the ceiling is low, I favor compact shades; for high ceilings, statement pieces shine.
I balance scale with island size, and pick a finish that complements hardware. Simple, cohesive lighting feels polished and inviting. Additionally, incorporating kitchen lighting ideas can enhance the overall aesthetic and functionality of your space.
How Many Lights Do You Need Over the Island

I’ll share how many lights you actually need over your island, based on size, task lighting, and your preferred mood. In practice, think about island lighting rules that balance brightness with spacing, not just décor. Let’s explore how to determine the right count for your space and style. Additionally, consider incorporating elegant lighting schemes that enhance both functionality and aesthetic appeal in your kitchen.
How Many Lights
Determining how many lights you need over the island comes down to the size of the island and the brightness you want.
I consider the width and length, then balance task lighting with ambience. For most islands, three fixtures create even coverage without crowding.
If your space is narrow, two can suffice; for larger rooms, add a third or adjust fixture size. Additionally, consider investing in splurge-worthy pendant lights to enhance both functionality and style in your kitchen.
Island Lighting Rules
Island lighting rules are about balance: you want enough brightness for tasks without creating glare or clutter.
I guide you to judge length, ceiling height, and fixture size to decide how many lights. Use even spacing for comfort, adjust with dimmers, and prioritize task zones.
Here are tips to refine your setup:
- Measure island width and plan spacing
- Choose fixtures with comparable brightness
- Use dimmable bulbs for flexibility
- Align centers for symmetry
- Factor shadows on work surfaces
Incorporating unique island designs can also enhance the overall aesthetic and functionality of your kitchen space.
Measuring for a Perfect Fit Over the Island
I’ll start by checking the ceiling height, so I know how low the fixture can safely hang and still feel balanced.
Next, I measure the island width to choose a fixture span that covers the space without crowding the ends.
Finally, I plan the overall fixture span to create a cohesive look that aligns with both the island and surrounding cabinets. Additionally, incorporating layered lighting can enhance the overall ambience of the kitchen, making it both functional and inviting.
Measure Ceiling Height
To measure ceiling height for hanging lights over the island, start by grabbing a tape measure and a ladder to reach the highest point you’ll install the fixture.
I’ll guide you clearly, so you place the fixture at the right level, balancing aesthetics and function.
- choose consistent drop length
- account for fixture size
- measure from countertop to mount
- confirm clearance above island
- note overall room height
Determine Island Width
Determining the right width for your island is the first step to a balanced, functional fixture setup.
I’ll guide you to measure confidently: note the island length, desired light spread, and any overhangs or seating areas.
Aim for a centered chandelier or two fixtures, spaced evenly.
Consider room clearance and wall-to-island relationships for a clean, proportional look. To enhance your kitchen’s functionality, explore how island solutions can maximize workspace in your galley kitchen.
Plan Fixture Span
When planning the fixture span, start by matching the lighted area to the island’s width and seating layout so the glow feels balanced.
I measure, mark, and adjust until shadows soften and corners feel inviting, not crowded.
- align with seating rows
- account for pendant thickness
- choose consistent drop length
- consider dimmer compatibility
- test light pattern across center
In an open-plan kitchen, light placement strategy can greatly enhance the overall ambiance and functionality of the space.
Height Guidelines: Mounting for Tasks and Ambiance
Choosing the right height for hanging lights above your kitchen island balances task practicality with mood.
I consider chair clearance and countertop usability, aiming for bulbs roughly 28–34 inches above the surface for standard stools.
If you have pendant clusters, keep the longest piece at least 30 inches above.
Prioritize even distribution and glare-free illumination to support both prep and social moments. Additionally, selecting fixtures that complement your overall design can enhance modern kitchen aesthetics and create a cohesive look.
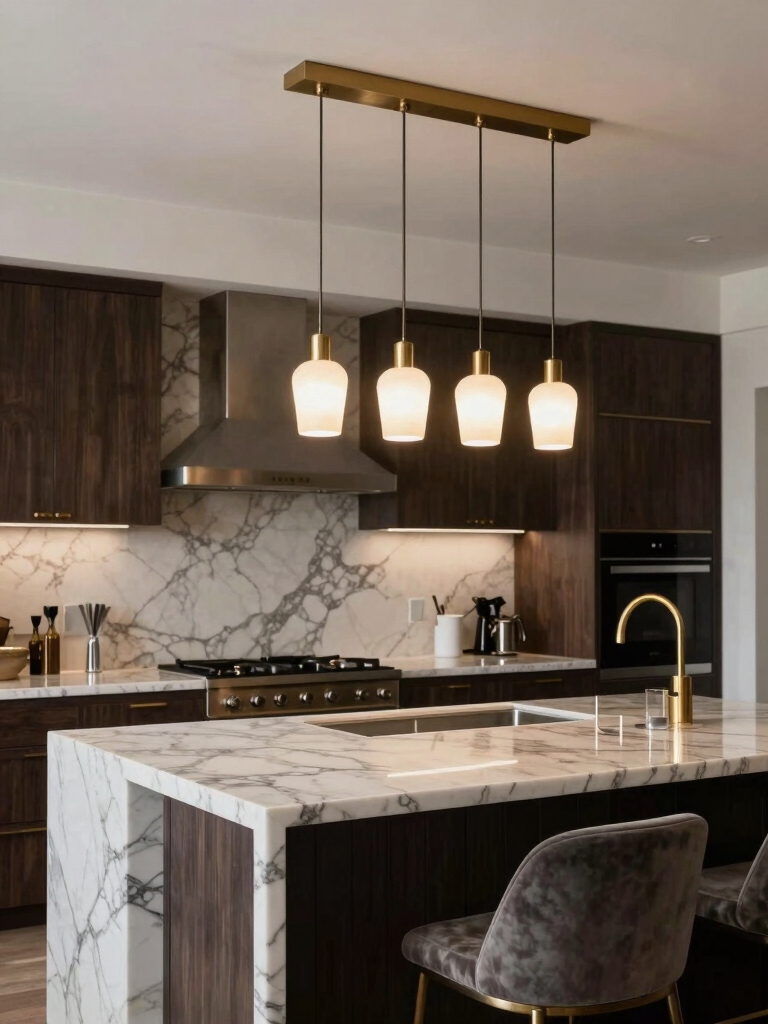
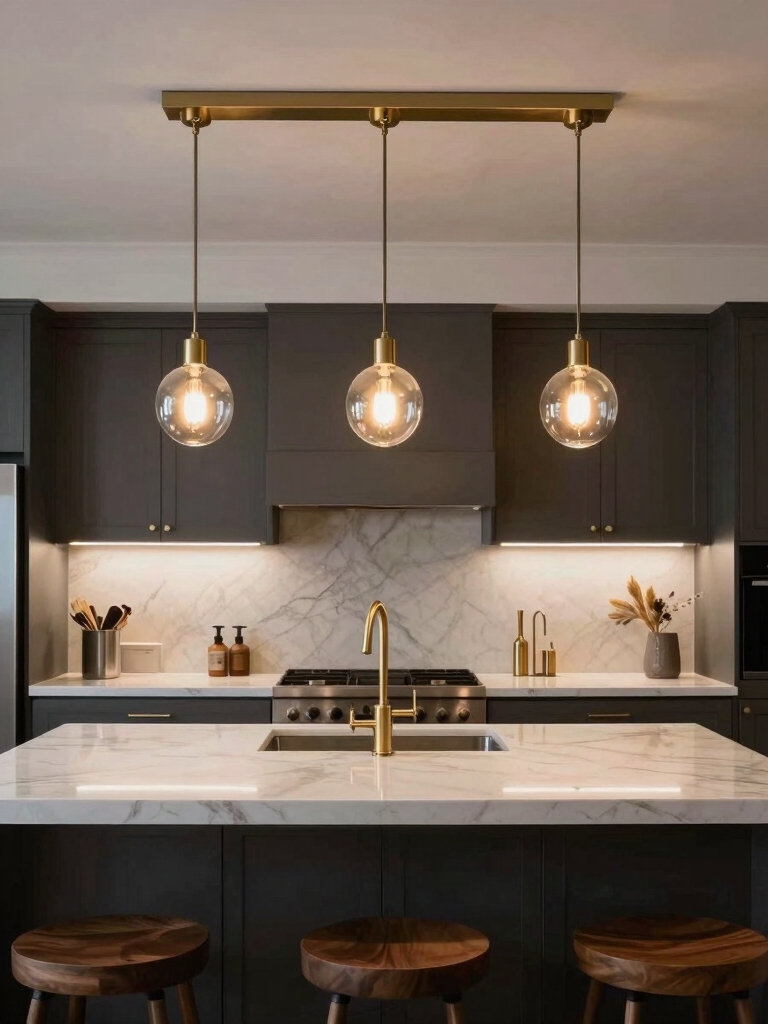
Mixing Pendants and Globes for a Cohesive Look
I like mixing pendants and globes to create a unified look that still feels personal.
I’ll show you how shape variety, balanced proportions, and thoughtful scale guide placement to keep the island cohesive.
Let’s explore practical tips that keep the overall rhythm steady without crowding or confusion. Additionally, incorporating trendy pendant lights can further enhance the aesthetic appeal of your kitchen island.
Mix of Shapes Unity
A cohesive kitchen island lighting scheme thrives on a deliberate mix of shapes.
I mix pendants and globes to create rhythm, not clutter, guiding the eye with varied silhouettes. The key is pairing scale and texture for unity, while letting each piece breathe.
- Vary heights to establish visual cadence
- Combine metal and glass finishes
- Alternate bulk with delicacy
- Use rounded and angular forms
- Maintain consistent warm glow
Balance With Proportions
Mixing pendants and globes works best when you balance proportions so nothing overwhelms the others.
I choose varied sizes to create rhythm, pairing a bold focal piece with lighter accents.
We’ll keep spacing even and parallel lines aligned for cohesion.
Subtle finishes tie the look together, while a few dimmable lights preserve atmosphere.
Proportions guide harmony, not rules.
Scale and Placement Guides
When arranging pendants and globes over a kitchen island, scale and placement matter more than exact shapes.
I guide you to mix sizes and keep even spacing, so the trio feels intentional, not random. Measure clearance above, group by visual weight, and align cords for a cohesive glow that invites conversation without clutter.
- Vary pendant sizes for balance
- Center the layout over the island
- Maintain equal vertical clearance
- Use one shared finish or mixed metals
- Adjust height for task lighting efficiency
Layering Light for Task, Ambient, and Accent
Layering light for task, ambient, and accent is about balance as much as brightness.
I mix focused task lamps over prep zones, soft ambient glow for evening gatherings, and a few subtle accents to highlight textures.
You’ll notice depth without glare when contrasts are deliberate, and everything remains usable.
Together, we create a space that feels inviting, efficient, and visually cohesive.
Lighting Temperature and Color Quality for Your Space
Color temperature shapes how the kitchen feels as much as how it looks. I’m guiding you to pick warmth and brightness that complement your space, not overwhelm it.
Color quality matters too; aim for accurate rendering of whites and foods. Choose a consistent temperature that matches cabinetry and countertops, avoiding mixed hues that confuse the eye.
- Consistent color temperature across fixtures
- Warmth around 2700–3000K for coziness
- Neutral 3500–4000K for task clarity
- High CRI (90+) for true color
- Test samples in situ before buying
Dimming, Controls, and Smart Options for Island Lighting
I’m excited to explore smart dimming options, simple control systems, and practical tips for island lighting.
We’ll compare smart bulbs, compatible dimmers, and automation setups to help you pick what fits your space and routine.
Let’s plunge into how these choices can balance mood, function, and style for your island.
Smart Dimming Options
Smart dimming options give you precise control over island lighting, so you can set the mood or boost task visibility at a moment’s notice.
I’ll share practical, easy tweaks to tailor brightness, tone, and timing without cluttering your space or workflow.
- Seamless ambient dimming for evenings
- Task-focused levels for food prep
- Programmable scenes for meals and entertaining
- Touch or app-based brightness adjustments
- Energy-efficient, long-lasting LEDs
Control System Choices
From here, you’ll pick a control system that matches how you cook, entertain, and live in your kitchen.
I favor simple dimmers for mood and precise brightness, plus scalable smart options for routines. A reliable hub keeps everything in sync without clutter.
Pick tactile switches for everyday use, and confirm compatibility with your island fixtures to avoid surprises.
Island Lighting Tips
When it comes to island lighting, I like a layered approach: a dimmable main fixture for general tasks, plus under-counter or pendant accents for mood and color.
I’ll share practical tips on dimming, controls, and smart options that streamline your space without clutter.
- Choose compatible dimmers for LED efficiency
- Layer control zones for task vs ambience
- Opt for smart hubs that fit existing gear
- Prioritize color temperature consistency
- Verify compatibility with future upgrades
Budget-Friendly Pendant Options That Look Big
Small changes can make a big impact over your kitchen island, and these budget-friendly pendant options prove you don’t need to splurge to get a bold, roomy look.
I’ll guide you to fixtures that feel larger than their price: oversized shades, dramatic finishes, and multi-light clusters.
You’ll gain presence without overspending, balancing scale, warmth, and a polished, inviting style.
Quick Installation Steps for a One-Day Upgrade
With just one day to upgrade, here’s a simple, step-by-step plan you can follow to install pendant lighting over your kitchen island quickly and confidently.
- Prep tools and bulbs, then measure center over the island
- Mark mounting height for balanced drama
- Install ceiling canopy and secure hardware
- Hang pendant fixtures, keep cords neat
- Test operation, adjust symmetry and glow
Power and Wiring Essentials for a One-Day Island Upgrade
Power and wiring considerations come into play once the fixtures are chosen and mounted, so let’s get the basics nailed down quickly.
I’ll keep this practical: map a dedicated circuit if possible, use proper gauge wiring, and plan for safe height and clearance.
Topic-specific tips: switch placement, ceiling box access, and lightweight, compliant connectors keep your upgrade smooth and reliable.
Safety First: Junction Box and Support Guidelines
Safety first means getting the junction box and support hardware right before you mount those pendant fixtures.
I guarantee proper box rating, secure anchors, and compliant wiring connections, so load and vibration won’t loosen anything.
Let’s keep measurements exact, use compatible screws, and check clearance. Your island stays level, safe, and ready for lighting elegance.
- Verify box type and rating
- Confirm stud spacing and anchors
- Use corrosion-resistant hardware
- Maintain level alignment
- Double-check weight and load limits
Island Lighting by Style: Modern, Rustic, Industrial, Minimalist
When I think about island lighting, Modern Island Illumination keeps spaces bright and current, while Rustic Lighting Aesthetic adds warmth and texture.
I’ll explore how clean lines, mixed metals, and soft amber tones can transform the vibe from sleek to cozy.
Let’s discuss what style best suits your kitchen island and how to balance function with atmosphere.
Modern Island Illumination
Modern island lighting blends form and function, balancing clean lines with warm, inviting glow that defines the space.
I love how modern fixtures emphasize simplicity, yet punch with character. Each piece can set mood, highlight textures, and frame conversations.
Here are ideas:
- Slim pendants over a sleek island
- Matte black or brushed metal finishes
- Adjustable heights for balance
- LED warmth for a welcoming vibe
- Minimalist silhouettes, maximum impact
Rustic Lighting Aesthetic
Rustic lighting brings warmth and character to any island, pairing rugged charm with practical illumination.
I love how it blends natural textures with softly diffused glow, creating a welcoming focal point.
You get durable metal finishes, wooden accents, and a timeless vibe that ages gracefully.
Choose warm bulbs, avoid clutter, and let the space feel inviting, not fussy.
Tie Island Lighting to Cabinetry and Backsplash
A cohesive kitchen feel starts by tying your island lighting to the surrounding cabinetry and backsplash, so the fixtures don’t look like an afterthought.
I’ll guide you to harmonize tones, materials, and scale, ensuring flow between elements without competing textures.
- Match metal finishes across hardware and fixtures
- Align pendant shapes with cabinet profiles
- Mirror backsplash tile grout lines subtly
- Use consistent ambiance through color temperature
- Consider integrated lighting near edges for balance
Maintenance Hacks to Keep Pendants Shiny
Keeping pendants shiny comes down to a simple routine and smart tweaks you can do in minutes.
I keep a microfiber cloth handy and wipe gently weekly, then dust with a soft brush to prevent buildup.
Use a mild soap solution sparingly, rinse, and dry immediately.
Avoid harsh chemicals; check cords and fixtures for tarnish, tightening connections as needed.
Consistency matters.
Lighting Red Flags That Signal a Mismatch
Sometimes a few lighting cues can signal a bigger mismatch between your kitchen island setup and your needs.
I’ll keep it simple: when brightness or color feel off, when shadows distract, or when height hurts workflow, you’re not aligned.
Let’s spot these signals and adjust.
- Too harsh glare or uneven light
- Color temp clashing with cabinetry
- Pendants are too high/low
- Insufficient task lighting
- Shadowy zones across the island
Real-Life Before-and-After Ideas for Inspiration
Before-and-after can be a quick roadmap from overwhelmed to inspired, and I’ve seen small tweaks deliver big results on kitchen islands.
Real-life examples show layers: a single pendant swapped for two, a dimmer added, and glow from under-cabinet lighting shaping shadows.
I share tried-and-true tweaks you can replicate, tailored to your space, mood, and daily rhythm.
How to Budget Today for a Quick Island Face-Lift
If you want a quick island face-lift without breaking the bank, start with a simple budget plan you can actually follow this week.
I’ll guide you, step by step, with practical choices that fit real-world prices and timelines.
Let’s keep it focused, intentional, and doable.
- set a ceiling for total spend
- prioritize essential updates
- compare options locally
- look for sales and discounts
- allocate contingency funds
Conclusion
Upgrading your kitchen island with hanging lights can transform the space in minutes. I’m always surprised by how a 15% increase in perceived brightness can make a room feel bigger and more inviting. With the right style, spacing, and height, you’ll enjoy tasks and ambiance in equal measure. If you’re unsure, start with three pendants and tweak from there. You’ll love the glow, the style, and how effortlessly it elevates everything around your island.