I’ll show you how to arrange open kitchen shelves so they stay tidy and feel warm and farmhouse-chic. Start by measuring walls and noting studs, then choose sturdy hardwood or painted pine sealed for kitchen use.
Zone shelves for everyday dishes, coffee, and prep tools near workspaces. Use baskets, labeled jars, and stacks to corral items, mix textures for coziness, and check brackets for weight. Keep a short daily wipe and I’ll share styling examples and practical steps next.
Measure Your Wall, Choose Shelf Size
Before you order or cut a single board, I measure the wall carefully so the shelves fit the space and look intentional.
I note studs, outlets, and sightlines, then sketch shelf lengths and spacing.
I balance symmetry with function—shorter runs over appliances, longer spans where art or platters go.
This keeps the display tidy, usable, and perfectly scaled to your kitchen’s rhythm.
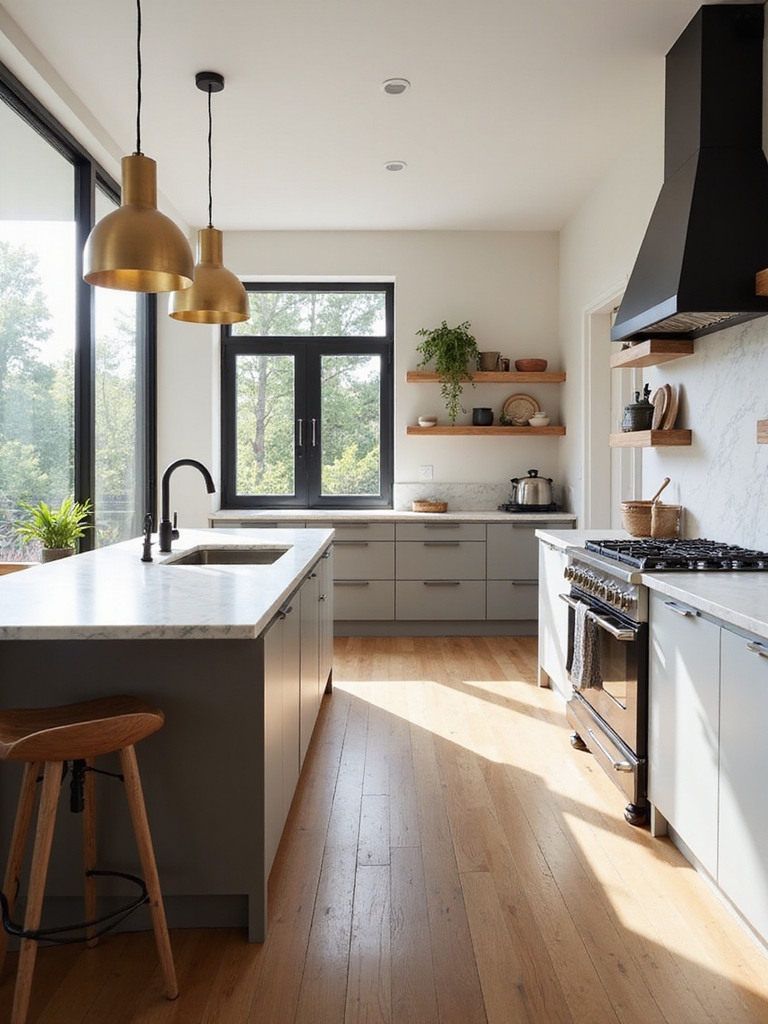
I also consider open kitchen layout principles, sketching blueprints to ensure the shelves fit any home shape and traffic flow open kitchen layouts.
Pick Durable Shelf Materials & Finishes
Once I’ve mapped the wall and settled on shelf lengths, I turn to materials and finishes that will stand up to everyday kitchen life.
I favor solid hardwood or reclaimed boards for warmth and strength, sealed with satin polyurethane or food-safe oil.
For a lighter look, painted pine with durable enamel works.
Metal brackets get a rust-resistant finish for lasting farmhouse charm.
Open shelving also benefits from thoughtful styling to keep things clutter-free and visually appealing.
Budget: Cost Ranges for Open Shelving
I’ll walk you through typical price brackets for common shelf materials so you can pick what fits your budget and style.
We’ll also talk about installation fees and those sneaky hidden costs—like brackets, wall repairs, or finishing—that can add up.
With a clear money plan you’ll know where to splurge and where to save.
Open shelving is also a major factor in creating effortlessly chic kitchen setups that look intentional without breaking the bank.
Materials And Price Brackets
Because you want sturdy, attractive open shelving without breaking the bank, I’ll walk you through common materials and what they typically cost so you can pick what fits your kitchen and budget.
Pine and poplar boards are affordable, $10–$50 per shelf; oak or walnut run $50–$200; reclaimed wood varies widely; metal or floating shelves start around $30 and go up for custom pieces.
Open shelving ranges from budget-friendly to total luxe depending on materials and finishes, so you can choose an approach that fits your style and wallet while keeping things functional and attractive—consider open shelving kitchen ideas when planning your layout.
Installation And Hidden Costs
When you add up the cost of the shelves themselves, don’t forget the extras that make them safe and sit right—I’ll walk you through typical installation and hidden costs so you can budget accurately.
I’ll mention brackets, anchors, stud-finding, wall repair, finishing, and possible electrician time for under-shelf lighting.
Expect $50–$300 DIY, $200–$1,000+ for pro installs depending on materials and complexity.
Open shelving also benefits from stylish arrangements that keep frequently used items accessible while minimizing visual clutter.
What to Store on Open Shelves First
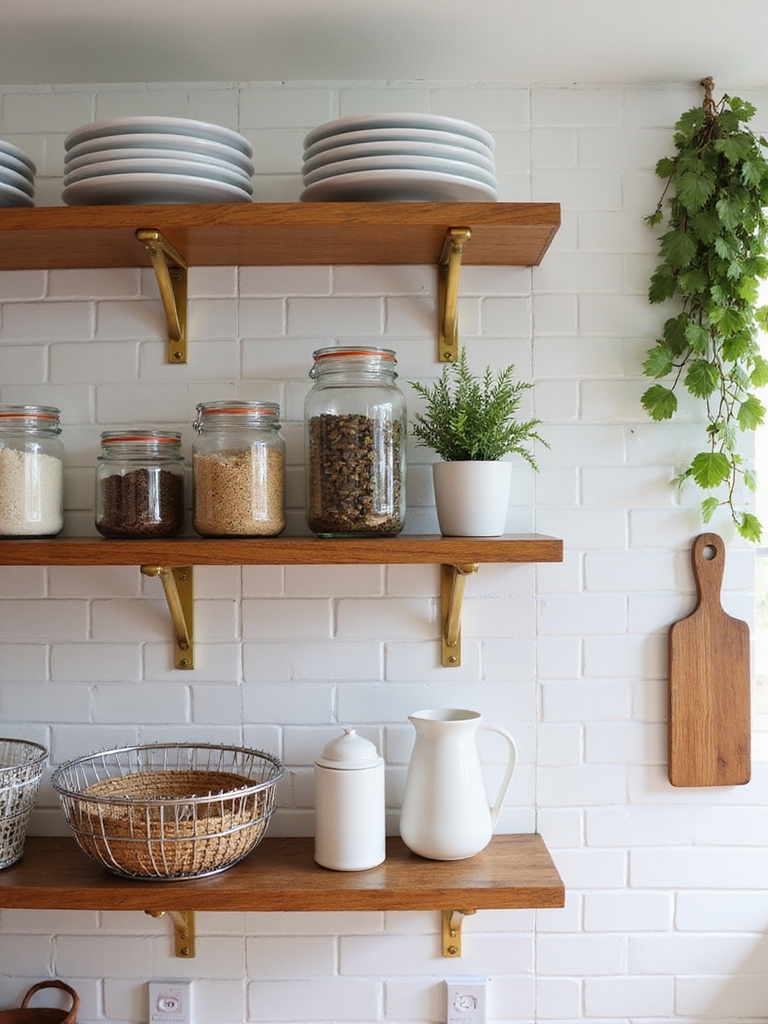
I like to start by putting everyday essentials—mugs, bowls, and the spices I reach for most—on the lower shelves so they’re always handy.
Above that I arrange a few attractive pieces, like a worn pitcher, patterned plates, or a small plant, to give the shelves warmth and character.
That simple mix keeps the space practical and pretty without feeling fussy.
Shelving that balances organization and style makes the whole kitchen feel intentional rather than cluttered.
Everyday Essentials Within Reach
Usually I keep the items I reach for every day right on the open shelves so cooking and cleanup stay simple and pleasant.
I place everyday plates, sturdy mugs, a small stack of bowls, and measuring cups within arm’s reach.
Olive oil, salt, a few wooden spoons, and a tea tin live there too — practical, tidy, and easy to grab during busy mornings.
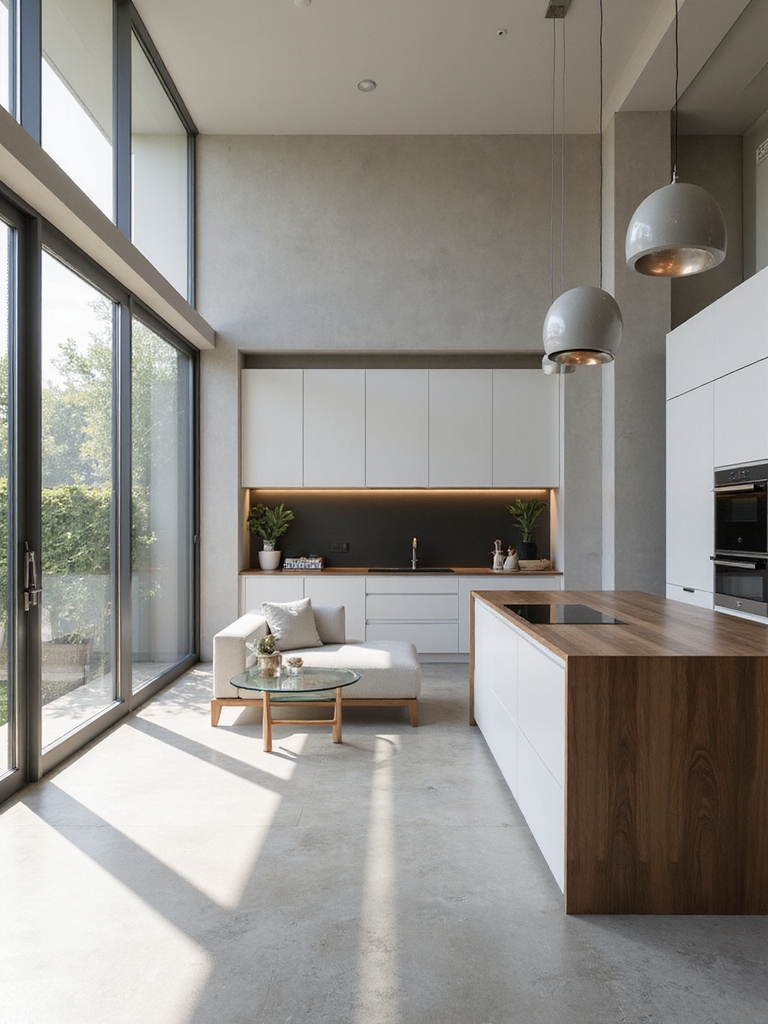
Open-concept layouts are popular for blending kitchen and living spaces and encouraging social interaction among family and guests.
Attractive Display Items
Now that the everyday pieces are within reach, I like to give the top eye-level shelves over to things that make the kitchen feel like home.
I display vintage plates, a small potted herb, a mason jar of wooden spoons, and a couple of pretty cookbooks.
These curated touches add warmth without clutter and invite guests into a cozy, lived-in farmhouse kitchen.
Open shelving arrangements often spark conversation and draw guests’ attention to the display.
Create a Zone Plan for Everyday Use

Because we use the kitchen every day, I plan zones so things are exactly where I need them—plates near the dishwasher, cutting boards by the prep surface, and breakfast items within easy reach.
- Everyday dishes at hand for quick unloading.
- Prep tools next to the counter for smooth workflow.
- Coffee and tea station reachable first thing.
- Cleaning supplies tucked near sink, tidy and handy.
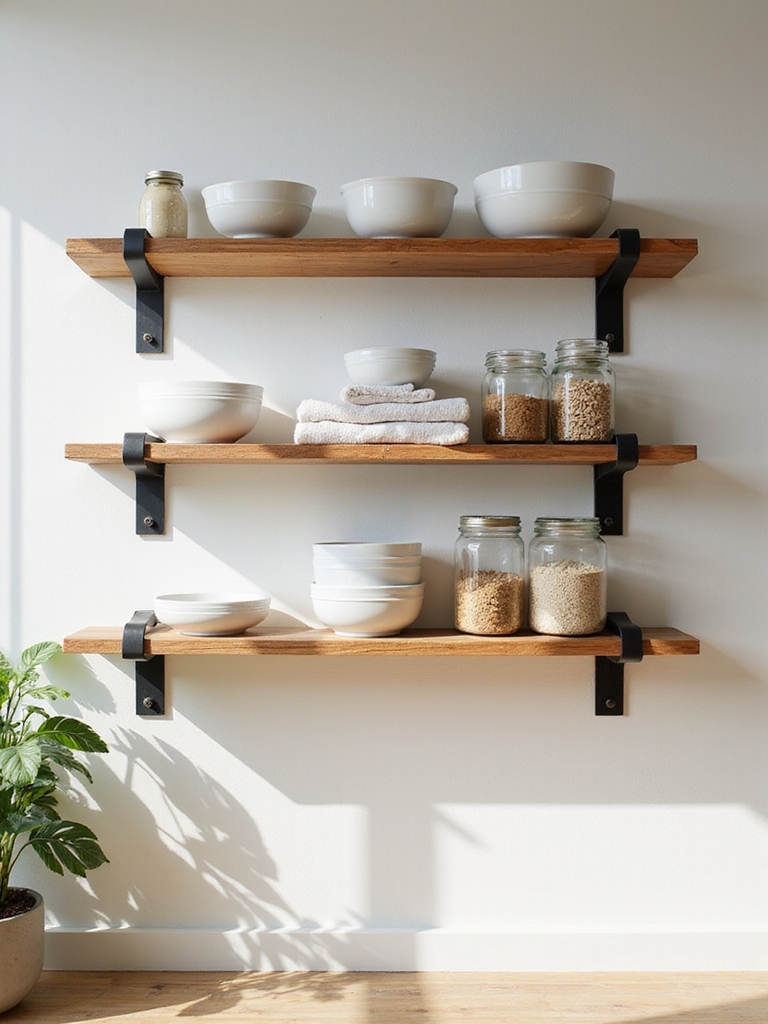
Group Like Items on Open Shelves
I like to keep open shelves tidy by grouping like items together so everything’s easy to find and use.
I sort by function—stacking plates, grouping mugs, and putting baking tools where I can grab them quickly.
I also match shapes and sizes so the shelf looks balanced and cozy.
Sort By Function
When I arrange open shelves, I group items by function so each spot feels purposeful and easy to use; plates with plates, baking tools together, and everyday mugs within arm’s reach.
I keep zones clear so cooking and cleanup flow smoothly, mixing practical bins and pretty pitchers for charm.
- Everyday dishes
- Baking supplies
- Coffee and tea
- Prep tools and bowls
Match Shapes And Sizes
Since similar shapes sit more harmoniously together, I group like items by size and silhouette on open shelves so everything reads as a calm, intentional vignette.
I line up matching bowls, stack plates by diameter, and corral jars of equal height. This simple rhythm feels cozy, reduces visual clutter, and makes reaching for everyday dishes effortless in my farmhouse kitchen.
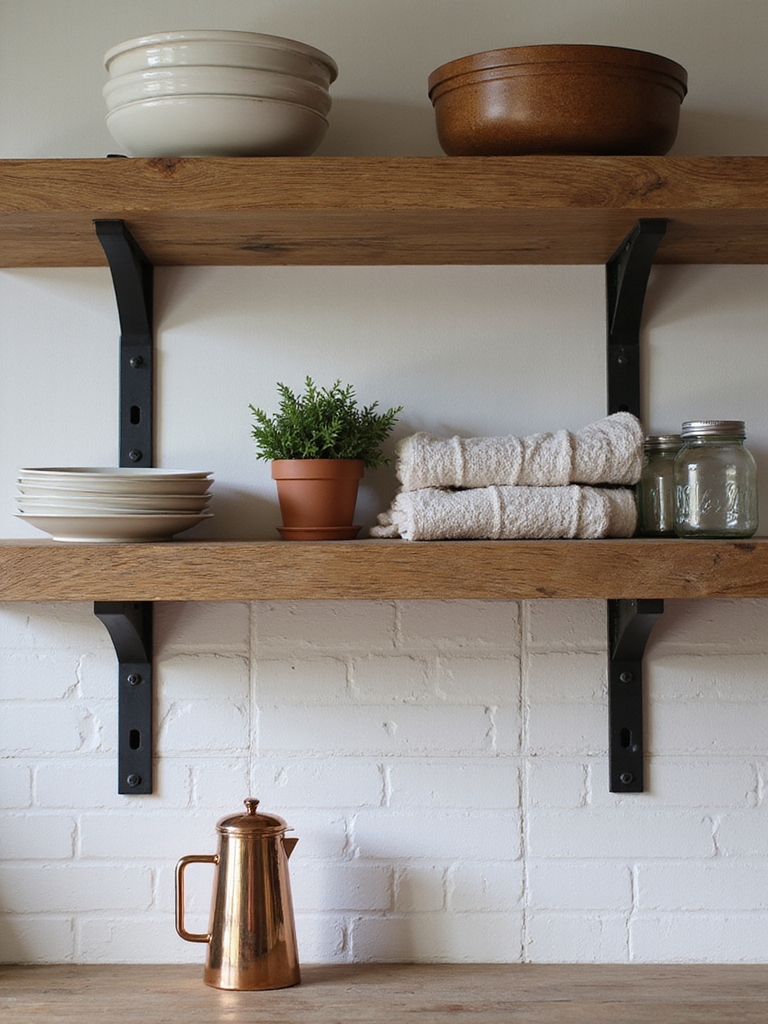
Mix Heights and Textures for Interest
Layer varied heights and textures across your open shelves to make the space feel lived-in and inviting. I mix wood boards, woven baskets, matte ceramics, and glass to balance warmth and shine.
I arrange pieces so eye moves naturally, keeping utility and charm in harmony.
- Tall vase
- Short bowls
- Wicker basket
- Clear jars
Use Stacks and Vertical Risers to Save Space
I like to build up from the grouped pieces on my shelves by adding stacks and vertical risers to make every inch work harder.
I stack plates, bowls, and mason jars, and place small risers to create tiers for mugs and pitchers.
This keeps things accessible, tidy, and visually layered, with a cozy farmhouse feel that’s practical and welcoming every day.
Add Baskets & Boxes to Hide Small Clutter
Tuck away the little things that clutter a shelf into baskets and boxes, and you’ll instantly calm the visual noise while keeping everyday items within reach.
I like woven baskets and lidded boxes for a cozy, practical look. They corral odds and ends without fuss.
- Mail & coupons
- Tea bags & spices
- Chargers & cords
- Small tools & tape
Pick a Color Palette That Makes Shelves Pop
I like to start with three coordinating hues—one main color, one supporting, and one small accent—to keep shelves feeling gathered and intentional.
I balance warm neutrals like cream or soft gray with a punch of color in ceramics or linens so the display feels calm but lively.
Together those choices make each shelf read as a finished, farmhouse-friendly vignette.
Choose Three Coordinating Hues
Start by picking three hues that play well together and give your shelves a calm, curated feel.
I choose a soft cream, muted sage, and warm terracotta to tie rustic pieces together and keep things cozy. I’ll arrange items by hue, mixing textures for interest.
- Cream ceramics
- Sage glassware
- Terracotta bowls
- Wood accents
Balance Neutrals With Accents
Layer a neutral base and then add moments of color to make your open shelves sing; I like to think of neutrals as the calm foundation that lets accents do the talking.
I keep whites, warm woods, and soft greys, then introduce blue pottery, sage linens, or a mustard jar. Small pops create rhythm without clutter, anchoring the farmhouse warmth.
Layer Decorative Accents Without Clutter
When I add decorative accents to open shelves, I keep things simple and purposeful so the display feels warm, not cluttered.
I layer textures, stick to a soothing palette, and leave breathing room so each piece sings.
- A small woven basket
- One vintage mug
- A framed herb sketch
- A sprig in a milk jar
Shelf Safety: Weight Limits & Mounting
I love how a few well-placed accents make shelves feel inviting, but I also check weight limits and mounting before I style anything so my display stays safe.
I pick sturdy brackets, anchor into studs, and distribute heavy dishes across shelves. I avoid overloading single boards, use thicker lumber for heavier loads, and double-check fasteners periodically to keep my kitchen cozy and secure.
Daily Habits to Keep Shelves Tidy
Usually I wipe down a shelf each morning and put things back where they belong so clutter never has a chance to pile up. I chat with my plants, tuck mugs in their spots, and keep a small tray for loose bits.
Simple routines make the space feel calm.
- Return items after use
- Sort mail elsewhere
- Refill frequently used jars
- Rotate seasonal decor
Fix Dust, Grease, and Overcrowded Shelves
Often I start by wiping shelves top to bottom, because dust, grease, and crowding show up together and need different fixes.
I use warm soapy water for grease, a microfiber for dust, and clear everything off to assess.
Then I return only daily items, add labelled baskets for odds and ends, and leave breathing room so the shelves feel calm and usable.
Styling Examples: Minimal, Rustic, Modern
After clearing and grouping items on the shelves, I like to show how three distinct looks can make the same space sing: minimal, rustic, and modern.
I walk you through simple swaps—tone, texture, and a focal piece—to shift vibe without clutter.
- Minimal: white dishes, open space, single herb pot.
- Rustic: wood bowls, mason jars, woven basket.
- Modern: matte black, geometric vase, glassware.
- Mix: blend elements for warmth.
I’ll admit—I could talk about open shelves forever, like I’m trying to fill every empty wall in the world with mason jars and cast-iron skillets.
But seriously, stick to measurements, sturdy brackets, and a few everyday items—then breathe.
A little routine and a couple of pretty bowls keep chaos at bay and make your kitchen feel like a lived-in hug. Tidy shelves aren’t perfection; they’re the warm, honest heart of home.