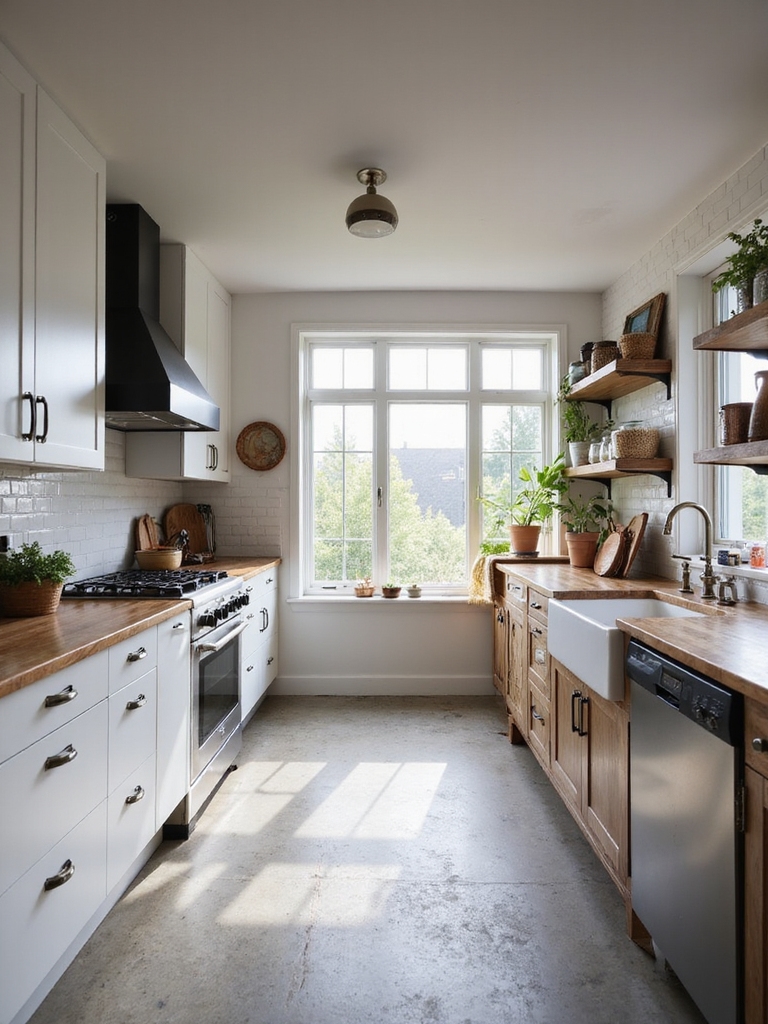
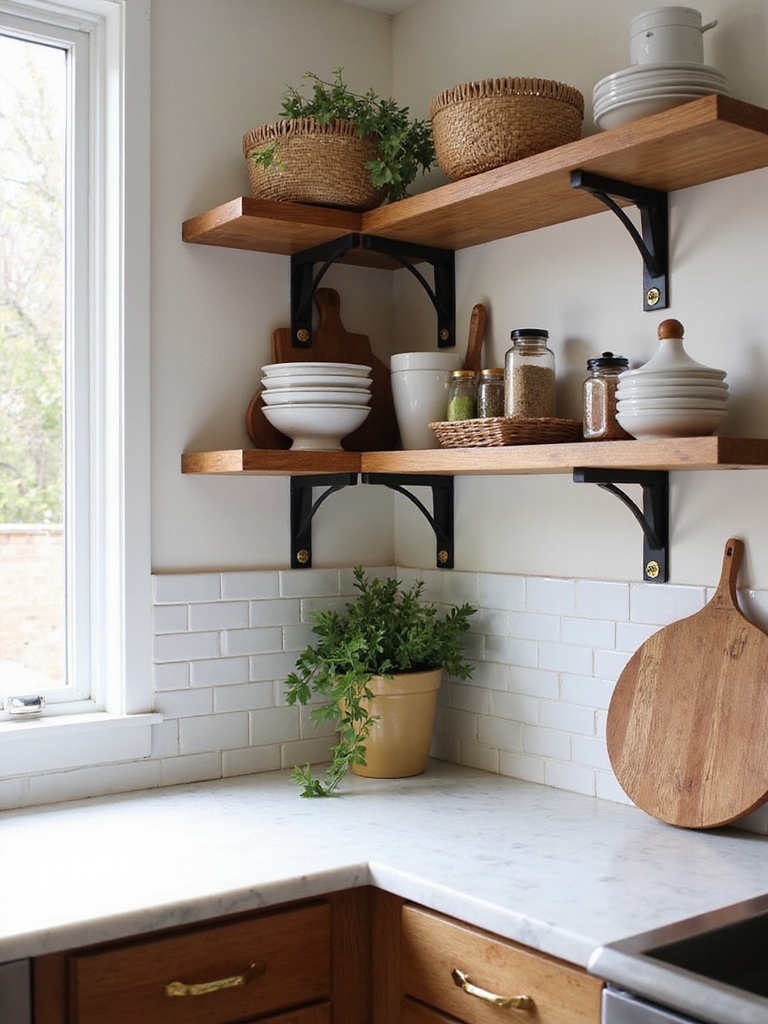
I love open shelves for their charm and practicality; they make a farmhouse kitchen feel lived-in and useful. Start simple with painted pine or reclaimed boards and sturdy iron brackets, or splurge on walnut, honed marble, or custom millwork for a luxe look.
Anchor into studs, add warm under-shelf LEDs, and mix white stoneware with baskets and hand-thrown mugs to balance beauty and function. Keep clutter minimal—stick around and I’ll share plans, lighting tips, and upkeep tricks.
Should You Use Open Shelves? Quick Pros, Cons & Checklist

Wondering whether open shelves belong in your kitchen? I love them for easy access, display, and airy charm, but they demand regular dusting and tidy styling.
Consider daily habits, storage needs, and whether fragile items suit constant exposure. My quick checklist: durable materials, secure mounts, balanced styling, and reachable heights.
If you’re tidy and practical, they’ll feel warm and useful. Open shelving can also be styled to look effortlessly chic and cohesive with the rest of your kitchen.
Open Shelving Cost Snapshot: DIY to Custom

If you like the airy look of open shelves but hesitate because of upkeep or practicality, you’ll also want to know what they’ll cost—from a weekend DIY to a fully custom installation.
I’ll break it down plainly: salvaged boards and brackets can run $50–$200, painted pine $150–$400, hardwood or floating systems $400–$1,500, and bespoke millwork $1,500+. Factor finishes and labor.
Open shelving also encourages thoughtful arranging and regular maintenance to keep a tidy, stylish kitchen; consider stylish open shelf arrangements as a guide.
Plan Shelf Placement: Function, Flow, and Sight Lines

I like to start by measuring the work triangle so shelves sit where I reach most often without crossing paths.
I’ll keep daily dishes and prep tools within easy arm’s reach and tuck less-used items on higher or end shelves.
I also watch sightlines so the room feels open and the pretty pieces face forward.
Open shelving lets you make organization beautiful with a mix of functional storage and curated displays, like grouping dishes by color and using baskets for hidden storage.
Measure Work Triangle
Because the kitchen’s rhythm comes from how you move between stove, sink, and fridge, I always start by measuring the work triangle before I sketch shelf placement.
I map distances, note sight lines, and keep walkways clear so open shelves won’t interrupt flow. That way rustic charm meets real function — baskets and jars sit where they’re reachable, not in the cook’s way.
Architects also use work triangle principles to maximize flow and sight lines when planning open shelving.
Prioritize Daily Items
When I plan shelf placement, I start by setting aside the things I reach for every day—coffee gear, dish soap, salt and pepper, a favorite mug—so they live where my hands naturally go.
I tuck daily plates and a wooden cutting board within easy reach, group frequently used jars together, and leave prettier pieces a touch higher, keeping function cozy and simple in a farmhouse rhythm.
Open shelving works best when you embrace minimalism and let open space and curated items breathe.
Maintain Clear Sightlines
If you want your open shelves to feel effortless rather than cluttered, I keep sightlines clear by arranging items so my eye can travel across the wall without interruption.
I group pieces by height, tuck taller jars to the ends, and leave some negative space. That simple rhythm lets ceramics, glass, and wooden accents breathe, making the kitchen calm, practical, and warmly inviting.
You can create a harmonious look by following simple arrangement principles that balance function and flow.
How to Mount Shelves: Floating, Bracketed, Hidden Cleats
Although open shelving can feel rustic and relaxed, mounting it correctly keeps that farmhouse charm from turning into a wobble hazard.
I prefer hidden cleats for a clean, floating look; sturdy brackets suit heavy pots and vintage pieces; and slim floating rods work when studs are scarce.
Measure carefully, anchor into studs, and enjoy shelves that look charming and stay solid.
Open shelving can also spark conversation with guests who notice the styling and organization.
Best Affordable Materials: Painted Pine, MDF, Reclaimed Wood

Now that your shelves are securely mounted, you’ll want materials that give you farmhouse warmth without blowing the budget.
I pick painted pine for its grain and charm, MDF for smooth, painted finishes, and reclaimed wood for rustic character. Each feels lived‑in and cozy.
- Painted pine
- MDF (painted)
- Reclaimed wood
Open-concept layouts are especially suited to this look because they help create a cohesive flow between the kitchen and living areas, highlighting open-concept design.
Mid‑Range Upgrades: Brackets, Floating Hardware & Mixed Cabinets
Because good hardware can quietly lift a space from simple to soulful, I like to invest in mid‑range upgrades that balance looks and function.
I pair sturdy iron brackets with sleek floating hardware, mixing open shelves and closed lower cabinets for warmth and practicality.
This farmhouse approach keeps everyday items accessible while hiding clutter, creating a lived‑in, curated kitchen that feels both rustic and refined.
Luxe Materials: Walnut, Marble & Custom Millwork (With Tradeoffs)
I love bringing in luxe materials—walnut shelving, honed marble, and custom millwork—to give open shelving a polished, intentional feel; they make the kitchen sing but they also demand more thought and care.
- Warm walnut warms a farmhouse core but needs oil and gentle cleaning.
- Honed marble reads refined; seal it, avoid acids.
- Custom millwork fits perfectly—higher cost, lasting payoff.
Open Shelving for Small Kitchens: Slim & Vertical Ideas
When space is tight, I reach for slim floating shelves to keep everyday dishes within easy reach without crowding the room.
I also love adding a vertical pegboard for mugs, utensils, and baskets that turns wall space into tidy storage. Together they give a small kitchen a cozy, organized farmhouse feel without weighing it down.
Slim Floating Shelves
Try fitting function into every inch—slim floating shelves are my go-to for small kitchens where space feels precious. I tuck in herbs, pretty dishes, and jars, keeping things airy and accessible.
They feel rustic yet refined, like a farmhouse wink.
- Narrow pine shelf with mason jars
- White-painted ledge for tea cups
- Reclaimed wood for spices and olive oil
Vertical Pegboard Storage
Because vertical space is often the most underused in a small kitchen, I love fitting a pegboard up a narrow wall to keep things tidy and within reach.
It adds charming farmhouse texture, holds mugs, utensils, and cutting boards, and adapts as needs change.
I paint mine a soft cream, peg in wooden pegs, and enjoy the practical, cozy look every day.
What to Show vs. What to Hide: Storage Strategy
I like to think of open shelving as a mini stage for the things I want to celebrate and a hiding place for the rest, so I balance pretty display with practical concealment.
I keep everyday mugs and olive oil visible, tuck messy gadgets behind baskets, and rotate seasonal pieces.
- Display: heirloom plates, jars
- Hide: small appliances, plasticware
- Rotate: seasonal linens
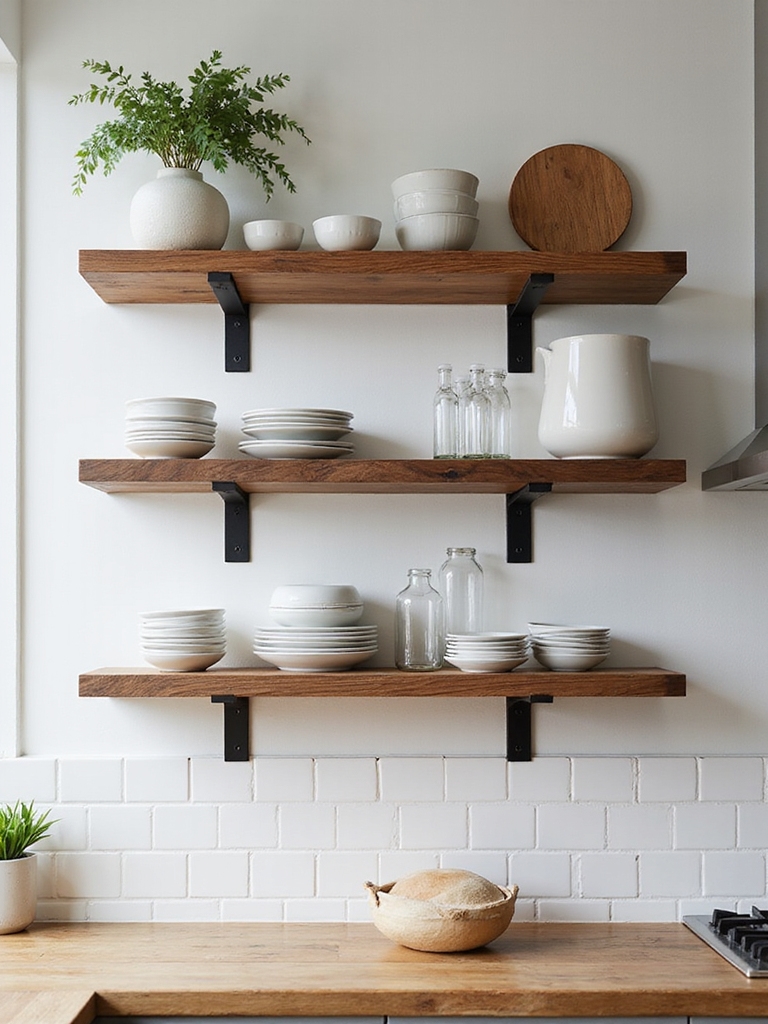
Styling Open Shelves: Everyday Looks That Photograph Well
I’ll show you how simple layers and varied heights make open shelves feel intentional and camera-ready without being fussy.
I like to mix bowls, jars, and a few cookbooks so the eye moves across the shelf, leaning on taller pieces to anchor each vignette.
Sticking to everyday neutral colorways—creams, soft grays, warm wood tones—keeps the look timeless and easy to restyle.
Balanced Layers And Heights
When I style open shelves, I pay close attention to layering and height so each vignette feels calm and intentional. I mix bowls, wooden boards, and a single plant, letting taller pieces anchor small stacks.
Balance keeps the shelf cozy, not cluttered, and photographs beautifully in soft morning light.
- Tall vase, low stack
- Plate propped, bowl front
- Cutting board backdrop
Everyday Neutral Colorways
Often I reach for muted tones first, because everyday neutral colorways make open shelves feel lived-in and photo-ready without fuss.
I mix cream dishes, weathered wood, and soft linen to create calm layers.
A few matte ceramics and aged brass accents add warmth.
I keep clutter minimal, rotate seasonal pieces, and let natural light highlight texture for that cozy farmhouse charm.
Choosing Dishware & Accessories That Look Great on Display
Think of open shelves as a little stage for the things you actually love to use — I want the dishware and accessories you pick to feel both pretty and lived-in.
I choose natural textures, mixed shapes, and functional pieces that invite touch.
Try this simple trio:
- White stoneware plates and bowls.
- Hand-thrown mugs in muted glazes.
- Wicker baskets for linens and produce.
Lighting for Open Shelves: Task, Accent & Integrated LEDs
With a soft glow tucked under a shelf or a warm beam highlighting a favorite bowl, lighting transforms open shelving from practical storage into a cozy focal point — and I like to layer task, accent, and integrated LEDs to get both function and mood right.
I use under-shelf strips for prep, tiny puck lights for display, and warm-toned integrated LEDs to keep everything inviting and farmhouse-charming.
DIY Projects: Simple Floating Shelves & Upcycling Plans (Tools, Time)
After the right lighting puts your shelves in their best light, I like to roll up my sleeves and build the shelves themselves — nothing beats the satisfaction of a simple floating shelf you made by hand.
I’ll sketch, gather tools, then happily upcycle. Consider:
- Reclaimed pine plank, pocket-hole jig, 1–2 hours.
- Brushed steel brackets, drill, 30–45 minutes.
- Painted crates turned shelf, sandpaper, 1–1.5 hours.
Common Problems & Fixes: Sagging, Dust, and Visual Clutter
I’ve learned the hard way that open shelves need a little muscle, a regular wipe, and a thoughtful edit to stay charming rather than chaotic.
I’ll show how to prevent sag with proper supports, keep dust from piling up without constant scrubbing, and pare down what’s on display so your kitchen feels calm.
Stick with me and we’ll make your shelves sturdy, tidy, and farmhouse-friendly.
Preventing Shelf Sag
When I set up open shelving in my kitchen, preventing sag became a top priority because bowed boards can ruin the farmhouse look fast; I’ve learned a few straightforward fixes that keep shelves sturdy and pretty.
- Use thicker wood or hardwood for spans.
- Add hidden steel brackets beneath.
- Install a center support post for long runs.
Managing Dust Buildup
I usually find dust is the uninvited guest that makes open shelves look cluttered and tired, so I tackle it with a few simple habits and smart choices that keep things fresh without constant scrubbing.
I wipe weekly with a damp cloth, use bowls or canisters for flour and sugar, rotate linens, and add a small houseplant—these tiny rituals keep my farmhouse shelves welcoming and tidy.
Reducing Visual Clutter
Keeping dust at bay made my open shelves feel fresher, but visual clutter can still steal that calm farmhouse look if I’m not careful.
I simplify with intention, edit often, and layer textures for warmth.
- Corral mugs in a woven basket.
- Stack plates by color and leave breathing room.
- Rotate decor seasonally; store extras out of sight.
Maintenance Checklist: Cleaning, Safety, and Seasonal Refreshes
While open shelves bring charm and easy access, they also invite dust, grease, and stray dishes, so I keep a simple routine to stay on top of it.
I wipe weekly with vinegar water, wash ceramics monthly, secure heavy items with nonstick pads, check anchors every season, rotate decor for a fresh look, and stash fragile pieces during holidays to prevent accidents.
I hope this guide gives you the confidence to try open shelving—mixing budget finds with a touch of luxe makes a big impact.
Keep function and flow front and center, and don’t be afraid to swap things seasonally so it always feels fresh. With the right mounting, lighting, and a little elbow grease, your kitchen can be cozy and practical.
Remember, sometimes you’ve got to roll up your sleeves to make a house feel like home.