
I’m obsessed with small islands that punch above their size, and I’m here to guide you through 20 bold ideas that fuse function with swagger. Think mixed textures, striking color blocks, hidden storage, and playful silhouettes that keep sightlines airy. We’ll mix durable materials with clever seating, overhangs for conversation, and high-contrast pairings that spark joy. Ready to elevate your tiny footprint? Stick with me and you’ll uncover tips that spark serious style—and a few surprising tricks along the way.
Why a Small Island Can Punch Above Its Size

A small kitchen island may look modest, but it punches above its weight by turning corners of your space into focal points and function into flair.
I’ve seen compact lines create grand vibes, thanks to smart storage, visual contrast, and witty details that invite you to linger. Multifunctional island solutions can maximize the usability of your kitchen, making even the smallest spaces feel abundant.
You don’t need inches to make an impression—just clever rhythm and playful scale.
How to Size Your Island for a Compact Kitchen

I’ll start by mapping your space, because every great island begins with a honest footprint.
We’ll check the kitchen’s measurements, then set a clear clearance radius so doors and drawers kiss but don’t fight.
Finally, we’ll weigh island shapes—boxy, rounded, or slim—so the flow stays as effortless as a hat trick. Additionally, consider incorporating creative ways to maximize your island for extra functionality and style.
Measure Kitchen Space
Size matters when you’re tucking an island into a small kitchen, and the starting point is simple: measure every relevant space before you lift a single plank.
I map door swings, appliance footprints, and countertop height preferences, then sketch a tight footprint.
With measured confidence, I balance function with flair, ensuring flow stays smooth, sightlines stay generous, and vibes stay irresistibly chic. Additionally, consider incorporating U shaped kitchen designs to maximize your space effectively.
Determine Clearance Radius
If you want smooth movement around a compact kitchen island, start by locking in a clear clearance radius you can rely on.
I size wisely, then trim excess to keep flow. Measure, map, and test with real use.
- Keep at least 42 inches of clearance for main paths
- Allow 36 inches beside seating
- Respect appliance doors’ swing
- Plan visual balance and access
Adding splurge-worthy pendant lights can enhance both functionality and aesthetics in your kitchen space.
Island Shape Considerations
When shaping a compact kitchen, the island’s silhouette can make or break flow, so start by imagining how you’ll move around it and what feels inviting.
I favor rounded corners for softness, rectangular for efficiency, and an asymmetrical splash to guide traffic without blocking sightlines.
Size matters: keep clearance generous, but let the shape echo your cooking rhythm and daily rituals. Additionally, consider how a fresh paint color can enhance the overall ambiance and revitalize your small kitchen, creating a more inviting space.
Silhouette Options That Maximize Impact

A kitchen island can steal the show, but its silhouette is what keeps the room feeling cohesive and spacious.
I’m sharing shapes that punch above size, without shouting too much. Subtle curves, slim profiles, Tetris-tight edges, and a compact footprint all work to broaden perception.
- Narrow-back island with rounded corners
- L-shaped footprint for traffic flow
- Counter-height, minimal ornament
- Open leg styling for airiness
Incorporating cozy built-in seating can enhance the island’s functionality while adding a stylish touch to the space.
Bold Color Pacts for Small Islands

I love playing with bold hues on small islands, where color choices feel like a wink to the whole room.
I’ll show you how strong color pacts—bright walls against caramel counters, or a pop of teal at the edge—can set the mood without overwhelming the space.
Playing with vibrant color concepts can truly transform your kitchen’s atmosphere.
Ready to experiment with color play on points and make your island sing?
Bold Hues For Islands
Ever wonder how a bold hue can instantly transform a compact kitchen? I say yes, and I’ll guide you through playful, punchy choices that feel effortless, not loud.
- Embrace warm corals for warmth with whispers of brass
- Try navy for depth that dazzles without shouting
- Go emerald to echo greenery and freshness
- Tap through sunny yellows for a sunny sprint
Bold hues, big mood. Additionally, you can enhance your small island’s appeal with trending kitchen cabinet colors that modernize the entire space.
Color Play On Points
Color plays on a point can be the secret sauce for small islands: a bold pact that keeps the space lively without stealing the scene.
I mix hues at focal points, not everywhere, so accents sparkle. You’ll notice cohesion with playful contrasts, crisp trim, and a wink of personality. Incorporating two tone kitchen cabinets can elevate the overall design, making the island a standout feature in your culinary space.
It feels polished, practical, and undeniably you.
High-Contrast Pairings That Draw the Eye
High-contrast pairings can instantly energize a small kitchen island.
I guide you toward bold combos that catch the eye and stay tasteful, not chaotic. Embrace white margins with charcoal accents, or deep navy against glossy white.
Let brass handles wink beside matte black, and red accents punctuate calm neutrals. Your island becomes a playful, sophisticated focal point.
- White and charcoal
- Navy and gloss white
- Brass on matte black
- Red accents with neutrals
To further enhance your design, consider incorporating charming wood kitchen islands, which can add warmth and texture to the overall aesthetic.
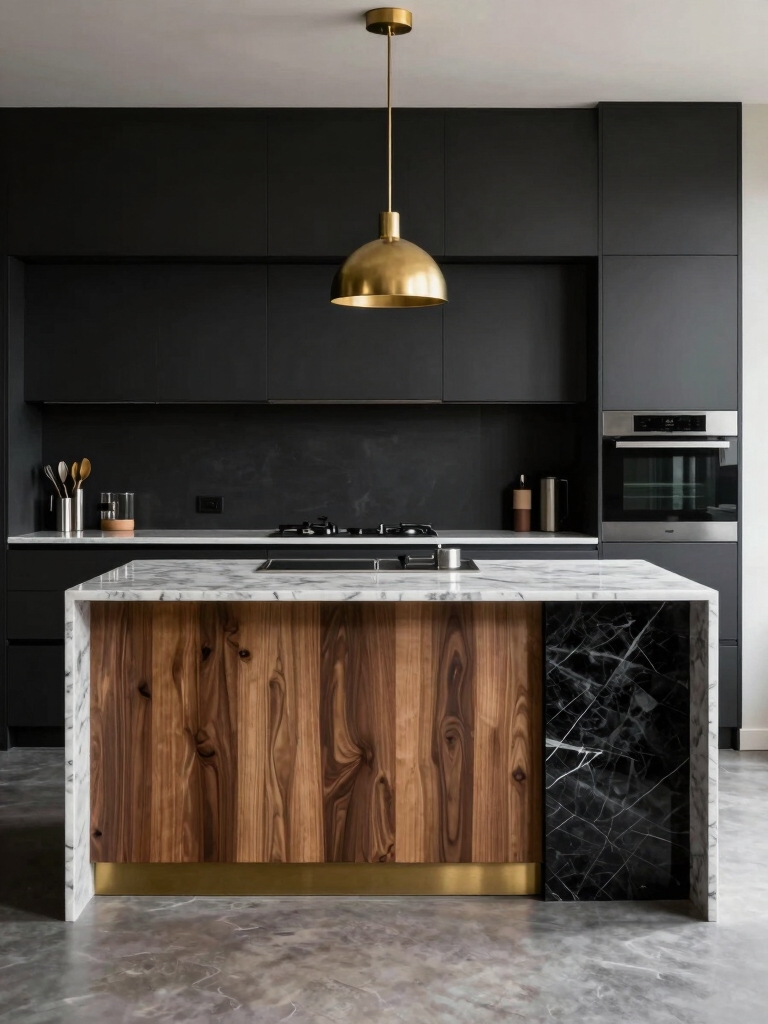
Two-Tone Finishes for Depth and Drama
Two-tone finishes can give your kitchen island instant depth and drama without overwhelming the space.
I love pairing a dark, lacquered base with a lighter, matte top to ground the room while keeping it playful. You can swap palettes seasonally or with your mood, but keep contrast intentional.
A touch of gleam or texture completes the chic, lived-in charm.
Durable Materials That Stand Up to Daily Use
Durable materials are the backbone of a kitchen island you can actually live with, day in and day out.
I choose surfaces that resist scratches, heat, and spills, so daily meals feel effortless rather than fragile.
- Quartz that gleams and cleans up fast
- Hardwood with a durable, sealed finish
- Stainless steel for sleek resilience
- solid surface that hides wear gracefully
Integrated Storage That Stays Invisible
I love how hidden storage can whisper into the room without shouting.
I’ll show you seamless cabinetry solutions, flush-mount storage, and clever hidden compartments that stay invisible while keeping essentials within reach.
Let’s explore together how these techniques balance function with a sleek, uncluttered look.
Hidden Storage Techniques
Hidden storage in a small kitchen isn’t an afterthought; it’s the secret that keeps counters clean and corners calm.
I love clever, invisible solutions that hide clutter while staying accessible.
- pull-out bins
- shallow drawers
- magnetic spice rails
- lid storage beneath islands
Seamless Cabinetry Solutions
Seamless cabinetry is all about storage that sneaks in where you least expect it, so your kitchen reads as calm and cohesive rather than busy.
I hide essentials behind panels, keeping lines clean and surfaces uninterrupted. You still get clever pullouts and organizers, but the illusion stays flawless.
It’s practical whimsy—effortless, chic, and a little magical in daily use.
Flush-Mount Storage Design
Flush-mount storage design makes every inch count without ever shouting for attention.
I’m showing you how integrated pockets vanish into the island, yet stay wildly practical. You’ll glide items in and out, never disrupting lines.
- Hidden pull-out trays glide smooth
- Concealed spice drawers wink softly
- Recessed vertical dividers save space
- Invisible hinges keep surfaces serene
Multitasking Surfaces: Prep, Seating, and Serving
A kitchen island isn’t just a countertop; it’s a versatile stage where prep, seating, and serving all mingle.
I pair sharp prep surfaces with cozy seating, so meals flow without chasing tools.
I fold in warm lighting and easy-access bowls for serving, keeping clutter at bay.
You’ll feel playful efficiency, polished charm, and a snack-ready vibe throughout.
Seamless Hardware: How to Minimize Visual Clutter
Curious how to keep your island looking sleek? I chase seamless hardware that whispers, not shouts, and I think you’ll too.
There’s magic in hidden magnets, concealed screws, and drawer pulls that disappear when you don’t need them. Here’s how:
- opt for integrated handles
- use push-to-open mechanisms
- mount hardware flush
- pick matte, matching finishes
Edge Treatments That Feel Sleek and Clean
I love a kitchen island with seamless edge profiles that feel almost invisible, like a quiet extension of the counter.
We’ll explore flush material shifts and how they read as one continuous plane, free of interruptions.
And I’ll tease out minimalist corner details that keep the look sleek, practical, and delightfully understated.
Seamless Edge Profiles
Seamless edge profiles instantly calm a kitchen’s energy, because clean lines let the real material shine rather than a busy border.
I’m drawn to edges that vanish, giving space to color, texture, and light.
- hide hardware for a ghostlike finish
- let countertops meet cabinets in a single sweep
- emphasize continuous grain or pattern
- soften changes without interruptions
Flush Material Transitions
Flush shifts keep the look crisp and uninterrupted, as if the countertop and cabinets blur into one continuous plane.
I love how I can blend materials for a seamless, modern vibe, without fiddly seams. My go-to: soft radiuses, flush laminates, and mortised edges.
The result feels calm, polished, and effortlessly chic—made for casual cooks who crave clean, confident lines.
Minimalist Corner Details
Corner details can feel like the quiet punctuation on a kitchen’s punctuation—subtle, not shouting, and powerfully present.
I lean into minimalist edge treatments that whisper rather than shout, keeping lines clean and tactile.
- squared corners with soft radii
- hidden joinery for seamless surfaces
- matte finishes that reduce glare
- slim, integrated edge lighting for glow
Overhangs That Invite Conversation Without Crowding
Ever wonder how to make your small kitchen island feel inviting without turning it into a crowded traffic jam?
I keep overhangs generous enough for stools, yet shallow enough to preserve flow. A slight curve or bevel adds warmth, not clutter.
I flirt with color and texture under the edge, so conversation dances, space breathes, and staying power remains stylishly low-key.
Enjoyable, practical chatter awaits.
Open-Leg Designs That Keep Sightlines Light
Open-leg designs keep sightlines light by vanishing the legs into open space, so the kitchen feels bigger and more breezy.
I love how this trick makes countertops float and conversations flow without visual clutter.
Try these ideas:
- slim, tapered supports
- cantilevered edges
- integrated toe-kicks
- open shelving above
This look stays playful, bright, and effortlessly chic.
Lighting Ideas to Elevate Islands After Dark
After dark, I love playfully layering ambient glow with task-oriented lighting to keep the island inviting and practical.
Think soft pendant halos for ambiance and focused under-counter or drawer lighting for prep, so the space feels effortless and precise.
We’ll explore how these techniques—ambient glow and task-oriented cues—work together to elevate your island mood and function.
Ambient Glow Techniques
Ambient glow can turn a kitchen island into a soft‑landing spot after dark, with lighting that’s intimate yet practical.
I lean into warmth, dimmers, and subtle under‑counter LEDs to create mood without clutter.
- Layered fixtures that hide yet hug the space
- Warm white tones for coziness
- Pointed accents to sculpt shadows
- Quiet backlighting for depth and ease
Task-Oriented Lighting Tips
Task-oriented lighting is all about clarity and control, so I’m showing you how to light an island for the nuts-and-bolts moments: slicing, chopping, and late-night prep without glare or guesswork.
Picture adjustable pendant charms guiding precise tasks, under-cabinet LEDs bathing counters in clean, cool glow, and dimmable shelves creating mood for after-dinner chats.
Practical, playful, perfectly lit—your island earns its glow.
Textured Fronts: Rattan, Plywood, or Brick Accents
Textured fronts instantly elevate a small kitchen island, giving it character without gobbling up precious space.
I’m drawn to tactile warmth, so I mix rattan, plywood, and brick accents for texture without clutter. You’ll love the visual punch.
- Rattan weave adds cozy coastal charm
- Birch plywood brings clean, modern lines
- Brick accents inject warmth and contrast
- Balanced mix keeps depth without heaviness
Panels and Cabinetry Integration for a Cohesive Look
Panels and cabinetry integration is where a cohesive kitchen really shines, and I’m all about letting the island feel like part of the whole rather than a standalone island fortress.
I blend materials, align heights, and mirror hardware for seamless flow. Subtle, quiet panels hide storage, while soft-soft edges keep things approachable, whimsical, and visually light without shouting for attention.
Concrete and Stone Micro-Tiling for Contrast
Concrete and stone micro-tiling brings a quiet drama to a small kitchen island, giving it texture and edge without shouting.
I share the look with you: bold yet subtle, easy to pair, and endlessly adaptable.
- tactile contrast that catches light
- micro-scale pattern for depth
- effortless cleanability and durability
- playful, modern edge that still feels warm
Floating Island Concepts for Tight Layouts
Floating island concepts for tight layouts lean into clever scale and gentle drama.
I sketch slim profiles, wheels tucked, and overhangs that gleam without shouting. You’ll find movable surfaces, foldable wings, and hidden storage that vanishes when guests arrive.
I suggest pairing light woods with matte metal accents, keeping lines clean, textures tactile, and mood playful—so efficiency feels stylish, not cramped.
Color-Blocking: Coordinating Island and Wall Tones
Color-blocking is my quick route to a cohesive kitchen, pairing island and wall tones so they feel deliberate rather than accidental.
I embrace contrast, balance, and a playful rhythm that keeps the space lively without shouting.
- Choose a dominant wall color, then tailor the island to echo it
- Add a secondary hue for accents and accessories
- Use matte finishes for calm cohesion
- Avoid clashing undertones by testing swatches together
How to Choose the Right Small Island for Your Space
Ever wonder how to pick a small island that feels meant to be in your kitchen?
I’d start with size, flow, and purpose, then balance style with function.
Measure clearance, envision daily tasks, and pick a silhouette you adore.
Consider storage, wheels or counter height, and adjacency to prep zones.
Trust intuition, and let your space whisper, “this fits.”
Conclusion
I’ve shown you tiny islands that punch way above their weight, and I bet you’re already sketching your own. Size doesn’t scare style here—think bold color, crisp silhouettes, and smart finishes that read roomy even in a compact footprint. If you’re stuck, remember: a floating bit of whimsy or a concrete tile twist can transform the whole kitchen. Now, go grab a tape measure, channel your inner designer, and let your space hum with personality—bonjour, big impact. Anachronistically, your retro toaster approves.


