I’ll show you how an L-shaped kitchen can feel cozy and work hard: I place sink, stove and fridge along the two legs to keep a tight, unobstructed triangle, tuck the fridge at one end and the stove toward the center, and use an island or peninsula if space allows for seating and extra prep.
I solve corners with pullouts or lazy Susans, layer warm task lighting, and suggest phased tweaks so your kitchen stays usable—keep going and you’ll pick up practical layouts, storage fixes, and styling tips.
Quick Summary: How to Plan an L‑Shaped Kitchen

When I plan an L-shaped kitchen, I start by picturing how I move between stove, sink, and fridge—keeping those work zones tight but unobstructed so cooking feels natural and efficient.
I favor durable surfaces, layered lighting, and open shelving for warmth.
I balance traffic flow and storage, tuck appliances into corners, and leave breathing room so the space feels cozy, usable, and inviting.
Architects often recommend open shelving paired with durable finishes to create both warmth and practicality in modern layouts.
Quick Checklist: What Makes an L Kitchen Work

Because I want an L kitchen that actually works, I start with a short checklist that keeps sightlines clear, traffic flowing, and essentials within easy reach.
I check for unobstructed walkways, reachable storage, smart appliance placement, good lighting over prep zones, and durable surfaces.
I allow cozy dining nook space and leave room for guests to move without interrupting cooking.
Open-plan layouts inspired many L-shaped kitchen designs to prioritize visual flow and social connection, so I consider how my layout supports open plan kitchens while keeping functionality.
Design the Work Triangle for an L Layout

With that checklist settled, I turn next to shaping the work triangle so cooking feels natural in an L kitchen.
I place sink, stove, and fridge at cozy, reachable points along the two legs, keeping each leg neither too long nor cramped.
That balance lets me move fluidly, chop and stir with ease, and invite helpers without disrupting my rhythm.
Architects often use smart layout tips to improve kitchen flow and maximize efficiency.
Place Appliances to Maximize Flow and Avoid Bottlenecks

I tuck appliances into the L so the kitchen breathes—placing the fridge at one end for quick access, the stove toward the center for a clear prep zone, and the dishwasher near the sink to keep cleanup out of the way.
I leave wide walkways, stagger busy zones, and keep countertops clear so movement feels natural, meals flow smoothly, and guests aren’t bumped during prep.
Proven storage hacks help maintain order with decluttered countertops and easy-to-reach zones.
Make Corner Areas Work: Pullouts, Lazy Susans, and Corner Ovens

When I tuck appliances into the L, I still watch those awkward corner cavities—those spots can swallow pans and patience if you let them.
I prefer pullout trays for easy reach, a lazy Susan for stacked spice jars, or a corner oven to use dead space.
These options make the kitchen feel honest and handy, turning hidden corners into hardworking, homespun helpers.
Smart pull-out solutions like pull-out trays maximize storage and accessibility in lower cabinets.
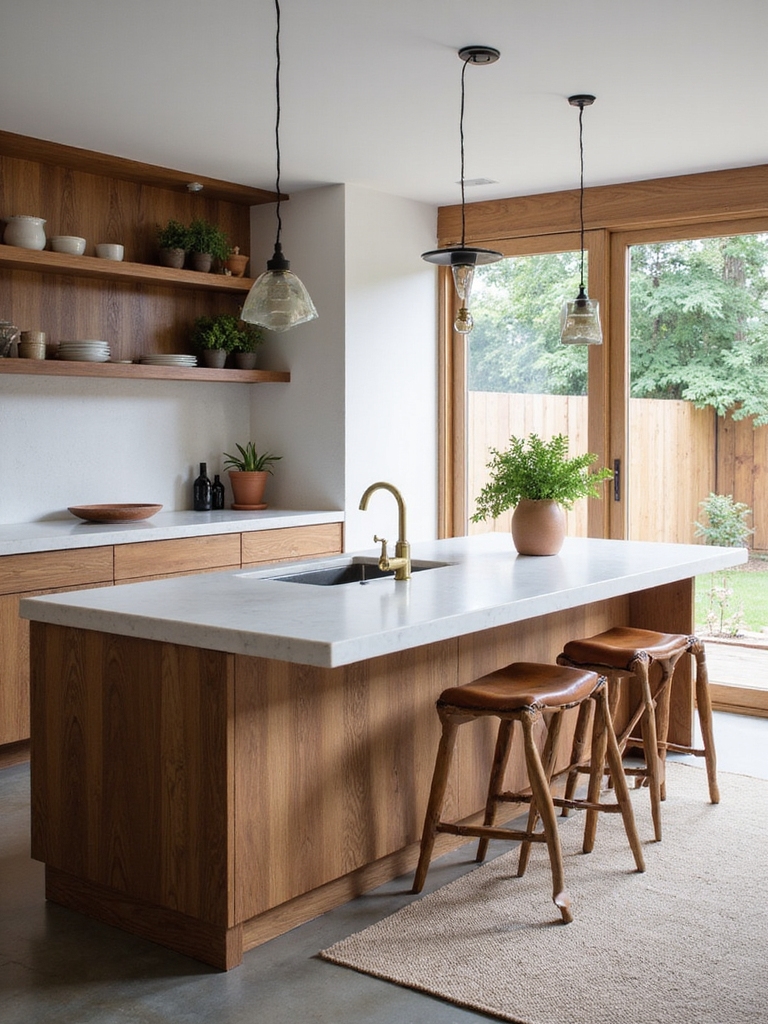
Choose an Island or Peninsula That Adds Function and Keeps Flow
When I’m planning an L-shaped kitchen, I think carefully about whether an island or a peninsula will fit the way we move and work.
An island can become a central prep station and gathering spot, while a peninsula is great for saving space and defining zones without blocking walkways.
I’ll show you how to pick the right one so traffic keeps flowing and the kitchen stays comfortable.
Islands can take many forms, from waterfall edges that extend countertop material over the sides to floating styles that free up visual space.
Island Versus Peninsula
Let’s talk islands and peninsulas—I’ve learned they do more than fill space; they shape how you cook, move, and entertain.
I prefer an island when I want social seating and prep room; it becomes a farmhouse hub.
A peninsula suits tighter L plans, offering extra counter space without isolating the cook. Choose based on tasks, sightlines, and rustic charm.
Open kitchen islands often become central gathering points and can define traffic flow and functionality in open-plan homes, serving as versatile workstations and seating areas with multiple uses.
Maintain Traffic Flow
Having picked between an island and a peninsula for seating and prep, I then focus on how people actually move through the room—because a beautiful workhorse that blocks the flow quickly turns frustrating.
I measure clearances, keep paths to the fridge and oven unobstructed, and orient the island so it guides traffic naturally.
That way function and conviviality coexist without crowding. Open island kitchens encourage interaction and let cooking become a social activity with multiple seating options and easy sightlines.
Optimize Cabinets: Tall, Base, and Drawer Strategies for Storage
I’ll show you how placing a tall pantry where it’s easy to reach everyday items keeps the work triangle flowing in an L layout.
I’ll also explain simple base cabinet systems that sort pots and baking sheets so you’re not fishing around every time you cook.
Finally, we’ll look at drawer divider options that make utensils and gadgets visible and stay put.
Tall Pantry Placement
If you want a kitchen that feels uncluttered and welcoming, place your tall pantry where it supports workflow without boxing you in.
I prefer it near prep zones but not blocking traffic; it becomes a comforting anchor, storing staples and small appliances.
Think vertical ease and sightlines.
- Keep frequently used items at eye level
- Reserve lower shelves for heavy jars
- Use pull-out trays for visibility
Base Cabinet Organization
After placing the tall pantry where it supports your prep flow, I like to focus on the base cabinets because they handle most of the day-to-day work.
I organize pots near the stove, baking sheets upright, and everyday plates at comfortable height. Pull-out shelves and lazy Susans keep corners usable.
Labelled baskets corral linens and small gadgets, keeping the rustic kitchen efficient and inviting.
Drawer Divider Systems
A few well-placed drawer dividers can turn drawer chaos into calm, and I always start by measuring what you actually use so each compartment fits plates, utensils, or tools snugly.
I prefer solid wood or woven trays for a rustic feel, and I arrange zones so daily items sit front and center for easy reach.
- Cutlery and gadgets
- Baking sheets and lids
- Miscellaneous prep tools
Space‑Saving Fittings: Drawers, Pullouts, and Integrated Organizers
I lean into the small hours of kitchen planning and always come back to one truth: how you fit things matters as much as how the room looks.
I favor deep drawers for pots, narrow pullouts for spices, corner carousel pullouts, and integrated organizers for utensils.
They keep counters clear, make cooking simpler, and give this L-shaped space a cozy, efficient heartbeat.
Durable Surfaces and Finishes That Suit L Kitchens
I like picking countertops and cabinet finishes that stand up to real life—think quartz or honed granite for the island and low-maintenance painted or thermofoil cabinets.
In an L kitchen those durable surfaces keep the work triangle looking good and functioning smoothly without constant fuss.
I’ll walk you through practical choices that marry wear resistance with the warm, rustic feel this layout loves.
Durable Countertop Choices
Think about how your countertop will live — I pick surfaces that stand up to heavy prep, hot pots, and sticky spills without looking tired.
I favor materials that age gracefully and feel homey, yet resist stains and scratches.
- Soapstone: deep, warm patina, forgiving of wear
- Quartz: consistent, durable, low-porosity performance
- Reclaimed wood: rustic charm, reseals for resilience
Low-Maintenance Cabinet Finishes
Usually I pick cabinet finishes that take the day-to-day beatings of an L-shaped kitchen without asking for constant fuss; you want surfaces that shrug off splatters, hide scuffs, and still feel welcoming.
I favor matte lacquer, textured wood veneers, and durable thermofoil — all wipe-clean, forgiving, and warm. They age nicely, mask wear, and keep maintenance simple so cooking stays joyful.
Design Lighting by Zone: Task, Ambient, and Accent
When you step into an L-shaped kitchen, lighting should guide what you do—so I’ll show you how task, ambient, and accent layers work together to make the space both useful and welcoming.
I prefer warm tones, layered control, and simple fixtures that feel lived-in yet intentional.
- Task: bright, focused over prep and stove.
- Ambient: soft, even glow for comfort.
- Accent: highlight textures, open shelves.
Plumbing and Electrical Placement for Flexible Layouts
I like to start by mapping the plumbing zones so sinks, dishwashers, and any future prep stations can slide into place without tearing up the floor.
Then I sketch an electrical outlet map that keeps counters usable and supports islands, under-cabinet lighting, and heavy appliances.
Finally, I plan flexible utility routing—think accessible chaseways and conduit—so you can rearrange the layout as needs change.
Plumbing Zone Planning
For a flexible L-shaped kitchen, I start by mapping the plumbing zone where sinks, dishwashers, and any water-fed appliances will sit so future layout changes stay simple and cost-effective.
I keep pipes accessible, protect against leaks, and plan for appliance swaps without heavy work.
- Group wet appliances near a single supply/drain.
- Use shutoffs and service access panels.
- Allow space for future water filtration.
Electrical Outlet Mapping
Let’s map the electrical layout so your L-shaped kitchen stays flexible: I place outlets to serve current appliances but also leave room for changes—countertop zones get spaced duplex outlets every 4 feet, dedicated circuits go to ovens and microwaves, and I position switched outlets for small appliances so you can rearrange without rewiring.
I tuck outlets under cabinets, plan island power, and label circuits.
Flexible Utility Routing
With an eye toward future changes, I run plumbing and electrical routes so your L-shaped kitchen can shift without major surgery:
I place supply and drain stub-outs in accessible chase boxes, set electrical runs on extra-capacity conduit, and cluster junctions where cabinets or a pantry can conceal them.
I keep things tidy, reachable, and ready for a new appliance or island.
- Accessible chase boxes for easy rerouting
- Oversized conduit for added circuits
- Concealed junctions near cabinet voids
Seating and Dining Options That Complement an L Plan
I usually recommend thinking about seating and dining as the embrace that completes an L-shaped kitchen — it’s where the work triangle relaxes into conversation and meals.
I suggest a sturdy wooden bench or farmhouse table tucked along the shorter leg, paired with a couple of stools at the counter for casual bites.
Keep textiles warm, lighting low, and circulation clear.
Small L Kitchens: Compact Layouts and Clever Hacks
Because a small L kitchen can feel cozy rather than cramped when you think vertically and deliberately, I focus on making every inch useful without losing that warm, lived-in charm. I favor open shelves, slim pull-outs, and layered lighting to keep things airy.
Clever hooks and magnetic strips free counters while adding character.
- Vertical shelving for jars and herbs
- Pull-out pantry for tight corners
- Wall-mounted foldable table
Styles That Suit L Kitchens: Minimal, Industrial, Warm
I often recommend three styles that work especially well in L-shaped kitchens: minimal, industrial, and warm, because each lets you play with the cornered flow in different ways.
I favor minimal for clean lines and open sightlines, industrial for metal accents and sturdy surfaces hugging the L, and warm for natural wood, soft lighting, and cozy nooks that turn corners into inviting moments.
Budgeting and Phasing a Remodel With Minimal Disruption
Start by mapping out the work in bite-sized phases so we can keep the kitchen functioning and your stress low.
I plan budgets around priorities, swap in temporary setups, and schedule noisy tasks when you’re out. We’ll protect surfaces and reuse what works.
- Prioritize essentials first
- Allocate contingency funds (10-15%)
- Phase noisy or messy work for minimal overlap
I’ll leave you with a little allegory: think of your L‑shaped kitchen as a well-worn barn corner where everything has its place — tools within reach, light falling just right.
As you plan, you’re not building a showroom; you’re shaping a cozy room that works for how you live.
Tweak the corners, mind the flow, add a stool, and your kitchen will feel like home: practical, warm, and quietly ready for the next good meal.