I’ve found a modern kitchen island can truly become the home’s warm center—part prep station, part casual dining spot, part storage hero and perfect for impromptu gatherings. Keep clearances roomy, mix levels for prep and a raised bar, and tuck smart storage and a mini-fridge into the base.
Choose durable, forgiving surfaces and layered lighting to shift from work to cozy. Stick with those basics and you’ll see how it all pulls together—keep going and I’ll show how.
Choose Your Island’s Primary Function

A kitchen island should earn its keep, so I always start by deciding what I need it to do most—prep station, casual dining spot, storage hub, or a place to entertain.
I picture daily rhythms, pick durable surfaces for hands-on work, add seating where conversations’ll happen, and tuck clever storage into corners.
Practicality guides style so the island truly supports how we live.
Open kitchens with islands often become the heart of your home, combining function and social space.
Choose the Right Kitchen Island Size for Your Layout

Before we pick a size, I always measure the available space so the island feels like a natural fit, not an afterthought.
I’ll also think about traffic flow — you want clear paths for cooking, carrying plates, and company milling about.
Finally, I match the island’s footprint to its role, whether it’s extra prep, casual dining, or both.
Modern U-shaped layouts can free up more perimeter counters, making it easier to integrate an island that complements the U-shape configuration.
Measure Your Available Space
With a tape measure in hand, I start by mapping out the room so we’re certain exactly how much breathing room an island can have; you’ll want at least 36–48 inches of clearance on walkways and 42–48 inches if you plan to hide appliances or open drawers.
I note door swing, counter heights, and cozy gaps so the island fits like an old friend, not a crowd.
Architects often recommend keeping the island proportionate to the work triangle to maintain efficient flow and sightlines, especially when planning open-concept layouts with modern kitchen islands.
Consider Traffic Flow
Because I want people moving through the kitchen without bumping elbows, I plan the island around clear sightlines and natural pathways so it feels like part of the room, not an obstacle.
I leave at least 36–42 inches around it for comfy circulation, keep walkways unobstructed, and orient seating to keep traffic flowing while preserving that cozy, lived-in farmhouse charm.
Modern island styles—from waterfall counters to floating designs—help integrate the island into the overall room aesthetic.
Match Island Functionality
Now that I’ve planned for smooth traffic around the island, I’ll match its size to what I actually want it to do—prep, dine, store, or all three.
I measure usable workspace, seating needs, and appliance clearances, then choose a footprint that feels cozy but functional.
Rustic wood tones, open shelving, and thoughtful proportions make the island welcoming without overwhelming the kitchen.
A carefully chosen island can become a focal point that combines form and function, especially when incorporating unique island designs that reflect high-end trends.
Plan Traffic Flow and Clearance Around the Island

Although I love a bold island, I always start by imagining how people will move around it, because tight pathways turn a pretty kitchen into a frustrating one;
I ask you to picture opening cabinets, carrying groceries, and two people passing with plates, then I measure for at least 42–48 inches of clearance on main work aisles (and 36 inches for a single-cook zone), so your island feels roomy, not like an obstacle.
Architects often use smart layout strategies to maximize kitchen flow and efficiency.
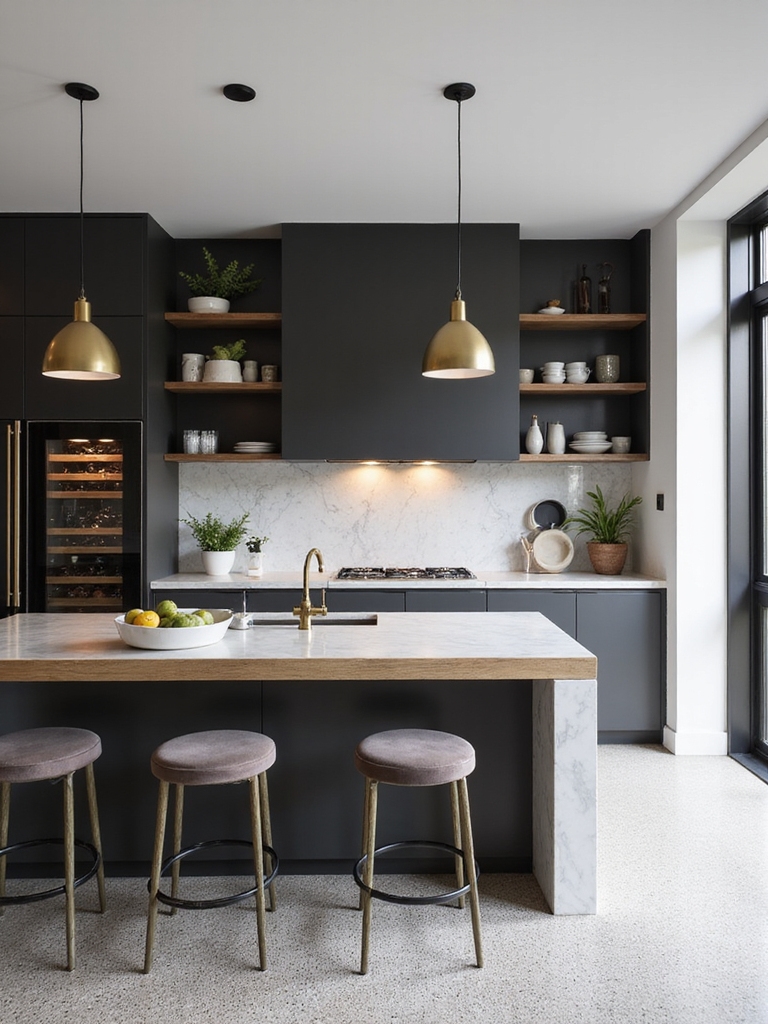
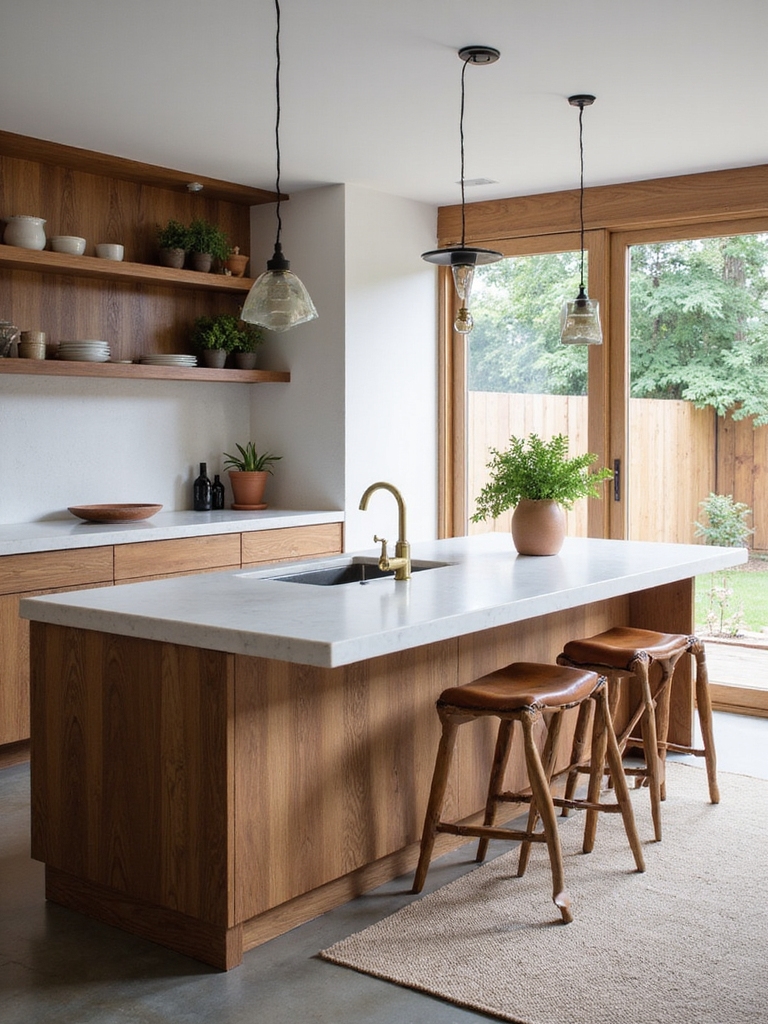
Use Multi-Level Surfaces for Cooking & Socializing

When I design an island, I love layering the surfaces so cooking and hanging out don’t compete — a lower prep zone with a deep countertop for chopping, a raised bar for guests to perch with drinks, and a short step-up for a cooktop or sink keeps tasks organized and gives everyone their own space.
I pair durable stone with warm wood, handy storage, and clear task zones so the kitchen feels cozy and efficient.
Stagers often recommend adding multi-level surfaces to define areas for food prep, serving, and socializing.
Design Seating That Encourages Conversation

I like arranging comfortable counter-height stools so people can linger without slouching.
A gentle curve to the island keeps faces turned toward one another and makes conversation flow more naturally.
Let’s talk about how stool height and a rounded layout can turn your island into the heart of the room.
Open island layouts encourage gathering and make cooking a shared experience with guests and family, creating a true social hub for the home.
Comfortable Counter-Height Seating
I often picture guests lingering at the counter, swapping stories over coffee, so I design seating to make conversation easy and cozy.
I choose counter-height stools with supportive backs, padded seats, and warm wood tones.
Staggered spacing, footrests, and subtle armrests invite lingering without crowding.
Natural textures and durable fabrics keep things lived-in and welcoming, encouraging relaxed, face-to-face chats.
Curved Conversation-Friendly Layout
Because people naturally turn toward curves, I arrange seating around a gentle crescent so conversations flow without raised voices or awkward angles.
I pick mixed wood stools with comfortable backs, low pendant lighting, and a warm butcher-block countertop.
Guests lean in easily, faces lit and relaxed.
This layout invites lingering, shared stories, and a cozy, homey rhythm that centers the kitchen.
Add Built-In Residential Appliances & Prep Stations
Let’s talk about slipping appliances and prep stations right into your island so everything’s within reach when you’re cooking.
I love nestling a compact fridge, wine cooler, prep sink, and pull-out cutting board into the island’s face.
It keeps mess contained, workflow smooth, and invites casual help. Rustic wood, worn brass handles, and simple task lighting finish the cozy, practical centerpiece.
Maximize Storage With Deep Drawers and Organizers
Think about pulling open a deep, well-organized drawer and finding exactly what you need — that’s the kind of kitchen calm I aim for.
I love fitting heavy pots, bulky mixers, and stacked pans into deep drawers with dividers, spice racks, and pull-out trays.
It keeps counters clear, saves bending, and makes cooking simpler.
Organizers make daily life feel thoughtfully rustic and cozy.
Make the Island a Focal Point With Contrasting Materials
Mixing woods, metals, and stone lets an island really stand out, and I love how a contrasting material instantly anchors the room.
I often pair reclaimed oak bases with a sleek dark metal frame or a raw concrete slab to create character.
That contrast draws eyes, invites touch, and gives the kitchen a warm, lived-in centerpiece without feeling fussy or overdone.
Pick Durable Countertops for Everyday Use
I usually recommend choosing a countertop that can take everyday life — spills, chopping, hot pans — without fussing or constant upkeep.
I favor materials like honed granite, engineered quartz, or oiled wood that age gracefully. Pick finishes that hide marks, and colors forgiving of crumbs.
Durable surfaces let you cook, gather, and relax without tiptoeing around the island.
Layer Task Lighting and Accent Fixtures
When I’m planning a kitchen island, I layer task lighting and accent fixtures so the space works hard and feels cozy at the same time.
I hang focused pendants for chopping, add under-counter strips for prep, and tuck warm wall sconces for ambiance.
Mixing beam angles and dimmers lets me shift from bright cooking mode to soft, rustic gatherings without fuss.
Add Smart Charging, Wi‑Fi & Hidden Tech
I like to tuck modern tech into a kitchen island so it feels cozy rather than gadgety. You can hide wireless charging pads under a wooden countertop, run cables through discreet channels, and keep a compact smart hub behind a drawer front for Wi‑Fi and voice control.
Those small touches make the island both charming and unexpectedly clever.
Built‑In Wireless Charging
Think of a kitchen island with secret-power functionality—I’m talking about built-in wireless charging pads tucked beneath butcher block or stone so your phone, earbuds, and even a tablet juice up without clutter.
I love how they feel effortless: set devices down, they charge, and the island stays cozy and simple.
It keeps counters clear, adds modern convenience, and respects rustic charm.
Discreet Cable Management
Alongside built‑in wireless charging, I also love hiding the mess that comes with modern life—cables, routers, hubs—so the island stays warm and uncluttered.
I tuck power strips into reclaimed-wood drawers, route cords through discreet channels, and mount a tiny Wi‑Fi point beneath the counter.
These small, practical touches keep the surface inviting and let conversation, not cords, take center stage.
Integrated Smart Hubs
Let’s bring the island to life with an integrated smart hub that keeps tech out of sight but always within reach.
I tuck wireless chargers, USB ports, and a discreet Wi‑Fi booster into reclaimed wood, so phones and tablets charge while counters stay serene.
Hidden touch panels control lighting and speakers; it’s practical, cozy, and keeps modern convenience from spoiling rustic charm.
Configure Your Island for Entertaining and Buffets
When I set up an island for entertaining, I aim to make it as welcoming and practical as a farmhouse table—room for platters, flow for guests, and a few cozy nooks for drinks.
I leave wide prep surfaces, add tiers or removable boards for buffet layering, tuck napkins and utensils into drawers, and arrange seating to encourage mingling so everyone can serve themselves easily.
Make Compact Islands Work in Small or Galley Kitchens
I’ve learned to make every inch count in a small or galley kitchen, turning a compact island into a hardworking centerpiece rather than a cramped obstruction.
I favor narrow, mobile islands with open shelving, butcher block tops, and stool-friendly overhangs. Clever hooks, inset cutting boards, and hidden bins keep clutter down.
The result feels cozy, practical, and warmly inviting without overwhelming the space.
Budget‑Friendly Upgrades That Deliver Big Impact
I like starting with simple, low-cost swaps that change the whole feel of an island—fresh paint or a refaced cabinet face can look custom without breaking the bank.
Swapping a few doors for open shelving lets you show off wood bowls and mason jars, and it warms the space instantly.
Let me show you which finishes and layouts punch above their price.
Paint Or Reface Cabinets
Let’s roll up our sleeves and talk cabinets: a fresh coat of paint or a smart refacing can change the whole feel of your island without blowing the budget.
I’ll suggest colors that age well, simple hardware swaps, and durable finishes. Reface when faces are sound; paint for personality.
Both revive wood grain, warm the room, and make the island feel handcrafted and lived‑in.
Add Open Shelving
Adding open shelving can instantly warm an island and stretch your budget, so I usually start by picking a spot that balances function with visual weight.
I mix reclaimed wood and simple brackets, display everyday dishes and a few plants, and leave negative space so it doesn’t feel cluttered.
It’s an easy, rustic touch that adds personality without breaking the bank.
Hire Contractors: Measurements, HVAC, Plumbing & Permits
When I called my contractor, I already had the island footprint measured and a rough plan for where the sink and cooktop would go, because clear measurements keep surprises to a minimum and make conversations about HVAC, plumbing, and permits far more productive.
I discussed venting, water lines, and electrical loads, confirmed permit needs, and trusted pros to coordinate timelines so the kitchen stayed cozy, functional, and safe.
I’ve watched my own kitchen island go from a cluttered catch‑all to the family’s heartbeat—like a well‑worn farmhouse table that hosted 200+ weekend breakfasts last year alone.
That number reminds me: plan with purpose. Pick a main function, size it for traffic, add comfy seating and multi‑levels for cooking and chatting, and don’t skip permits.
Do that, and your island won’t just look good—it’ll gather life, laughter, and late‑night recipes.