I swapped a cabinet for a reclaimed oak floating shelf above the sink and my friends keep asking where it came from — it’s cozy, useful, and easy to style with mugs, jars, and a potted herb.
Try staggered tiers by the stove for reach, or a narrow pantry wall of shelves for cookbooks. I’ll walk you through measuring clearances, anchoring to studs, lighting tips, and quick weekend makeovers so you can get the same warm, lived-in look.
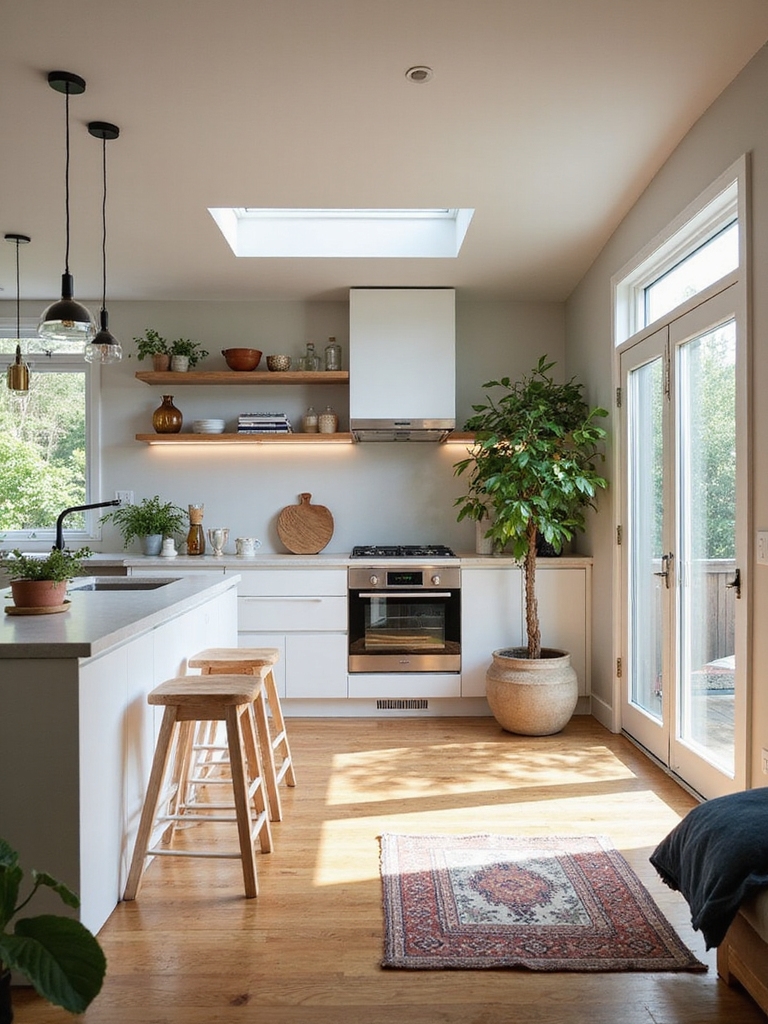
Quick Open-Shelf Layouts to Try This Weekend

If you’re itching to freshen up your kitchen this weekend, try swapping a cabinet for a row of open shelves — I’ve found it instantly warms the room and makes everyday dishes feel intentional.
I’ll suggest simple layouts: single floating shelf above the sink, staggered shelves near the stove, and a narrow pantry wall of tiers. Keep wood tones, grouped ceramics, and tidy spacing for charm.
Consider mixing budget-friendly and luxe materials to create layered visual interest, like combining rustic wood with metal brackets and stacked tiers.
Where to Replace Cabinets With Open Shelves

Think about swapping out the upper cabinets above your sink and stove first—those spots make the biggest visual impact and keep often-used items within easy reach.
I’d also open up:
- Above the coffee station for mugs and jars.
- Over a prep counter for mixing bowls.
- Beside the fridge for cookbooks.
- In a breakfast nook to display pottery.
These choices feel warm, lived-in, and practical. Open shelving often creates an effortlessly chic focal point while making everyday items more accessible.
Measure and Plan Shelf Spacing

Now that you’ve picked the spots to peel back cabinets and show off dishes, it’s time I measure and plan the spacing so those shelves actually work.
I start by measuring tallest items, leaving clearance for plates, bowls and jars. I sketch shelf heights on paper, keep even sightlines, and allow a little breathing room so things feel collected, not cramped or precarious.
Adding consistent depths and staggered heights helps create visual balance and keeps the display functional.
Load Limits: Studs, Anchors, and Safe Hanging

I want you to trust your shelves, so we’ll talk about anchoring into studs versus relying on drywall anchors and what each will safely hold.
I’ll show roughly how many pounds per linear foot different brackets and fasteners can manage so you can plan where to put heavy dishes.
Let’s make sure your rustic shelves look lovely and stay solid on the wall.
Corner open shelves can use every forgotten inch of kitchen space, and installing them properly lets you keep that space both beautiful and functional — learn more about corner open shelves and their layout considerations.
Studs Vs. Drywall Anchors
When I’m planning open shelves, the first practical question I ask is whether I’m fastening into studs or relying on drywall anchors, because that choice determines how much weight the shelf can safely carry. I prefer studs for heavy dishes; anchors work for displays.
- Studs = strongest
- Toggle anchors = next best
- Plastic anchors = light loads
- Use a stud finder and level
I also consider shelf depth and spacing to avoid cluttered arrangements that defeat the purpose of open shelving.
Weight Per Linear Foot
Because the difference between studs and anchors determines what your shelf will actually hold, I always start by thinking in pounds per linear foot—how much weight each foot of shelving will carry before the wall gives up.
I figure studs safely hold 40–80 lb/ft, good anchors 15–30 lb/ft.
I plan loads, space brackets, and keep heavy cookware near studs for a cozy, reliable shelf.
Smart pull-out solutions can help make heavy items accessible while preserving shelf integrity, especially with pull-out organizers that fit lower cabinets.
Best Materials for Durable Open Kitchen Shelves

I like starting with solid wood for shelves because its warmth and strength hold heavy dishes and age beautifully.
For a sleeker, more industrial look I’ll often mix metal brackets or full steel shelves for extra load-bearing confidence.
And when you want lightness without sacrificing durability, tempered glass paired with sturdy supports gives a clean, practical option.
Open shelving can suit styles from rustic to ultra-modern, offering versatile design choices and wide aesthetic range for different kitchens.
Solid Wood Options
Wood’s warmth makes it my top pick for open shelves that need to stand up to daily use.
I love sturdy, lived-in grain and simple finishes that hide wear. Consider these solid wood choices:
- Reclaimed oak — character and resilience.
- Maple — tight grain, clean look.
- Walnut — rich tone, durable.
- Pine — affordable, rustic charm with knots.
Open shelving remains a timeless choice with everlasting appeal that complements many kitchen styles.
Metal And Glass
Lean into metal and glass when you want open shelves that look sleek and stand up to real kitchen life; I often recommend them for homes where durability matters as much as style.
I love pairing weathered iron brackets with clear or frosted glass for a light, practical feel. They resist stains, clean easily, and keep a kitchen airy without sacrificing rustic charm.
Budget-Friendly Open Shelves Under $100
Even on a tight budget, I’ll show you how to get the cozy, rustic look of open shelving for under $100—no sacrifice to style or function.
I’ll guide you through thrifted finds and simple DIYs that feel handcrafted and warm.
- Reclaimed pine plank
- Sanded and stained finish
- Thrifted dishes and jars
- Simple floating look
Open-Shelf Hardware and Bracket Guide
I’ll walk you through the main bracket types—floating, L-brackets, and decorative iron—so you can pick the look that fits your kitchen.
I’ll also share simple tips for matching brackets to shelf thickness and expected weight so your jars and plates stay safe.
Let’s keep it practical and rustic, so your shelves look good and hold up for years.
Bracket Types Explained
When you’re choosing brackets for open shelves, think of them as both the backbone and the finishing touch of your kitchen — I want the hardware to feel sturdy, match the room’s mood, and stay out of the way of everyday use.
- Simple steel L-bracket for rustic charm.
- Decorative iron for vintage flair.
- Floating-mount for minimalist look.
- Wooden corbel for warm, cottage vibes.
Weight Capacity Tips
Because heavier dishes and pantry staples can stress open shelves more than you expect, I always start by figuring out how much weight each shelf will actually hold.
I check bracket specs, stud placement, and shelf thickness, then err on the conservative side.
Use metal brackets or cleats for heavy loads, distribute weight evenly, and rotate items periodically so shelves stay safe and charming.
High-End Open-Shelf Materials and Looks Worth Splurging On
If you want your open shelves to feel like a deliberate, luxe feature instead of an afterthought, I’ll show you which materials are worth splurging on and why. I love warm, sturdy choices that age beautifully:
- Reclaimed oak — rich grain, rustic charm.
- Marble slabs — elegant focal points.
- Brass brackets — patina over time.
- Walnut floating shelves — deep, cozy warmth.
Style Shelves: Mix Function and Décor
You’ve seen which luxe materials raise open shelving into a design statement; now I’ll show you how to make those shelves work — not just look pretty.
I mix everyday dishes with a few cookbooks, herb pots, woven baskets and a vintage pitcher.
Functional items sit front and center; decorative pieces soften edges. It feels lived-in, tidy and welcoming, like your best kitchen self.
What to Display : and What to Hide
I like keeping everyday mugs, plates, and glasses right where I can grab them, but I also hide the messy stuff—plastic bags, mismatched Tupperware, and junk drawers—out of sight.
I’ll arrange a few favorite bowls, a vintage pitcher, or a framed herb print to give the shelves personality without crowding them.
Let’s look at how to balance useful items and curated pieces so your kitchen feels lived-in, not cluttered.
Everyday Items Visible
Usually I leave the things I reach for every day out on open shelves—mugs, a wooden salt cellar, and a stack of simple plates—because they make the kitchen feel lived-in and make cooking easier.
I show rather than stash:
- Earthenware mugs
- Copper tea kettle
- Hand-thrown bowls
- Folded linen towels
These are useful, pretty, and easy to grab.
Hide Clutter Strategically
Let’s tuck away the mess while keeping the soul of the kitchen intact: I hide bulky appliances, mismatched plasticware, and overflow pantry items behind closed doors so the open shelves stay calm and inviting.
I keep everyday dishes, a few cookbooks, and mason jars visible, while storing rarely used gadgets, cleaning supplies, and surplus packaging out of sight—simple rules make the space feel intentional.
Showcase Decorative Pieces
Curate what you show like you’re telling a story—I’ll put a handful of well-loved pieces front and center and tuck the rest away.
I mix function and charm, keeping practical items hidden and heirlooms visible. Imagine this:
- Mason jar herbs
- Worn wooden bowl
- Ceramic teapot
- Stacked vintage plates
These choices feel warm, simple, and intentional.
Color, Finish, and Contrast Tips That Make Shelves Pop
When I want open shelves to catch the eye, I play with color, finish, and contrast so each piece looks intentional rather than accidental.
I mix matte wood with glossy ceramics, layer warm tones against cool backsplashes, and use chipped or distressed finishes for charm.
Contrast anchors groupings, while repeating a color ties diverse items into a cozy, rustic rhythm.
Lighting Options to Highlight Open Shelves
Because light can turn a display into a mood, I pick fixtures that feel lived-in and deliberate—soft under-cabinet strips for even glow, small puck lights to spotlight pottery, and a few warm, dimmable bulbs to bring out wood grain and color.
- Soft strips for wash
- Pucks for focal pieces
- Warm dimmable pendants
- Directional spots for texture
I layer them for cozy, rustic warmth.
Kid- and Pet-Safe Open-Shelf Strategies
If I’m keeping open shelves with kids and pets in the house, I choose practical placements and sturdy materials first—low, reachable shelves hold washable, unbreakable items, while fragile or heavy pieces go higher and out of paw-and-hand reach.
I anchor shelves securely, use raised lips or edge guards, arrange everyday dishes low, and stash curios and glassware up high for a cozy, safe kitchen feel.
Common Open-Shelf Mistakes and How to Avoid Them
Although I love the airy look of open shelving, I’ve learned the hard way that a pretty display can quickly become a cluttered, unsafe mess if you don’t plan for everyday use.
I’ll keep it simple:
- Overcrowding — leave breathing room.
- Heavy items on top — anchor and balance.
- Dust neglect — wipe weekly.
- Mismatched heights — group for calm cohesion.
Weekend Projects: 3 Quick Open-Shelf Makeovers
I’ll walk you through three weekend-ready makeovers that’ll give your open shelves fresh function and cozy charm without a big budget or fancy tools.
First, sand and stain a single shelf for rustic warmth.
Second, add hooks and baskets for corralling mugs and linens.
Third, swap in patterned wallpaper backing for instant personality.
All are quick, practical, and friendly.
I hope this sparks your next kitchen refresh — open shelving can make a room sing like a well-loved wooden spoon.
Start simple, measure carefully, and pick sturdy materials so your shelves hold what matters. Add warm lighting, secure anchors, and keep fragile items out of paw and kid reach.
Try one weekend project, enjoy the process, and soon friends will be asking where you got that charming, practical look.