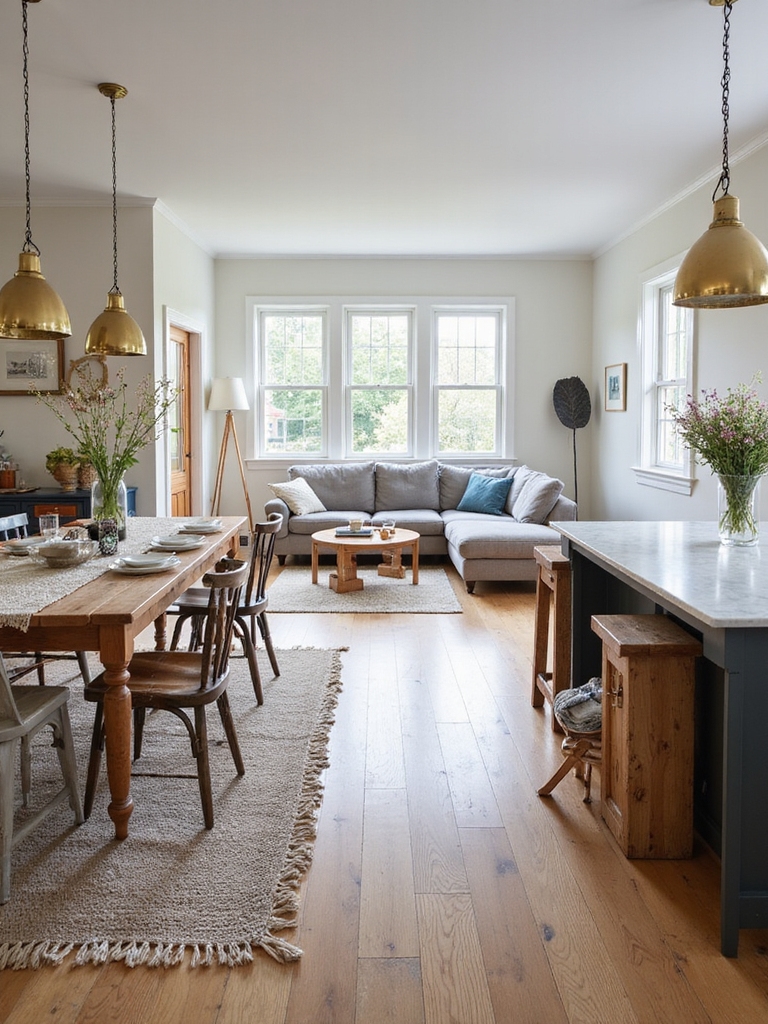
I’ve pinned dozens of open-plan kitchen–living layouts and I’ll tell you the island is the heart that tethers cooking, seating and sightlines. Pick one island for focused prep and storage, or two for separate work and social zones so traffic never jams.
Keep 36–48 inches clear for movement, 15–18 inch overhangs for stools, and match materials for visual unity. Layer warm pendant and task lights, add deep drawers and a hidden appliance garage—and there’s more guidance if you want it.
Quick Checklist: Which Island Is Right for Your Open-Plan Space

Let’s figure out which island suits your open-plan kitchen — I’ll walk you through the quick checklist that helps match function and style to your space.
I ask about seating needs, cooking tasks, traffic flow, and storage.
I check measurements, lighting, and material feel.
Then I propose shapes — rectangular for prep, L-shaped for socializing — keeping proportions cozy and practical.
Open kitchen islands often become the heart of the home, anchoring the open-plan layout and encouraging interaction.
Why Islands Matter in Open-Plan Kitchen–Living Rooms

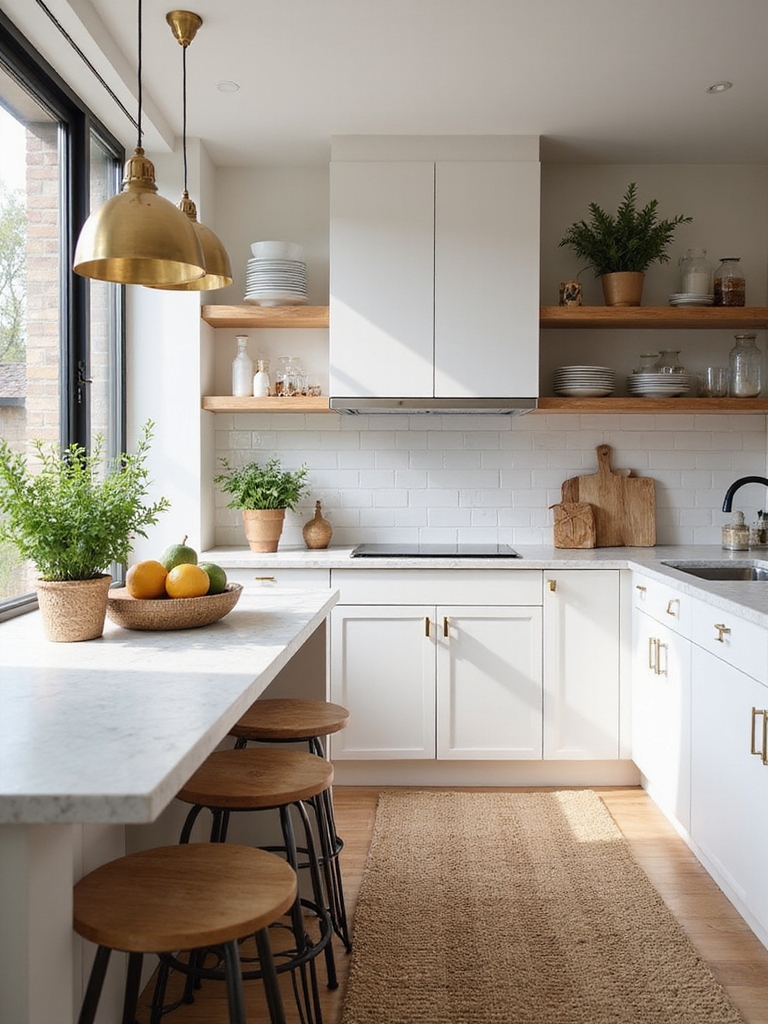
I’ve found that a well-placed island becomes the visual anchor that grounds an open-plan kitchen and living area, giving the room a cozy center.
It also acts as a practical zone divider, marking where cooking ends and lounging begins without blocking sightlines or conversation.
Let’s look at how the right shape, height, and finish can pull both function and feel together.
Open islands often encourage gathering and make cooking a shared, social experience, turning meal prep into social time for family and guests.
Visual Anchor For Space
A sturdy kitchen island becomes the room’s visual anchor, and I always lean on it when planning an open-plan layout because it grounds the space and gives people a natural place to gather.
Its timber textures, pendant lighting, and scaled proportions create a cozy focal point that ties living and cooking areas together, offering warmth, rhythm, and a quietly intentional center without shouting for attention.
High-end kitchens often benefit from unique island designs that elevate both function and form.
Functional Zone Divider
When I place an island between the kitchen and living area, it does more than add counter space — it carves out function without erecting walls.
I use islands to anchor flow, hide prep mess, and invite gathering:
- Defines zones subtly
- Stores essentials within reach
- Creates casual seating for shared moments
It feels practical, warm, and quietly rustic. Islands often serve as multifunctional workstations in compact layouts, combining prep, storage, and seating without taking up extra floor space.
Island Sizing Checklist: How Big to Make It

Want to know how big your island should be? I’ll keep it simple: allow 36–48 inches clear on work sides, 42–48 inches behind seating for comfort, and aim for at least 4 feet length for prep plus a 15–18 inch overhang per stool.
Match proportions to your kitchen footprint and planned uses — prep, casual dining, storage — so it feels cozy and practical.
Consider how the island will connect to the rest of the space in an open kitchen and living room with island flow and plan for traffic flow accordingly.
Placement Rules for Sightlines, Traffic, and Flow

I want to make sure your open plan feels effortless, so we’ll place key elements to preserve clear sightlines to the fireplace or view.
I’ll keep traffic paths wide and unobstructed so people can move between the kitchen and living area without bumping into islands or seating.
With a few simple placement rules, the room will feel welcoming and easy to live in.
Open-plan layouts also benefit from strategic traffic flow planning to separate work zones and social areas without walls.
Sightlines To Focal Points
I’ll start by saying sightlines are the backbone of any open-plan kitchen living room—what you can see (and what you can’t) shapes how people move, sit, and linger.
I position islands and seating to frame a hearth or view, keeping sight clear.
Consider:
- Anchor focal point
- Align seating
- Keep low-profile storage
Modern kitchen design on Pinterest shows how open layouts use islands and flow to create airy, connected spaces with open-concept principles that prioritize sightlines, multifunctional islands, and seamless transitions between zones.
Unobstructed Traffic Paths
Because clear paths make a room breathe, I place furniture and islands so people can move naturally between prep, seating, and entry without detours.
I aim for generous walkways—about 36–48 inches—keep sightlines open, and avoid blocking doorways.
Rustic textures and warm tones guide movement subtly, while deliberate spacing lets conversation, cooking, and traffic flow together easily and comfortably.
Top architects often recommend designing islands and seating to maintain connection across the space for an integrated feel, which is a hallmark of open-concept kitchen design.
Choosing Island Function: Prep, Dining, Storage, or Media

Balancing function and feel, I treat the island as the heart of an open-plan kitchen — whether it’s dedicated to prep, casual dining, hidden storage, or a media hub, its role shapes how we live in the space.
- Prep: butcher block, sink, sturdy surface.
- Storage: deep drawers, appliance garages.
- Media: discreet wiring, cozy charging nook.
I choose a single focus, then layer warmth with reclaimed wood and iron accents.
Island Seating: Family- and Party-Friendly Options
Now that the island’s purpose is settled, seating becomes the way people actually live there—eating homework-strewn breakfasts, hosting friends, or resting with a glass of wine while I cook.
I favor a mix: sturdy stools for quick meals, cushioned benches for lingering, and a couple of swivel chairs for conversation.
Keep heights comfortable, materials durable, and arrangement flexible for family life and impromptu parties.
12 Island Layouts to Copy : Compact to Expansive
I’ll walk you through island layouts that work whether your kitchen is cozy or cathedral-ceilinged, starting with compact designs that stretch the feel of space and moving to expansive plans that make the island the room’s social hub.
I love practical warmth; here are straightforward ideas:
- Narrow prep island for tight flows.
- Mid-size multiuse island with storage.
- Large island with zones for cooking and gathering.
L-Shaped Islands for Corner Plans
If you liked how islands can stretch a small kitchen or anchor a grand one, consider an L-shaped island when your layout favors a corner — it turns two planes into a single, usable work-and-gathering surface.
I love how it creates cozy zones for cooking, casual dining, and homework without blocking flow. Choose warm wood, open shelving, and forged metal accents for a rustic, lived-in feel.
Peninsula-Style Islands When Space Is Tight
Slide a peninsula into a tight kitchen and you’ll gain counter space, seating, and a natural divider without closing off the room.
I love how a wood-topped peninsula feels cozy and practical. Consider:
- Narrow footprint for flow
- Stools tucked under for neatness
- Open shelving or hooks for warmth
It anchors the space without overwhelming it.
When Two Islands Work: Pros, Plans, and Pitfalls
I’ve found that adding a second island can be magic or mayhem, depending on how you handle traffic flow between cook, sink, and fridge.
I’ll show simple layouts that keep the work triangle efficient while also warning about the visual balance challenges two islands can create.
Let’s look at practical plans and common pitfalls so you can decide if two islands suit your home.
Traffic Flow Considerations
When you’re thinking about adding two islands, remember that good flow makes them feel effortless rather than cumbersome.
I picture people moving naturally, avoiding jams, and keeping sightlines open. Consider:
- Keep 42–48 inches between islands for passing.
- Allow clear routes to entrances and seating.
- Use materials and low-profile stools to preserve sightlines and cozy rhythm.
Work Triangle Efficiency
Although two islands can sound indulgent, I’ll admit they’re worth considering when you want a kitchen that’s social, efficient, and distinctly organized.
I map my stove, sink, and fridge into a clear work triangle, then place one island for prep and one for seating or baking. That separation keeps tasks tidy, reduces cross-traffic, and makes cooking feel calm and communal.
Visual Balance Challenges
If you’re tempted by the charm of two islands, know they can easily tip the visual scale without careful planning. I’ll gently guide you to keep warmth and proportion while avoiding clutter.
- Match materials to unite both islands.
- Vary heights to create hierarchy.
- Reserve clear sightlines for the living area.
I favor humble, balanced choices that feel lived-in.
Built-In Appliances in Islands: Layout, Ventilation, and Serviceability
Because an island is often the heart of an open-plan kitchen, I treat built-in appliances there as both practical tools and design anchors: their placement determines traffic flow, their ventilation needs shape cabinetry and ceiling treatments, and their serviceability affects how long the island will stay useful.
I prefer simple layouts, accessible panels, and quiet vents tucked into beams so repairs are easy and the room feels warm.
Material Pairings for Island Surfaces and Side Panels
I like to layer durable, tactile materials on an island so it feels lived-in and welcoming: a honed stone countertop for daily work, a warm wood face on the service side, and a tougher, stain-resistant panel where kids or pets tend to gather.
- Honed stone for prep
- Warm wood for visual comfort
- Durable panel for wear and spills
Island Lighting: Task Lights, Ambient Glow, and Zoning
After pairing durable surfaces on the island, I turn my attention to lighting that makes those materials sing and the space work for daily life.
I pick layered fixtures: focused pendants for chopping, under-counter strips for prep, and warm recessed cans for evening glow. Zoning with dimmers keeps tasks separate from lounging.
The result feels cozy, practical, and quietly rustic.
Storage Hacks for Open-Plan Kitchen Islands
Maximizing storage on an open-plan island starts with thinking like a cook who also entertains—I want drawers deep enough for pans, pull-outs for recycling, and open cubbies to show off stacked bowls.
I favor practical, visible solutions:
- Deep drawers for pots
- Tilt-out tray for utensils
- Built-in wine or board storage
It stays cozy, organized, and inviting.
Budgeting Your Island: Cost Ranges and Where to Splurge
When I plan an island I think hard about where the money will make the biggest difference — solid wood or a quality stone top is worth splurging on for longevity and character.
You should also factor labor and installation costs early, since complex layouts, plumbing, or reinforcement can add up quickly.
Let’s walk through realistic price ranges so you can decide what to invest in and where to save.
Materials: Where To Splurge
Balance matters when you’re budgeting your island, and I’ll help you decide where it’s worth spending more. I favor honest materials that age well—splurge on surfaces and hardware that earn their keep.
Consider:
- Marble or quartz for durable beauty.
- Solid wood for warmth and repairability.
- Heavy-duty hardware and faucets for daily reliability.
These choices keep the room cozy and enduring.
Labor And Installation Costs
Plan for labor costs early, because installation can quickly change a tidy budget into a stretch. I’ve learned to get multiple bids, ask about timeline and hidden fees, and budget a contingency of 10–20%.
Skilled trades—plumbing, electrical, countertop templating—are worth paying for. I’ll splurge on craftsmanship where visible and keep simpler finishes to stay cozy without regret.
I’ve walked you through the nuts and bolts—size, sightlines, lighting, and where to spend—so your island fits like a well-worn boot in an open-plan room.
Think of it as your hearth: a place for chopping, chatting, homework, or Sunday soup. Like old cottages that gathered families, a thoughtfully planned island anchors life and flow.
Trust what feels warm and useful, then build around that comfort, and your space will welcome everyone.